


Nextcloud All-in-One
The official Nextcloud installation method. Nextcloud AIO provides easy deployment and maintenance with most features included in this one Nextcloud instance.
Included are:
- Nextcloud
- High performance backend for Nextcloud Files
- Nextcloud Office (optional)
- High performance backend for Nextcloud Talk and TURN-server (optional)
- Nextcloud Talk Recording-server (optional)
- Backup solution (optional, based on BorgBackup)
- Imaginary (optional, for previews of heic, heif, illustrator, pdf, svg, tiff and webp)
- ClamAV (optional, Antivirus backend for Nextcloud)
- Fulltextsearch (optional)
- Simple web interface included that enables easy installation and maintenance
- Easy updates included
- Update and backup notifications included
- Daily backups can be enabled from the AIO interface which also allows updating all containers, Nextcloud and its apps afterwards automatically
- Instance restore from backup archive via the AIO interface included (you only need the archive and the password in order to restore the whole instance on a new AIO instance)
- APCu as local cache
- Redis as distributed cache and for file locking
- Postgresql as database
- PHP-FPM with performance-optimized config (e.g. Opcache and JIT enabled by default)
- A+ security in Nextcloud security scan
- Ready to be used behind existing Reverse proxies
- Can be used behind Cloudflare Tunnel
- Ready for big file uploads up to 10 GB on public links, adjustable (logged in users can upload much bigger files using the webinterface or the mobile/desktop clients since chunking is used in that case)
- PHP and web server timeouts set to 3600s, adjustable (important for big file uploads)
- Defaults to a max of 512 MB RAM per PHP process, adjustable
- Automatic TLS included (by using Let's Encrypt)
- Brotli compression enabled by default for javascript, css and svg files which reduces Nextcloud load times
- HTTP/2 and HTTP/3 enabled
- "Pretty URLs" for Nextcloud are enabled by default (removes the index.php from all links)
- Video previews work out of the box and when Imaginary is enabled, many recent image formats as well!
- Only one domain and not multiple domains are required for everything to work (usually you would need to have one domain for each service which is much more complex)
- Adjustable location of Nextcloud's datadir (e.g. good for easy file-sharing with host system on Windows and MacOS)
- By default confined (good for security) but can allow access to additional storages in order to enable the usage of the local external storage feature
- Possibility included to adjust default installed Nextcloud apps
- Nextcloud installation is not read only - that means you can apply patches if you should need them (instead of having to wait for the next release for them getting applied)
ffmpeg,smbclientandnodejsare included by default- Possibility included to permanently add additional OS packages into the Nextcloud container without having to build your own Docker image
- Possibility included to permanently add additional PHP extensions into the Nextcloud container without having to build your own Docker image
- Possibility included to pass the needed device for hardware transcoding to the Nextcloud container
- Possibility included to store all docker related files on a separate drive
- Additional features can be added very easily
- LDAP can be used as user backend for Nextcloud
- Migration from any former Nextcloud installation to AIO is possible. See this documentation
- Fail2Ban can be added
- phpMyAdmin, Adminer or pgAdmin can be added
- Mail server can be added
- Nextcloud can be accessed locally via the domain
- Can be installed locally (if you don't want or cannot make the instance publicly reachable)
- IPv6-ready
- Can be used with Docker rootless (good for additional security)
- Runs on all platforms Docker supports (e.g. also on Windows and Macos)
- Included containers easy to debug by having the possibility to check their logs directly from the AIO interface
- Docker-compose ready
- Can be installed without a container having access to the docker socket
- Can be installed with Docker Swarm
- Can be installed with Kubernetes
- Almost all included containers Alpine Linux based (good for security and size)
- Many of the included containers run as non-root user (good for security)
- Many of the included containers have a read-only root-FS (good for security)
- Included containers run in its own docker network (good for security) and only really necessary ports are exposed on the host
- Multiple instances on one server are doable without having to deal with VMs
- Adjustable backup path from the AIO interface (good to put the backups e.g. on a different drive)
- Possibility included to also back up external Docker Volumes or Host paths (can be used for host backups)
- Borg backup can be completely managed from the AIO interface, including backup creation, backup restore, backup integrity check and integrity-repair
- Remote backups are indirectly possible
- Updates and backups can be run from an external script. See this documentation for a complete example.
Screenshots
| First setup | After installation |
|---|---|
 | 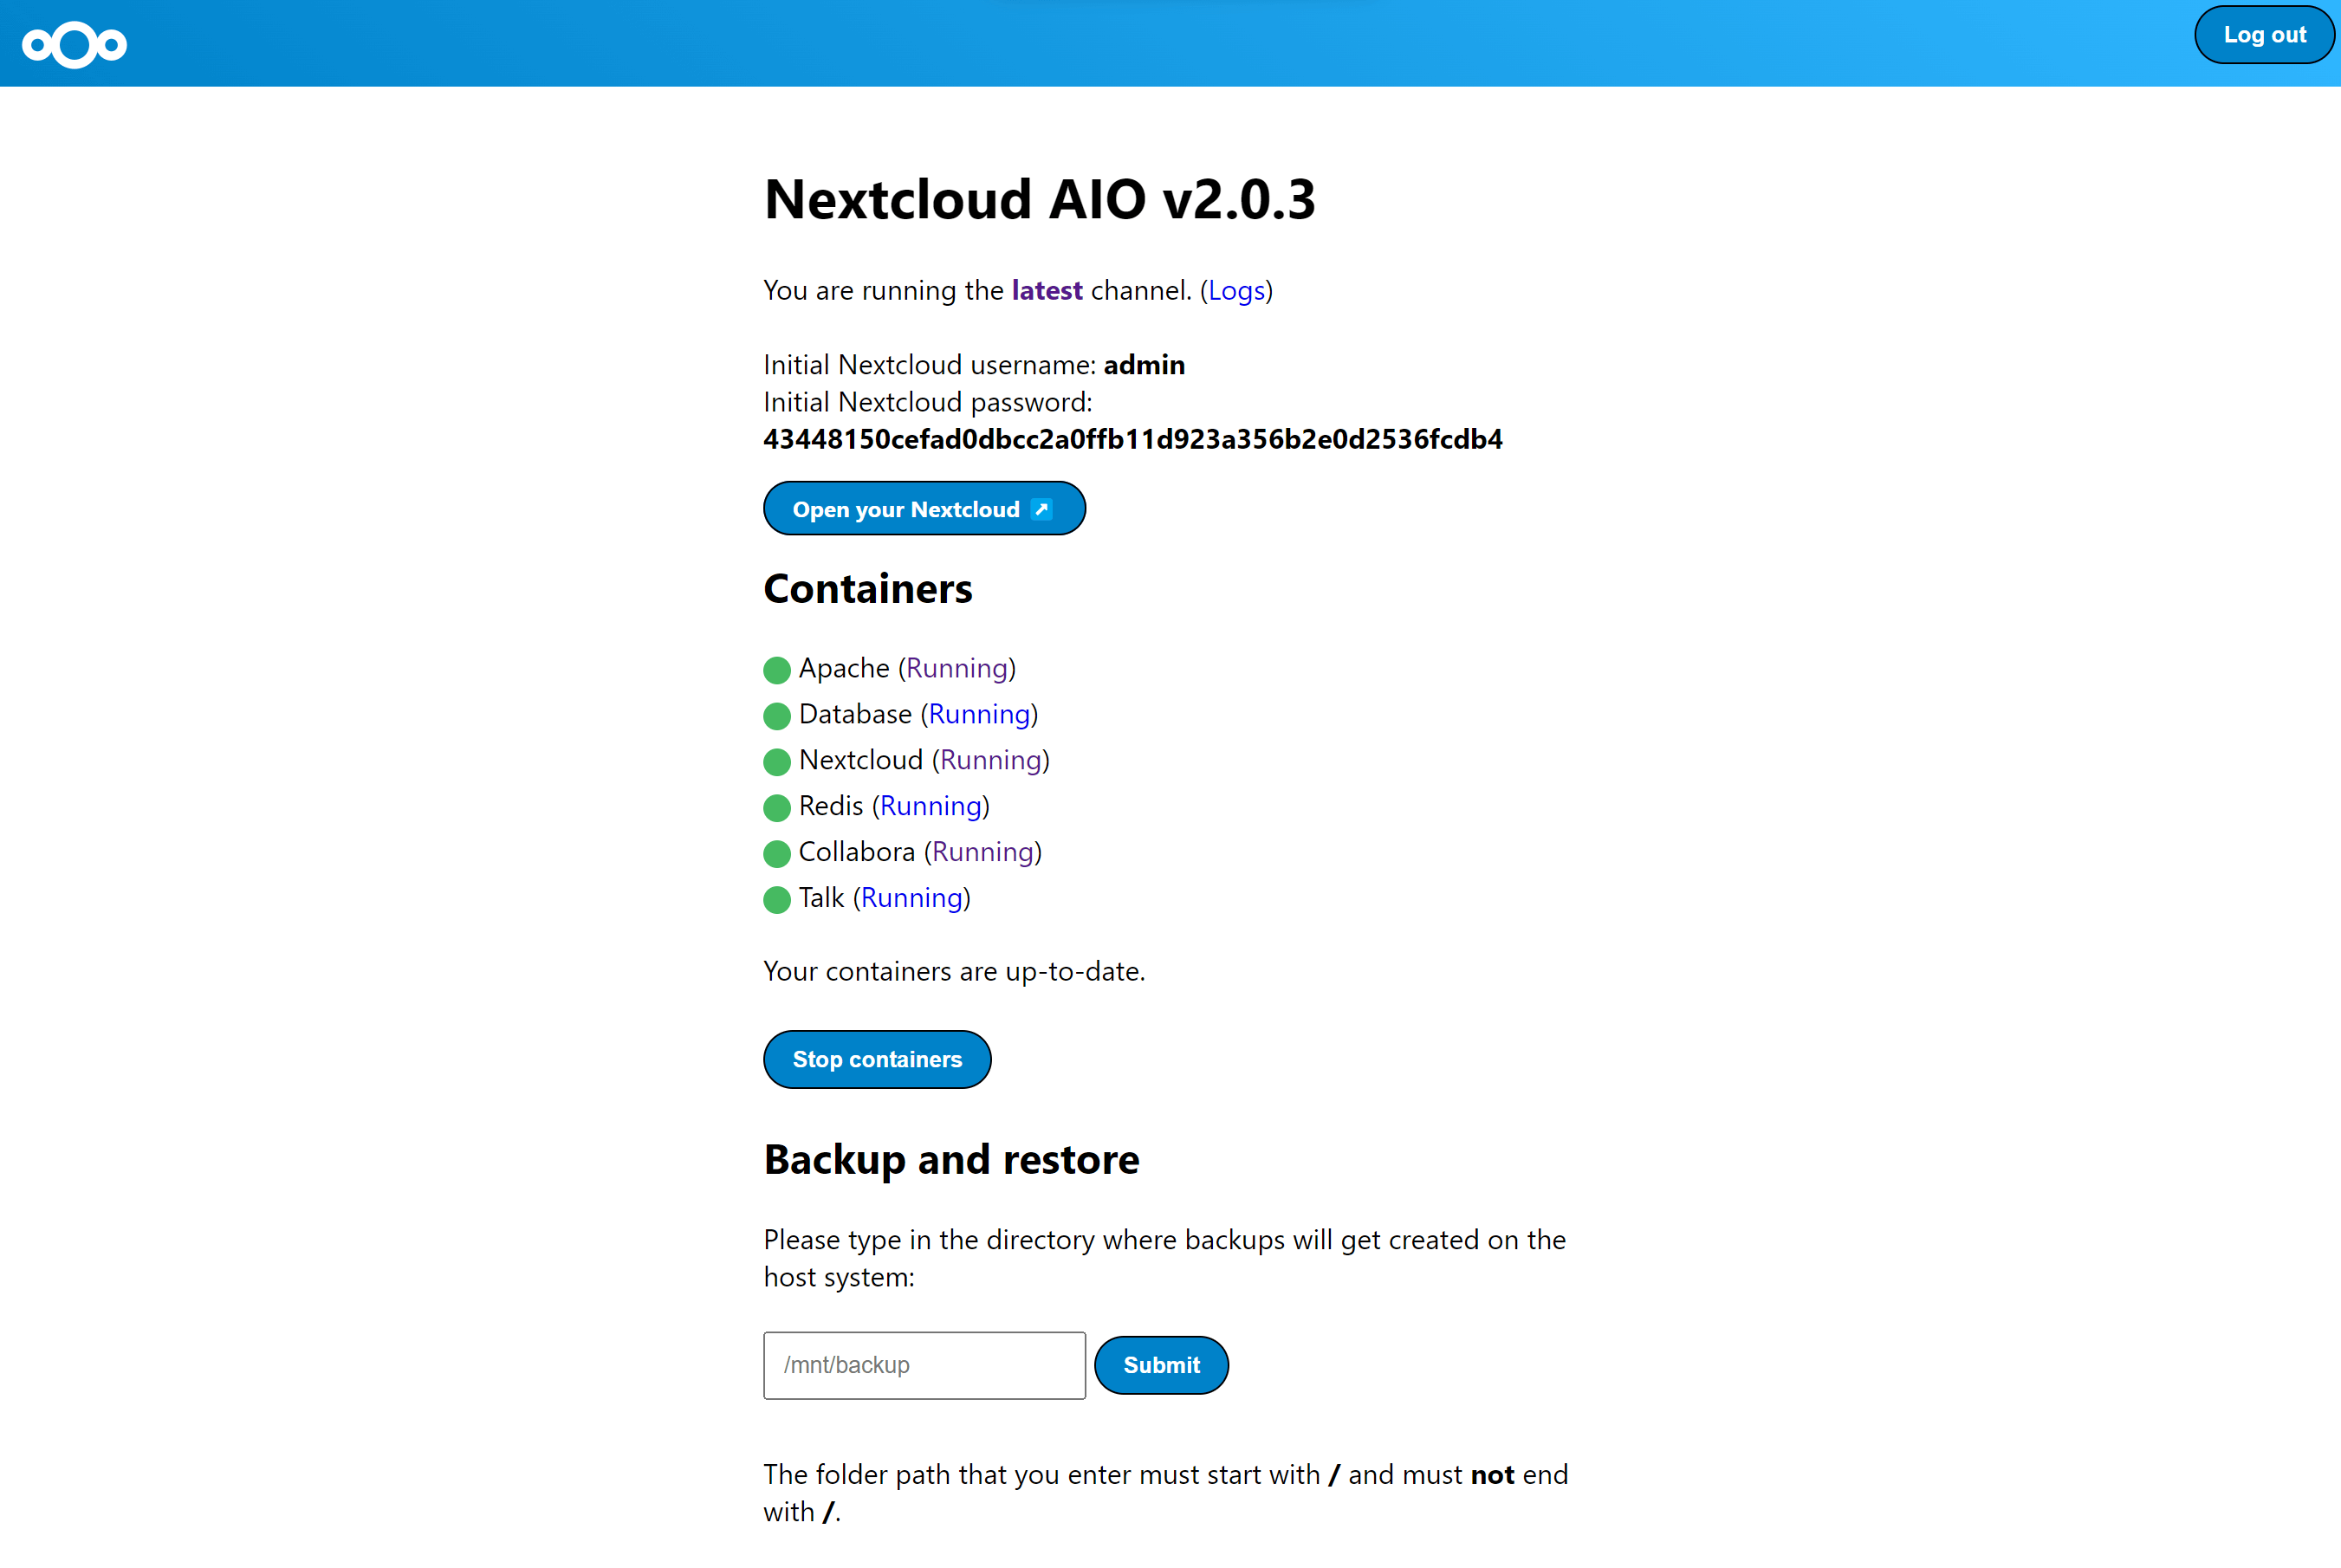 |
How to use this?
The following instructions are meant for installations without a web server or reverse proxy (like Apache, Nginx, Caddy, Cloudflare Tunnel and else) already being in place. If you want to run AIO behind a web server or reverse proxy (like Apache, Nginx, Caddy, Cloudflare Tunnel and else), see the reverse proxy documentation. Also, the instructions below are especially meant for Linux. For macOS see this, for Windows see this and for Synology see this.
-
Install Docker on your Linux installation by following the official documentation: https://docs.docker.com/engine/install/#supported-platforms. The easiest way is installing it by using the convenience script:
curl -fsSL https://get.docker.com | sudo sh -
If you need ipv6 support, you should enable it by following https://github.com/nextcloud/all-in-one/blob/main/docker-ipv6-support.md.
-
Run the command below in order to start the container on Linux and without a web server or reverse proxy (like Apache, Nginx, Caddy, Cloudflare Tunnel and else) already in place:
<details> <summary>Explanation of the command</summary># For Linux and without a web server or reverse proxy (like Apache, Nginx, Caddy, Cloudflare Tunnel and else) already in place: sudo docker run \ --init \ --sig-proxy=false \ --name nextcloud-aio-mastercontainer \ --restart always \ --publish 80:80 \ --publish 8080:8080 \ --publish 8443:8443 \ --volume nextcloud_aio_mastercontainer:/mnt/docker-aio-config \ --volume /var/run/docker.sock:/var/run/docker.sock:ro \ nextcloud/all-in-one:latestsudo docker runThis command spins up a new docker container. Docker commands can optionally be used withoutsudoif the user is added to the docker group (this is not the same as docker rootless, see FAQ below).--initThis option makes sure that no zombie-processes are created, ever. See the Docker documentation.--sig-proxy=falseThis option allows to exit the container shell that gets attached automatically when usingdocker runby using[CTRL] + [C]without shutting down the container.--name nextcloud-aio-mastercontainerThis is the name of the container. This line is not allowed to be changed, since mastercontainer updates would fail.--restart alwaysThis is the "restart policy".alwaysmeans that the container should always get started with the Docker daemon. See the Docker documentation for further detail about restart policies: https://docs.docker.com/config/containers/start-containers-automatically/--publish 80:80This means that port 80 of the container should get published on the host using port 80. It is used for getting valid certificates for the AIO interface if you want to use port 8443. It is not needed if you run AIO behind a web server or reverse proxy and can get removed in that case as you can simply use port 8080 for the AIO interface then.--publish 8080:8080This means that port 8080 of the container should get published on the host using port 8080. This port is used for the AIO interface and uses a self-signed certificate by default. You can also use a different host port if port 8080 is already used on your host, for example--publish 8081:8080(only the first port can be changed for the host, the second port is for the container and must remain at 8080).--publish 8443:8443This means that port 8443 of the container should get published on the host using port 8443. If you publish port 80 and 8443 to the public internet, you can access the AIO interface via this port with a valid certificate. It is not needed if you run AIO behind a web server or reverse proxy and can get removed in that case as you can simply use port 8080 for the AIO interface then.--volume nextcloud_aio_mastercontainer:/mnt/docker-aio-configThis means that the files that are created by the mastercontainer will be stored in a docker volume that is callednextcloud_aio_mastercontainer. This line is not allowed to be changed, since built-in backups would fail later on.--volume /var/run/docker.sock:/var/run/docker.sock:roThe docker socket is mounted into the container which is used for spinning up all the other containers and for further features. It needs to be adjusted on Windows/macOS and on docker rootless. See the applicable documentation on this. If adjusting, don't forget to also setWATCHTOWER_DOCKER_SOCKET_PATH! If you dislike this, see https://github.com/nextcloud/all-in-one/tree/main/manual-install.nextcloud/all-in-one:latestThis is the docker container image that is used.- Further options can be set using environment variables, for example
--env NEXTCLOUD_DATADIR="/mnt/ncdata"(This is an example for Linux. See this for other OS' and for an explanation of what this value does. This specific one needs to be specified upon the first startup if you want to change it to a specific path instead of the default Docker volume). To see explanations and examples for further variables (like changing the location of Nextcloud's datadir or mounting some locations as external storage into the Nextcloud container), read through this readme and look at the docker-compose file: https://github.com/nextcloud/all-in-one/blob/main/compose.yaml
Note: You may be interested in adjusting Nextcloud’s datadir to store the files in a different location than the default docker volume. See this documentation on how to do it.
-
After the initial startup, you should be able to open the Nextcloud AIO Interface now on port 8080 of this server.<br> E.g.
https://ip.address.of.this.server:8080<br> ⚠️ Important: do always use an ip-address if you access this port and not a domain as HSTS might block access to it later! (It is also expected that this port uses a self-signed certificate due to security concerns which you need to accept in your browser)<br><br> If your firewall/router has port 80 and 8443 open/forwarded and you point a domain to your server, you can get a valid certificate automatically by opening the Nextcloud AIO Interface via:<br>https://your-domain-that-points-to-this-server.tld:8443 -
Please do not forget to open port
3478/TCPand3478/UDPin your firewall/router for the Talk container!
FAQ
How does it work?
Nextcloud AIO is inspired by projects like Portainer that manage the docker daemon by talking to it through the docker socket directly. This concept allows a user to install only one container with a single command that does the heavy lifting of creating and managing all containers that are needed in order to provide a Nextcloud installation with most features included. It also makes updating a breeze and is not bound to the host system (and its slow updates) anymore as everything is in containers. Additionally, it is very easy to handle from a user perspective because a simple interface for managing your Nextcloud AIO installation is provided.
Are reverse proxies supported?
Yes. Please refer to the following documentation on this: reverse-proxy.md
Which CPU architectures are supported?
You can check this on Linux by running: uname -m
- x86_64/x64/amd64
- aarch64/arm64/armv8 (Note: ClamAV is currently not supported on this CPU architecture)
Which ports are mandatory to be open in your firewall/router?
Only those (if you access the Mastercontainer Interface internally via port 8080):
443/TCPfor the Apache container443/UDPif you want to enable http3 for the Apache container3478/TCPand3478/UDPfor the Talk container
Explanation of used ports:
8080/TCP: Mastercontainer Interface with self-signed certificate (works always, also if only access via IP-address is possible, e.g.https://ip.address.of.this.server:8080/) ⚠️ Important: do always use an ip-address if you access this port and not a domain as HSTS might block access to it later! (It is also expected that this port uses a self-signed certificate due to security concerns which you need to accept in your browser)80/TCP: redirects to Nextcloud (is used for getting the certificate via ACME http-challenge for the Mastercontainer)8443/TCP: Mastercontainer Interface with valid certificate (only works if port 80 and 8443 are open/forwarded in your firewall/router and you point a domain to
编辑推荐精选


扣子-AI办公
职场AI,就用扣子
AI办公助手,复杂任务高效处理。办公效率低?扣子空间AI助手支持播客生成、PPT制作、网页开发及报告写作,覆盖科研、商业、舆情等领域的专家Agent 7x24小时响应,生活工作无缝切换,提升50%效率!


堆友
多风格AI绘画神器
堆友平台由阿里巴巴设计团队创建,作为一款AI驱动的设计工具,专为设计师提供一站式增长服务。功能覆盖海量3D素材、AI绘画、实时渲染以及专业抠图,显著提升设计品质和效率。平台不仅提供工具,还是一个促进创意交流和个人发展的空间,界面友好,适合所有级别的设计师和创意工作者。


码上飞
零代码AI应用开发平台
零代码AI应用开发平台,用户只需一句话简单描述需求,AI能自动生成小程序、APP或H5网页应用,无需编写代码。


Vora
免费创建高清无水印Sora视频
Vora是一个免费创建高清无水印Sora视频的AI工具


Refly.AI
最适合小白的AI自动化工作流平台
无需编码,轻松生成可复用、可变现的AI自动化工作流


酷表ChatExcel
大模型驱动的Excel数据处理工具
基于大模型交互的表格处理系统,允许用户通过对话方式完成数据整理和可视化分析。系统采用机器学习算法解析用户指令,自动执行排序、公式计算和数据透视等操作,支持多种文件格式导入导出。数据处理响应速度保持在0.8秒以内,支持超过100万行数据的即时分析。


TRAE编程
AI辅助编程,代码自动修复
Trae是一种自适应的集成开发环境(IDE),通过自动化和多元协作改变开发流程。利用Trae,团队能够更快速、精确地编写和部署代码,从而提高编程效率和项目交付速度。Trae具备上下文感知和代码自动完成功能,是提升开发效率的理想工具。


AIWritePaper论文写作
AI论文写作指导平台
AIWritePaper论文写作是一站式AI论文写作辅助工具,简化了选题、文献检索至论文撰写的整个过程。通过简单设定,平台可快速生成高质量论文大纲和全文,配合图表、参考文献等一应俱全,同时提供开题报告和答辩PPT等增值服务,保障数据安全,有效提升写作效率和论文质量。


博思AIPPT
AI一键生成PPT,就用博思AIPPT!
博思AIPPT,新一代的AI生成PPT平台,支持智能生成PPT、AI美化PPT、文本&链接生成PPT、导入Word/PDF/Markdown文档生成PPT等,内置海量精美PPT模板,涵盖商务、教育、科技等不同风��格,同时针对每个页面提供多种版式,一键自适应切换,完美适配各种办公场景。


潮际好麦
AI赋能电商视觉革命,一站式智能商拍平台
潮际好麦深耕服装行业,是国内AI试衣效果最好的软件。使用先进AIGC能力为电商卖家批量提供优质的、低成本的商拍图。合作品牌有Shein、Lazada、安踏、百丽等65个国内外头部品牌,以及国内10万+淘宝、天猫、京东等主流平台的品牌商家,为卖家节省将近85%的出图成本,提升约3倍出图效率,让品牌能够快速上架。
推荐工具精选


AI云服务特惠
懂AI专属折扣关注微信公众号
最新AI工具、AI资讯
独家AI资源、AI项目落地

微信扫一扫关注公众号