
cml
专注MLOps的开源持续集成工具
CML是一款专注MLOps的开源命令行工具,用于机器学习项目的持续集成和交付。它能自动化配置环境、训练评估模型、比较实验结果和监控数据变化。CML可在每次代码提交时自动执行工作流程,生成可视化报告。该工具采用GitFlow工作模式,无需额外服务即可搭建完整的机器学习平台。


What is CML? Continuous Machine Learning (CML) is an open-source CLI tool for implementing continuous integration & delivery (CI/CD) with a focus on MLOps. Use it to automate development workflows — including machine provisioning, model training and evaluation, comparing ML experiments across project history, and monitoring changing datasets.
CML can help train and evaluate models — and then generate a visual report with results and metrics — automatically on every pull request.
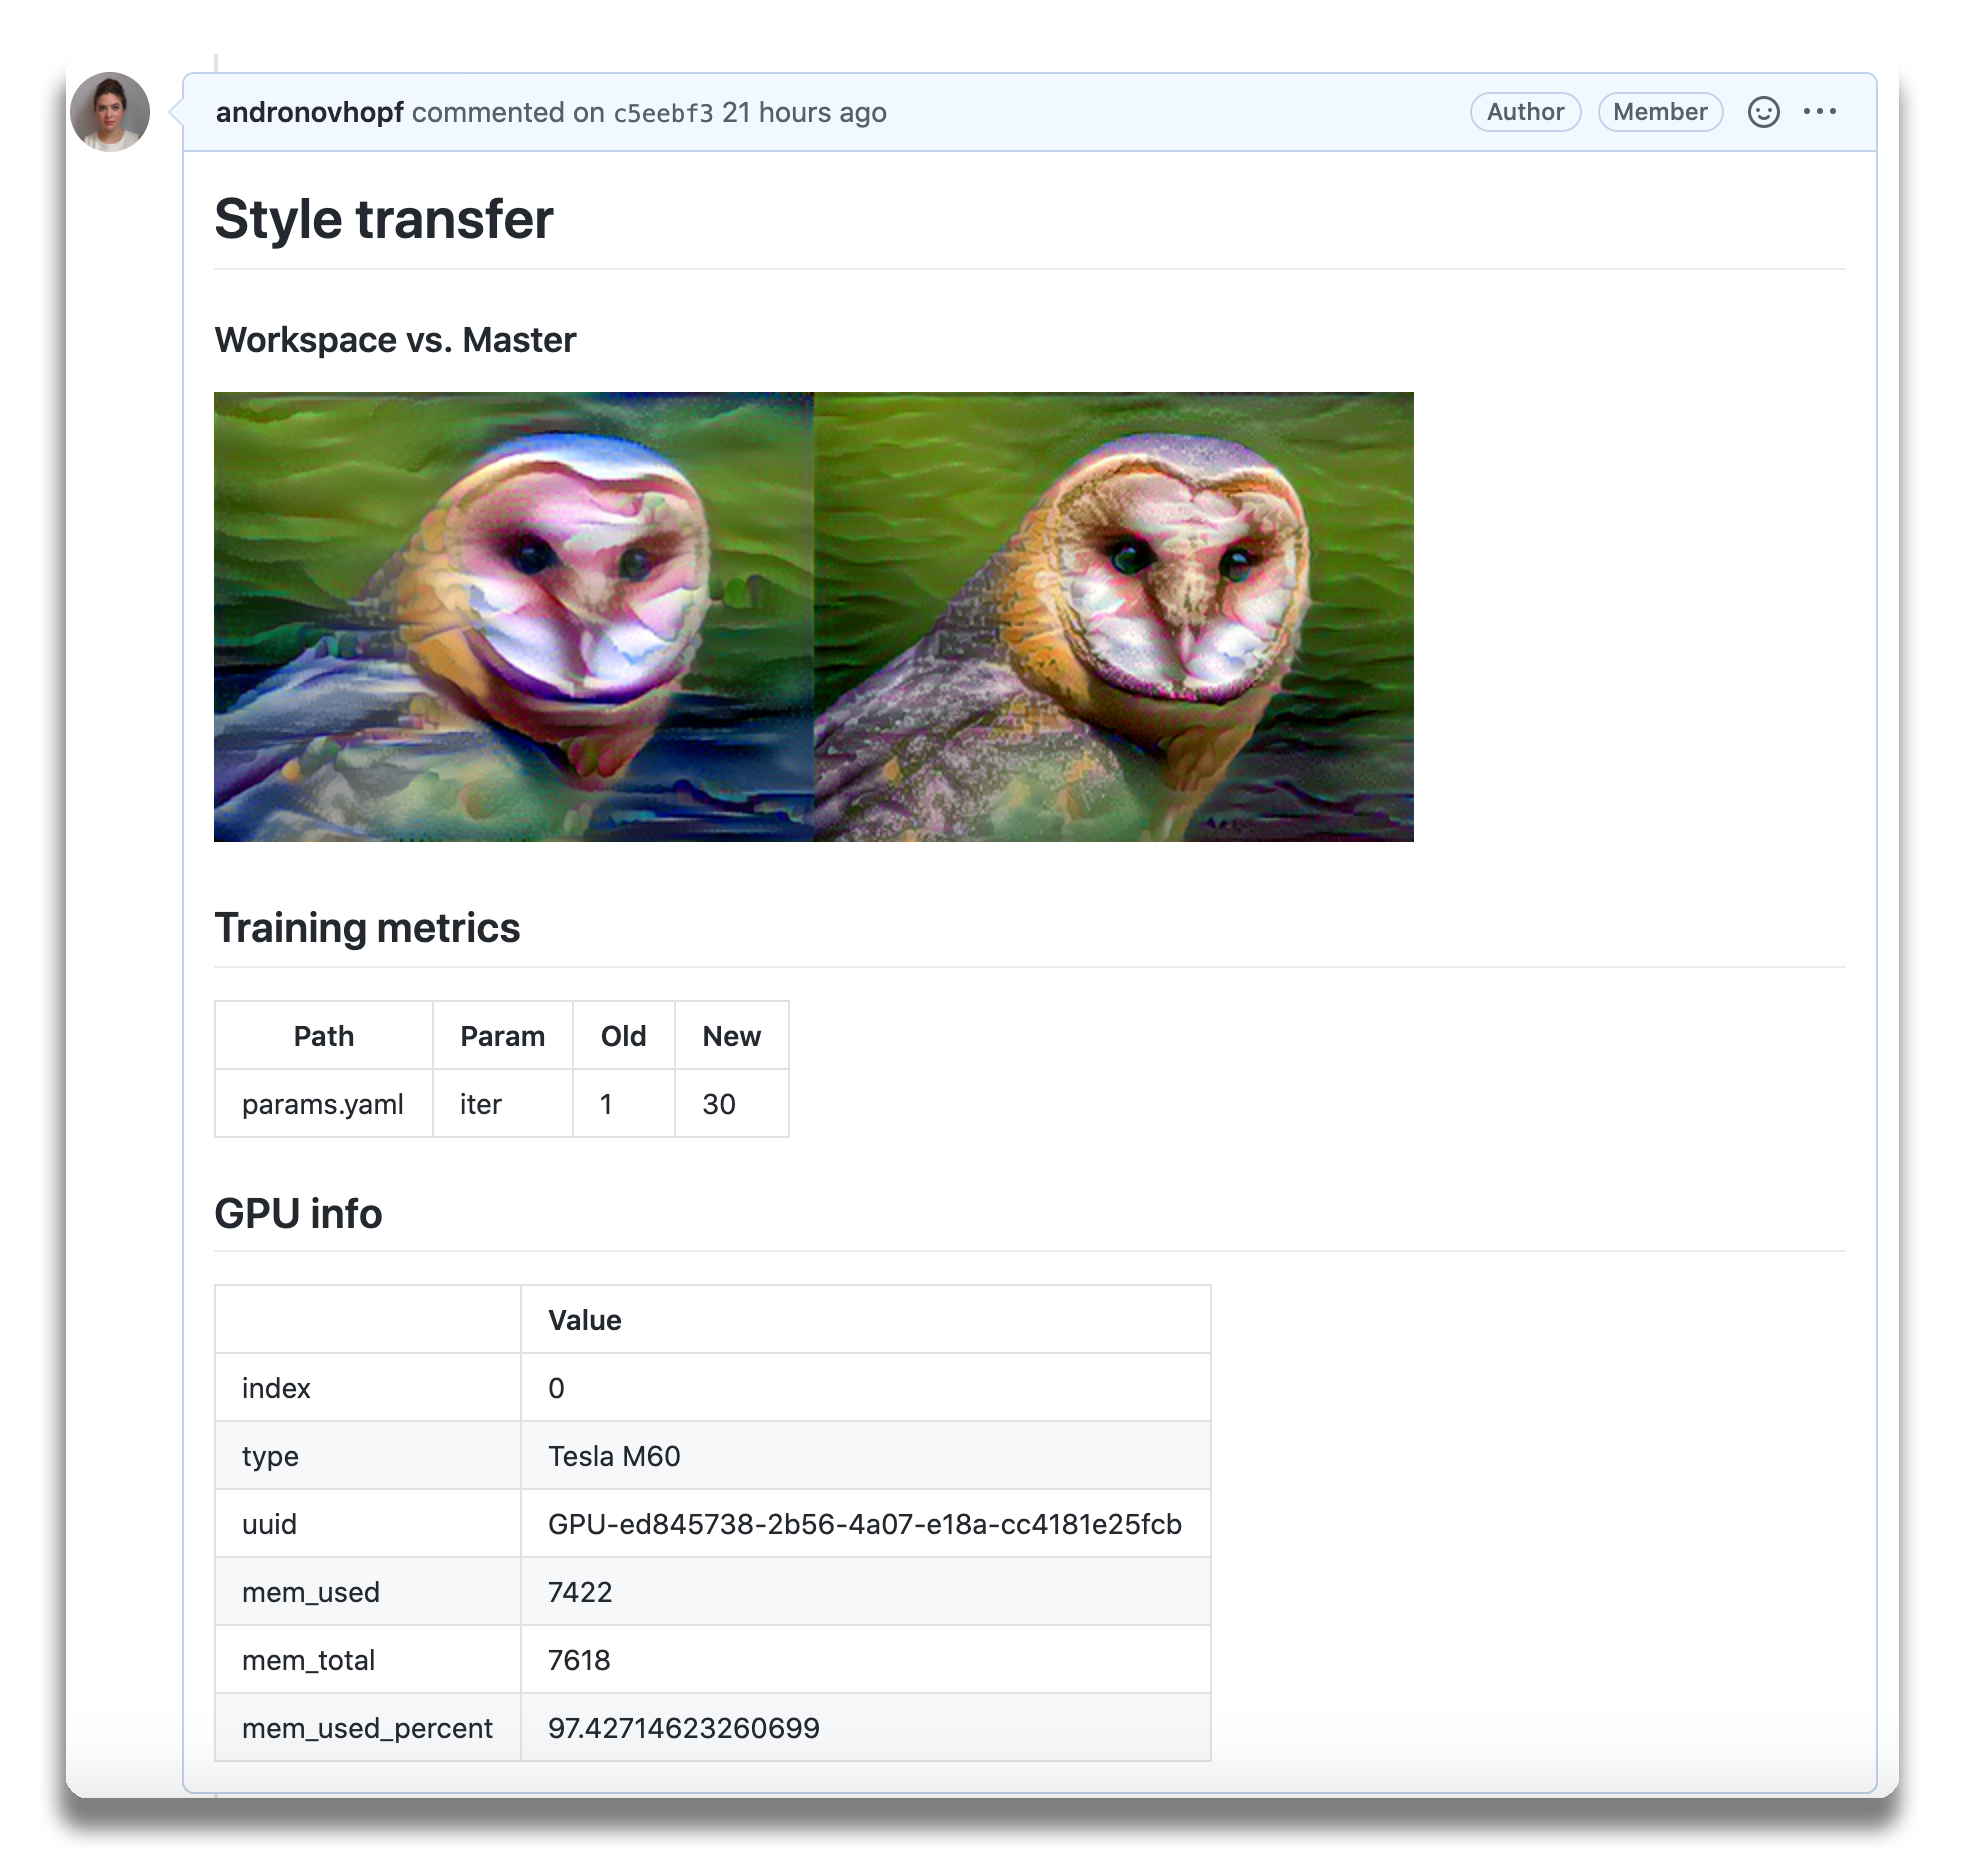 An
example report for a
neural style transfer model.
An
example report for a
neural style transfer model.
CML principles:
- GitFlow for data science. Use GitLab or GitHub to manage ML experiments, track who trained ML models or modified data and when. Codify data and models with DVC instead of pushing to a Git repo.
- Auto reports for ML experiments. Auto-generate reports with metrics and plots in each Git pull request. Rigorous engineering practices help your team make informed, data-driven decisions.
- No additional services. Build your own ML platform using GitLab, Bitbucket, or GitHub. Optionally, use cloud storage as well as either self-hosted or cloud runners (such as AWS EC2 or Azure). No databases, services or complex setup needed.
:question: Need help? Just want to chat about continuous integration for ML? Visit our Discord channel!
:play_or_pause_button: Check out our YouTube video series for hands-on MLOps tutorials using CML!
Table of Contents
- Setup (GitLab, GitHub, Bitbucket)
- Usage
- Getting started (tutorial)
- Using CML with DVC
- Advanced Setup (Self-hosted, local package)
- Example projects
Setup
You'll need a GitLab, GitHub, or Bitbucket account to begin. Users may wish to familiarize themselves with Github Actions or GitLab CI/CD. Here, will discuss the GitHub use case.
GitLab
Please see our docs on CML with GitLab CI/CD and in particular the personal access token requirement.
Bitbucket
Please see our docs on CML with Bitbucket Cloud.
GitHub
The key file in any CML project is .github/workflows/cml.yaml:
name: your-workflow-name
on: [push]
jobs:
  run:
    runs-on: ubuntu-latest
    # optionally use a convenient Ubuntu LTS + DVC + CML image
    # container: ghcr.io/iterative/cml:0-dvc2-base1
    steps:
      - uses: actions/checkout@v3
      # may need to setup NodeJS & Python3 on e.g. self-hosted
      # - uses: actions/setup-node@v3
      #   with:
      #     node-version: '16'
      # - uses: actions/setup-python@v4
      #   with:
      #     python-version: '3.x'
      - uses: iterative/setup-cml@v1
      - name: Train model
        run: |
          # Your ML workflow goes here
          pip install -r requirements.txt
          python train.py
      - name: Write CML report
        env:
          REPO_TOKEN: ${{ secrets.GITHUB_TOKEN }}
        run: |
          # Post reports as comments in GitHub PRs
          cat results.txt >> report.md
          cml comment create report.md
Usage
We helpfully provide CML and other useful libraries pre-installed on our
custom Docker images.
In the above example, uncommenting the field
container: ghcr.io/iterative/cml:0-dvc2-base1) will make the runner pull the
CML Docker image. The image already has NodeJS, Python 3, DVC and CML set up on
an Ubuntu LTS base for convenience.
CML Functions
CML provides a number of functions to help package the outputs of ML workflows (including numeric data and visualizations about model performance) into a CML report.
Below is a table of CML functions for writing markdown reports and delivering those reports to your CI system.
| Function | Description | Example Inputs |
|---|---|---|
cml runner launch | Launch a runner locally or hosted by a cloud provider | See Arguments |
cml comment create | Return CML report as a comment in your GitLab/GitHub workflow | <path to report> --head-sha <sha> |
cml check create | Return CML report as a check in GitHub | <path to report> --head-sha <sha> |
cml pr create | Commit the given files to a new branch and create a pull request | <path>... |
cml tensorboard connect | Return a link to a Tensorboard.dev page | --logdir <path to logs> --title <experiment title> --md |
CML Reports
The cml comment create command can be used to post reports. CML reports are
written in markdown (GitHub,
GitLab, or
Bitbucket
flavors). That means they can contain images, tables, formatted text, HTML
blocks, code snippets and more — really, what you put in a CML report is up to
you. Some examples:
:spiral_notepad: Text Write to your report using whatever method you prefer. For example, copy the contents of a text file containing the results of ML model training:
cat results.txt >> report.md
:framed_picture: Images Display images using the markdown or HTML. Note that
if an image is an output of your ML workflow (i.e., it is produced by your
workflow), it can be uploaded and included automaticlly to your CML report. For
example, if graph.png is output by python train.py, run:
echo "" >> report.md cml comment create report.md
Getting Started
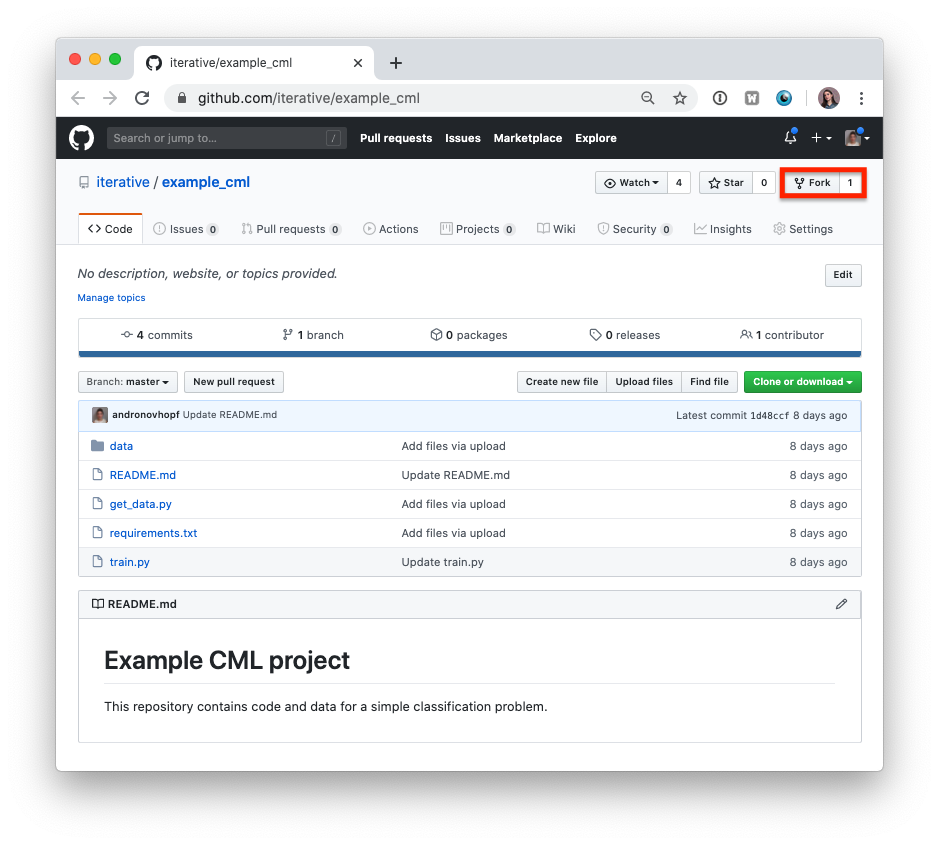
- Fork our example project repository.
:warning: Note that if you are using GitLab, you will need to create a Personal Access Token for this example to work.
:warning: The following steps can all be done in the GitHub browser interface. However, to follow along with the commands, we recommend cloning your fork to your local workstation:
git clone https://github.com/<your-username>/example_cml
- To create a CML workflow, copy the following into a new file,
.github/workflows/cml.yaml:
name: model-training on: [push] jobs: run: runs-on: ubuntu-latest steps: - uses: actions/checkout@v3 - uses: actions/setup-python@v4 - uses: iterative/setup-cml@v1 - name: Train model env: REPO_TOKEN: ${{ secrets.GITHUB_TOKEN }} run: | pip install -r requirements.txt python train.py cat metrics.txt >> report.md echo "" >> report.md cml comment create report.md
-
In your text editor of choice, edit line 16 of
train.pytodepth = 5. -
Commit and push the changes:
git checkout -b experiment
git add . && git commit -m "modify forest depth"
git push origin experiment
- In GitHub, open up a pull request to compare the
experimentbranch tomain.
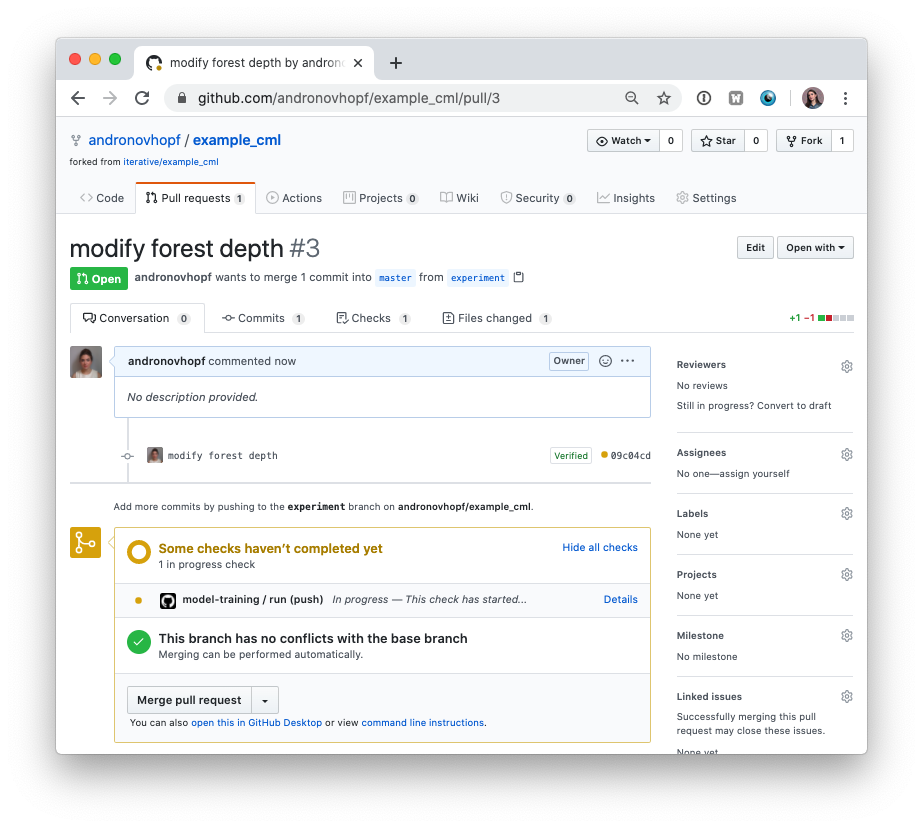
Shortly, you should see a comment from github-actions appear in the pull
request with your CML report. This is a result of the cml send-comment
function in your workflow.
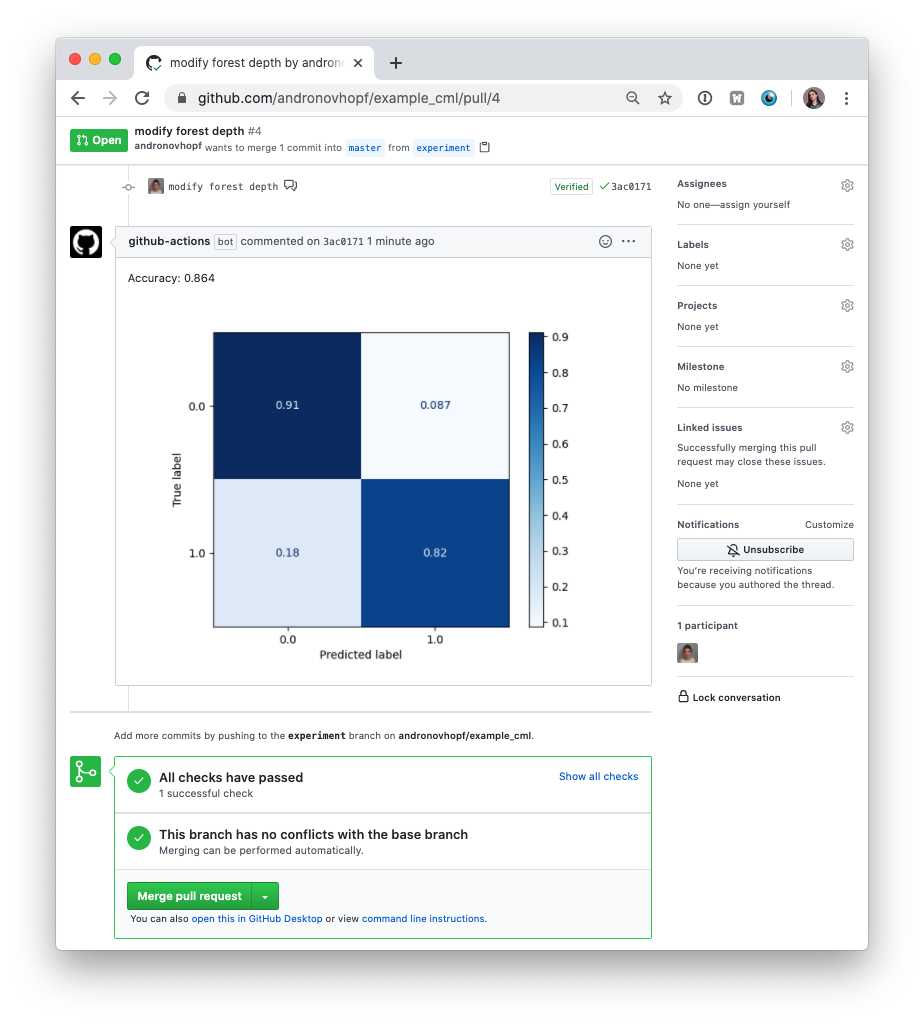
This is the outline of the CML workflow:
- you push changes to your GitHub repository,
- the workflow in your
.github/workflows/cml.yamlfile gets run, and - a report is generated and posted to GitHub.
CML functions let you display relevant results from the workflow — such as model performance metrics and visualizations — in GitHub checks and comments. What kind of workflow you want to run, and want to put in your CML report, is up to you.
Using CML with DVC
In many ML projects, data isn't stored in a Git repository, but needs to be downloaded from external sources. DVC is a common way to bring data to your CML runner. DVC also lets you visualize how metrics differ between commits to make reports like this:
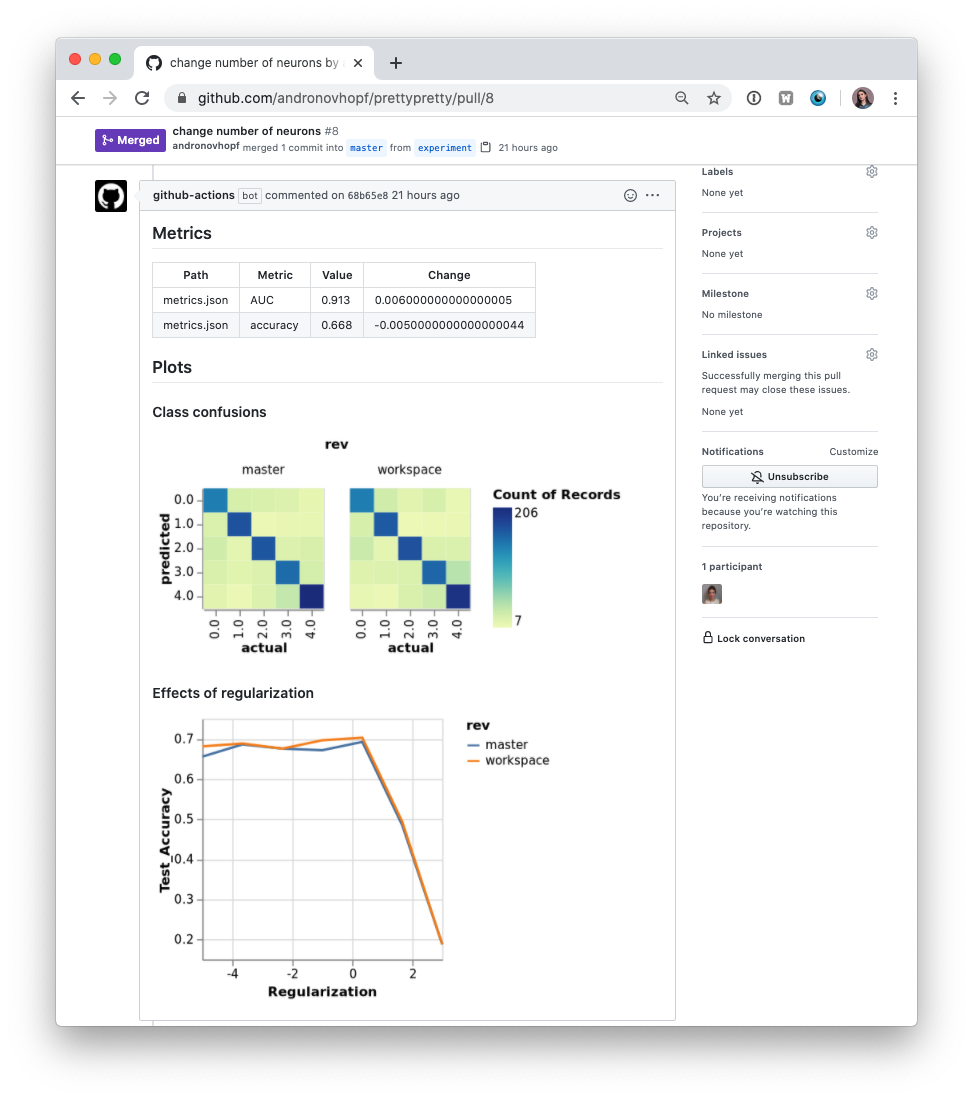
The .github/workflows/cml.yaml file used to create this report is:
name: model-training on: [push] jobs: run: runs-on: ubuntu-latest container: ghcr.io/iterative/cml:0-dvc2-base1 steps: - uses: actions/checkout@v3 - name: Train model env: REPO_TOKEN: ${{ secrets.GITHUB_TOKEN }} AWS_ACCESS_KEY_ID: ${{ secrets.AWS_ACCESS_KEY_ID }} AWS_SECRET_ACCESS_KEY: ${{ secrets.AWS_SECRET_ACCESS_KEY }} run: | # Install requirements pip install -r requirements.txt # Pull data & run-cache from S3 and reproduce pipeline dvc pull data --run-cache dvc repro # Report metrics echo "## Metrics" >> report.md git fetch --prune dvc metrics diff main --show-md >> report.md # Publish confusion matrix diff echo "## Plots" >> report.md echo "### Class confusions" >> report.md dvc plots diff --target classes.csv --template confusion -x actual -y predicted --show-vega main > vega.json vl2png vega.json -s 1.5 > confusion_plot.png echo "" >> report.md # Publish regularization function diff echo "### Effects of regularization" >> report.md dvc plots diff --target estimators.csv -x Regularization --show-vega main > vega.json vl2png vega.json -s 1.5 > plot.png echo "" >> report.md cml comment create report.md
:warning: If you're using DVC with cloud storage, take note of environment variables for your storage format.
Configuring Cloud Storage Providers
There are many supported could storage providers. Here are a few examples for some of the most frequently used providers:
<details> <summary> S3 and S3-compatible storage (Minio, DigitalOcean Spaces, IBM Cloud Object Storage...) </summary># Github env: AWS_ACCESS_KEY_ID: ${{ secrets.AWS_ACCESS_KEY_ID }} AWS_SECRET_ACCESS_KEY: ${{ secrets.AWS_SECRET_ACCESS_KEY }} AWS_SESSION_TOKEN: ${{ secrets.AWS_SESSION_TOKEN }}
:point_right:
AWS_SESSION_TOKENis optional.
</details> <details> <summary> Azure </summary>:point_right:
AWS_ACCESS_KEY_IDandAWS_SECRET_ACCESS_KEYcan also be used bycml runnerto launch EC2 instances. See [Environment Variables].
</details> <details> <summary> Aliyun </summary>env: AZURE_STORAGE_CONNECTION_STRING: ${{ secrets.AZURE_STORAGE_CONNECTION_STRING }} AZURE_STORAGE_CONTAINER_NAME: ${{ secrets.AZURE_STORAGE_CONTAINER_NAME }}
</details> <details> <summary> Google Storage </summary>env: OSS_BUCKET: ${{ secrets.OSS_BUCKET }} OSS_ACCESS_KEY_ID: ${{ secrets.OSS_ACCESS_KEY_ID }} OSS_ACCESS_KEY_SECRET: ${{ secrets.OSS_ACCESS_KEY_SECRET }} OSS_ENDPOINT: ${{ secrets.OSS_ENDPOINT }}
:warning: Normally,
GOOGLE_APPLICATION_CREDENTIALSis the path of thejsonfile containing the credentials. However in the action this secret variable is the contents of the file. Copy thejsoncontents and add it as a secret.
</details> <details> <summary> Google Drive </summary>env: GOOGLE_APPLICATION_CREDENTIALS: ${{ secrets.GOOGLE_APPLICATION_CREDENTIALS }}
:warning: After configuring your Google Drive credentials you will find a
jsonfile atyour_project_path/.dvc/tmp/gdrive-user-credentials.json. Copy its contents and add it as a secret variable.
</details>env: GDRIVE_CREDENTIALS_DATA: ${{ secrets.GDRIVE_CREDENTIALS_DATA }}
Advanced Setup
Self-hosted (On-premise or Cloud) Runners
GitHub Actions are run on GitHub-hosted runners by default. However, there are many great reasons to use your own runners: to take advantage of GPUs, orchestrate your team's shared computing resources, or train in the cloud.
:point_up: Tip! Check out the official GitHub documentation to get started setting up your own self-hosted runner.
Allocating Cloud Compute Resources with CML
When a workflow requires computational resources (such as GPUs), CML can
automatically allocate cloud instances using cml runner. You can spin up
instances on AWS, Azure, GCP, or Kubernetes.
For example, the following workflow deploys a g4dn.xlarge instance on AWS EC2
and trains a model on the instance. After the job runs, the instance
automatically shuts down.
You might notice that this workflow is quite similar to the
basic use case above. The only addition is cml runner and a few
environment variables for passing your cloud service credentials to the
workflow.
Note that cml runner will also automatically restart your jobs (whether from a
GitHub Actions 35-day workflow timeout
or a
AWS EC2 spot instance interruption).
name: Train-in-the-cloud
on: [push]
jobs:
  deploy-runner:
    runs-on: ubuntu-latest
    steps:
      - uses: iterative/setup-cml@v1
      - uses: actions/checkout@v3
      - name: Deploy runner on EC2
        env:
          REPO_TOKEN: ${{ secrets.PERSONAL_ACCESS_TOKEN }}
          AWS_ACCESS_KEY_ID: ${{ secrets.AWS_ACCESS_KEY_ID }}
          AWS_SECRET_ACCESS_KEY: ${{ secrets.AWS_SECRET_ACCESS_KEY }}
        run: |
          cml runner launch \
            --cloud=aws \
            --cloud-region=us-west \
            --cloud-type=g4dn.xlarge \
            --labels=cml-gpu
  train-model:
    needs: deploy-runner
    runs-on: [self-hosted, cml-gpu]
    timeout-minutes: 50400 # 35 days
    container:
      image: ghcr.io/iterative/cml:0-dvc2-base1-gpu
      options: --gpus all
    steps:
      - uses: actions/checkout@v3
      - name: Train model
        env:
          REPO_TOKEN: ${{ secrets.PERSONAL_ACCESS_TOKEN }}
        run: |
          pip install -r requirements.txt
          python train.py

          cat metrics.txt > report.md
          cml comment create report.md
In the workflow above, the deploy-runner step launches an EC2
编辑推荐精选


豆包
字节跳动旗下 AI 智能助手
字节跳动旗下 AI 智能助手


GPT Plus|Pro充值
GPT充值
支持 ChatGPT Plus / Pro 充值服务,支付便捷,自动发货,售后可查。


GPT Image 2中文站
AI 图片生成平台
GPT Image 2 是面向用户的 AI 图片生成平台,支持文生图、图生图及多模型创意工作流。


Vecbase
你的AI Agent团队
Vecbase 是专为 AI 团队打造的智能工作空间,将数据管理、模型协作与知识沉淀整合于一处。算法、产品与业务在同一平台无缝协同,让从数据到 AI 应用的落地更快一步。


音述AI
全球首个AI音乐社区
音述AI是全球首个AI音乐社区,致力让每个人都能用音乐表达自我。音述AI提供零门槛AI创作工具,独创GETI法则帮助用户精准定义音乐风格,AI润色功能支持自动优化作品质感。音述AI支持交流讨论、二次创作与价值变现。针对中文用户的语言习惯与文化背景进行专门优化,支持国风融合、C-pop等本土音乐标签,让技术更好地承载人文表达。


QoderWork
阿里Qoder团队推出的桌面端AI智能体
QoderWork 是阿里推出的本地优先桌面 AI 智能体,适配 macOS14+/Windows10+,以自然语言交互实现文件管理、数据分析、AI 视觉生成、浏览器自动化等办公任务,自主拆解执行复杂工作流,数据本地运行零上传,技能市场可无限扩展,是高效的 Agentic 生产力办公助手。


lynote.ai
一站式搞定所有学习需求
不再被海量信息淹没,开始真正理解知识。Lynote 可摘要 YouTube 视频、PDF、文章等内容。即时创建笔记,检测 AI 内容并下载资料,将您的学习效率提升 10 倍。


AniShort
为AI短剧协作而生
专为AI短剧协作而生的AniShort正式发布,深度重构AI短剧全流程生产模式,整合创意策划、制作执行、实时协作、在线审片、资产复用等全链路功能,独创无限画布、双轨并行工业化工作流与Ani智能体助手,集成多款主流AI大模型,破解素材零散、版本混乱、沟通低效等行业痛点,助力3人团队效率提升800%,打造标准化、可追溯的AI短剧量产体系,是AI短剧团队协同创作、提升制作效率的核心工具。


seedancetwo2.0
能听懂你表达的视频模型
Seedance two是基于seedance2.0的中国大模型,支持图像、视频、音频、文本四种模态输入,表达方式更丰富,生成也更可控。


nano-banana纳米香蕉中文站
国内直接访问,限时3折
输入简单文字,生成想要的图片,纳米香蕉中文站基于 Google 模型的 AI 图片生成网站,支持文字生图、图生图。官网价格限时3折活动
推荐工具精选


AI云服务特惠
懂AI专属折扣关注微信公众号
最新AI工具、AI资讯
独家AI�资源、AI项目落地

微信扫一扫关注公众号