


Alarmo
![]()
This is an alarm system integration for Home Assistant. It provides a user interface for setting up your own alarm system completely from the browser.
- Alarmo
Introduction
This is an integration for the alarm_control_panel domain in HA.
It allows to combine existing sensors for creating a security system for your house.
The integration is comparable with the Manual Alarm in HA, but also has some additional features that makes it easier to use.
Alarmo consists of 3 parts:
- Alarmo component: a custom component for HA that controls the states of the alarm panel entities in HA.
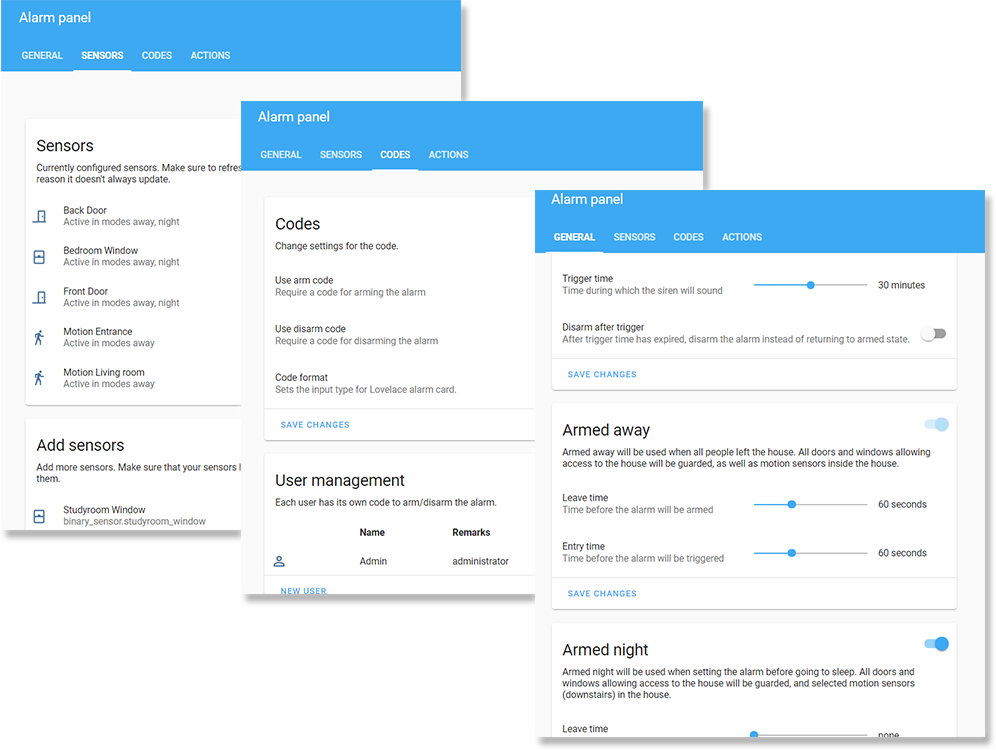
- Alarmo panel: a GUI for configuring the settings of your alarm (sensors, delays, actions etc.)
- Alarmo card: a custom card for arming / disarming the alarm.
Features
- Fully compatible with Home Assistant and the Alarm Panel Card.
- Has an integrated panel for complete management via UI (no YAML required).
- No restarts required when making changes.
- Can set up to 4 arm modes (armed_away, armed_home, armed_night, armed_custom_bypass), each with configurable delays and security perimeter.
- Supports configuring your existing HA entities as security sensors. These sensors will be watched automatically.
- Allows setting up multiple users with individual pincode and permission levels.
- Will restore its previous state after restart of HA.
- Built-in actions: receive push notifications when anything changes in the alarm, activate a siren when the alarm is triggered, etc.
- Supports splitting up your house security system into multiple areas which can be armed independently.
Preview
Installation

Updating
<details> <summary>Click to show updating instructions</summary> <ol> <li>Update the files: <ul> <li><u>Using HACS:</u><br> In the HACS panel, there should be an notification when a new version is available. Follow the instructions within HACS to update the installation files. </li> <li><u>Manually:</u><br> Download the <a href="https://github.com/nielsfaber/alarmo/releases">latest release</a> as a zip file and extract it into the <code>custom_components</code> folder in your HA installation, overwriting the previous installation. </li> </ul> <li>Restart HA to load the changes.</li> <li>(Optional) Verify the version number. <ul> <li><u>Verify version of the backend</u>:<br> In HA, go to Configuration -> Integrations. In the Alarmo card, you should see a link with '1 device', click it. In the table click the 'Alarmo' device, and you should see the Device info. The 'firmware version' represents the installed version number. </li> <li><u>Verify version of the frontend</u>:<br> In the Alarmo configuration panel, the version number is displayed in the top right. If the version does not match with the backend version, your browser has an outdated version stored in the cache. <br> To clear the cache, you should do a <a href="https://refreshyourcache.com/en/cache/">force refresh</a> of your browser. </li> </ul> </li> </ol> </details>Uninstalling
<details> <summary>Click to show uninstall instructions</summary> <ol> <li><u>Remove Alarmo from HA:</u><br> In HA go to Configuration -> Integrations. In the Alarmo card, click the button with the 3 dots, and click 'Delete'. </li> <li>Remove the files: <ul> <li> <u>When installed with HACS:</u><br> In the HACS panel go to integrations and look for Alarmo. Click the button with the 3 dots and click 'Uninstall'. </li> <li> <u>When installed manually:</u><br> In the <code>custom_components</code> directory, remove the 'alarmo' folder. </li> </ul> </li> <li>Restart HA to make all traces of the component dissapear. </li> </ol> </details>Usage
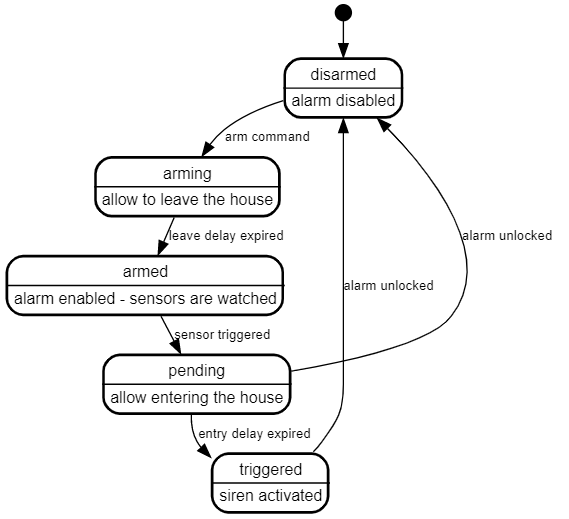
Alarm functionality
The following diagram describes the operational states of the alarm and provides a simplified overview of the functionality.
Arm modes
The alarm can be activated (armed) in a certain mode. This mode defines a certain set of sensors and represents the security zone (or perimeter).
The following modes are supported:
- Armed away
- Armed night
- Armed home
- Armed vacation
- Armed custom bypass (let's just call it armed custom from now on)
In the tab general you can find the settings for each mode. There are flip switches to enable/disable modes.
Alarmo entity
After installing Alarmo the entity alarm_control_panel.alarmo shall be added to HA.
You can use this entity together with the Alarm panel card, or in conjuction with automations to automatically arm/disarm the alarm.
States
The Alarmo entity follows the state definitions as defined by HA:
| State | Description |
|---|---|
disarmed | The alarm is disabled/off. |
arming | The alarm is arming.<br>After the leave delay has expired, the alarm will be armed. |
armed_away | The alarm is armed in away mode. |
armed_home | The alarm is armed in home mode. |
armed_night | The alarm is armed in night mode. |
armed_vacation | The alarm is armed in vacation mode. |
armed_custom_bypass | The alarm is armed in custom mode. |
pending | The alarm is pending.<br>After the entry delay has expired, the alarm will be triggered. |
triggered | The alarm is triggered. |
unavailable<br>unknown | Something is wrong.<br>Check the logs for more information. |
Attributes
The Alarmo entity defines the following attributes:
| Attribute | Default value | Example value when set | Description |
|---|---|---|---|
arm_mode | null | armed_away | The current active arm mode.<br> Defined in all states except disarmed. |
next_state | (same as current state) | armed_away | When alarm is in state arming: next_state is equal to the arm_mode.<br>When alarm is in state pending: next_state is triggered. <br>When alarm is in state triggered: next_state is triggered (if no trigger time is configured), disarmed (if 'disarm after triggering' setting is enabled) or equal to the arm_mode (otherwise).<br>In other cases, the next_state will be equal to the current state. |
changed_by | null | Niels | User who last armed or disarmed the alarm.<br> Detected from the entered code.<br> Cleared when alarm is armed or disarmed without a code. |
open_sensors | null | {binary_sensor.backdoor: on} | Dictionary of sensors with their entity-ID + state, that caused the alarm to change state.<br>Set when arming attempt failed (due to one or more sensors).<br>Set when alarm is triggered (only first sensor that caused the triggering is stored). |
bypassed_sensors | null | [binary_sensor.backdoor] | List of sensors that are temporarily excluded from the alarm, due to arming in force. |
delay | null | 30 | Duration of the exit or entry delay. Only set in the arming and pending states, null otherwise. |
Commands
The Alarmo entities support the following commands:
| Command | Description | Conditions |
|---|---|---|
ARM_AWAY | Arm the alarm in mode armed_away. | - The entity has the mode away enabled.<br>- The current alarm state is disarmed, armed_home, armed_night, armed_vacation or armed_custom_bypass. |
ARM_HOME | Arm the alarm in mode armed_home. | - The entity has the mode home enabled.<br>- The current alarm state is disarmed, armed_away, armed_night, armed_vacation or armed_custom_bypass. |
ARM_NIGHT | Arm the alarm in mode armed_night. | - The entity has the mode night enabled.<br>- The current alarm state is disarmed, armed_away, armed_home, armed_vacation or armed_custom_bypass. |
ARM_VACATION | Arm the alarm in mode armed_vacation. | - The entity has the mode vacation enabled.<br>- The current alarm state is disarmed, armed_away, armed_home, armed_night or armed_custom_bypass. |
ARM_CUSTOM_BYPASS | Arm the alarm in mode armed_custom_bypass. | - The entity has the mode custom enabled.<br>- The current alarm state is disarmed, armed_away, armed_home, armed_vacation or armed_night. |
DISARM | Disarm the alarm. | - The current alarm state is not disarmed |
Areas
An area is a physical compartment of your house, such as a garage, 1st floor of the house, garden, etc.
Alarmo will create an alarm_control_panel entity for each area which can be armed and disarmed independently. An area has its own set of sensors and can have dedicated configuration for arm modes, exit/entry times and automations.
In the general tab of the Alarmo configuration UI, there is a card showing the areas in your setup. You can add additional areas, as well as rename or remove existing areas. Alarmo requires at least 1 area to be set up to be functional.
The name of an area defines the entity ID as well. The entity will be instantly renamed after saving.
Warning: renaming an area changes the entity ID, which might break your Lovelace cards and automations outside of Alarmo, so treat it with care.
Alarm Master
Alarmo has the option for enabling an alarm master. The option appears in the general tab in general settings if you have multiple areas defined.
The alarm master is meant for operating your areas synchronously.
An extra alarm_control_panel entity is created for the master, which watches the state of the areas for and mirrors its own state with that.
States
The Alarm Master will watch the states of the area entities and updates its own state accordingly.
The following table shows the rules which are implemented to determine the the master alarm state (in order of priority):
| Condition | Master Alarm state |
|---|---|
One or more areas have state triggered | triggered |
One or more areas have state pending | pending |
One or more areas have state arming, others have state armed_away, armed_home, armed_night, armed_vacation or armed_custom_bypass | arming |
All areas have state armed_away | armed_away |
All areas have state armed_home | armed_home |
All areas have state armed_night | armed_night |
All areas have state armed_vacation | armed_vacation |
All areas have state armed_custom_bypass | armed_custom_bypass |
All areas have state disarmed | disarmed |
| Otherwise | (previous state is kept) |
Notes:
- The Alarm Master cannot determine its state if some are disarmed while others are armed. If the Alarm Master is used for arming/disarming the alarm, this condition should not occur.
- If the areas are independently operated, the user is reponsible to maintain synchronism between the areas. If independent operation is desired, usage of the Master Alarm is not recommended.
Commands
Arming / disarming the master will cause the action to be propagated to all areas.
If the arming of an area fails (due to blocking sensors), the arming procedure will be aborted and all areas are disarmed.
The available arm modes for the Master Alarm are determined from the areas. Only arm modes which are in common for all areas are available for the Master Alarm.
Sensor configuration
Currently Alarmo supports sensors of type binary_sensor. Alarmo will check the device class of each sensor, and only supports sensors that are related to security.
Available sensors should show up automatically in the sensors tab in the Add sensors card. Simply check the sensors that you wish to include in the alarm, and click 'add to alarm'. Review the configuration for each sensor in the sensors card.
Sensor types
The sensor configuration in the Alarmo panel allows defining a type for each sensor entity.
Setting a type for a sensor has the benefit that the appropriate configuration is automatically set. HA defines device classes for binary sensors. When assigning sensors to Alarmo, the type of the sensor is automatically determined based on this property (if it is defined).
Note that assigning a sensor type is not mandatory, and all configuration settings can also be set manually. It is also possible to deviate from the predefined configuration after setting a type.
The following table defines the sensor types and the predefined configuration:
| Type | Device classes | Arm modes | Enabled configuration options |
|---|---|---|---|
| Door | door<br> garage_door<br>lock<br> opening | Armed Away<br> Armed Home<br>Armed Night<br>Armed Vacation | `Arm |
编辑推荐精选


音述AI
全球首个AI音乐社区
音述AI是全球首个AI音乐社区,致力让每个人都能用音乐表达自我。音述AI提供零门槛AI创作工具,独创GETI法则帮助用户精准定义音乐风格,AI润色功能支持自动优化作品质感。音述AI支持交流讨论、二次创作与价值变现。针对中文用户的语言习惯与文化背景进行专门优化,支持国风融合、C-pop等本土音乐标签,让技术更好地承载人文表达。


QoderWork
阿里Qoder团队推出的桌面端AI智能体
QoderWork 是阿里推出的本地优先桌面 AI 智能体,适配 macOS14+/Windows10+,以自然语言交互实现文件管理、数据分析、AI 视觉生成、浏览器自动化等办公任务,自主拆解执行复杂工作流,数据本地运行零上传,技能市场可无限扩展,是高效的 Agentic 生产力办公助手。


lynote.ai
一站式搞定所有学习需求
不再被海量信息淹没,开始真正理解知识。Lynote 可摘要 YouTube 视频、PDF、文章等内容。即时创建笔记,检测 AI 内容并下载资料,将您的学习效率提升 10 倍。


AniShort
为AI短剧协作而生
专为AI短剧协作而生的AniShort正式发布,深度重构AI短剧全流程生产模式,整合创意策划、制作执行、实时协作、在线审片、资产复用等全链路功能,独创无限画布、双轨并行工业化工作流与Ani智能体助手,集成多款主流AI大模型,破解素材零散、版本混乱、沟通低效等行业痛点,助力3人团队效率提升800%,打造标准化、可追溯的AI短剧量产体系,是AI短剧团队协同创作、提升制作效率的核心工具。


seedancetwo2.0
能听懂你表达的视频模型
Seedance two是基于seedance2.0的中国大模型,支持图像、视频、音频、文本四种模态输入,表达方式更丰富,生成也更可控。


nano-banana纳米香蕉中文站
国内直接访问,限时3折
输入简单文字,生成想要的图片,纳米香蕉中文站基于 Google 模型的 AI 图片生成网站,支持文字生图、图生图。官网价格限时3折活动


扣子-AI办公
职场AI,就用扣子
AI办公助手,复杂任务高效处理。办公效率低?扣子空间AI助手支持播客生成、PPT制作、网页开发及报告写作,覆盖科研、商业、舆情等领域的专家Agent 7x24小时响应,生活工作无缝切换,提升50%效率!


堆友
多风格AI绘画神器
堆友平台由阿里巴巴设计团队创建,作为一款AI驱动的设计工具,专为设计师提供一站式增长服务。功能覆盖海量3D素材、AI绘画、实时渲染以及专业抠图,显著提升设计品质和效率。平台不仅提供工具,还是一个促进创意交流和个人发展的空间,界面友好,适合所有级别的设计师和创意工作者。


码上飞
零代码AI应用开发平台
零代码AI应用开发平台,用户只需一句话简单描述需求,AI能自动生成小程序、APP或H5网页应用,无需编写代码。


Vora
免费创建高清无水印Sora视频
Vora是一个免费创建高清无水印Sora视频的AI工具
推荐工具精选


AI云服务特惠
懂AI专属折扣关注微信公众号
最新AI工具、AI资讯
独家AI资源、AI项目落地

微信扫一扫关注公众号