


REST Client

![]()


REST Client allows you to send HTTP request and view the response in Visual Studio Code directly. It eliminates the need for a separate tool to test REST APIs and makes API testing convenient and efficient.
Main Features
- Send/Cancel/Rerun HTTP request in editor and view response in a separate pane with syntax highlight
- Send GraphQL query and author GraphQL variables in editor
- Send cURL command in editor and copy HTTP request as
cURL command - Auto save and view/clear request history
- Compose MULTIPLE requests in a single file (separated by
###delimiter) - View image response directly in pane
- Save raw response and response body only to local disk
- Fold and unfold response body
- Customize font(size/family/weight) in response preview
- Preview response with expected parts(headers only, body only, full response and both request and response)
- Authentication support for:
- Basic Auth
- Digest Auth
- SSL Client Certificates
- Azure Active Directory
- Microsoft Identity Platform
- AWS Signature v4
- AWS Cognito
- Environments and custom/system variables support
- Use variables in any place of request(URL, Headers, Body)
- Support environment, file, request and prompt custom variables
- Interactively assign prompt custom variables per request
- Auto completion and hover support for both environment, file and request custom variables
- Diagnostic support for request, file and prompt custom variables
- Go to definition support for request and file custom variables
- Find all references support ONLY for file custom variables
- Provide system dynamic variables
{{$guid}}{{$randomInt min max}}{{$timestamp [offset option]}}{{$datetime rfc1123|iso8601 [offset option]}}{{$localDatetime rfc1123|iso8601 [offset option]}}{{$processEnv [%]envVarName}}{{$dotenv [%]variableName}}{{$aadToken [new] [public|cn|de|us|ppe] [<domain|tenantId>] [aud:<domain|tenantId>]}}{{$oidcAccessToken [new] [<clientId:<clientId>] [<callbackPort:<callbackPort>] [authorizeEndpoint:<authorizeEndpoint}] [tokenEndpoint:<tokenEndpoint}] [scopes:<scopes}] [audience:<audience}]}
- Easily create/update/delete environments and environment variables in setting file
- File variables can reference both custom and system variables
- Support environment switch
- Support shared environment to provide variables that available in all environments
- Generate code snippets for HTTP request in languages like
Python,JavaScriptand more! - Remember Cookies for subsequent requests
- Proxy support
- Send SOAP requests, as well as snippet support to build SOAP envelope easily
HTTPlanguage support.httpand.restfile extensions support- Syntax highlight (Request and Response)
- Auto completion for method, url, header, custom/system variables, mime types and so on
- Comments (line starts with
#or//) support - Support
jsonandxmlbody indentation, comment shortcut and auto closing brackets - Code snippets for operations like
GETandPOST - Support navigate to symbol definitions(request and file level custom variable) in open
httpfile - CodeLens support to add an actionable link to send request
- Fold/Unfold for request block
- Support for Markdown fenced code blocks with either
httporrest
Usage
In editor, type an HTTP request as simple as below:
https://example.com/comments/1
Or, you can follow the standard RFC 2616 that including request method, headers, and body.
POST https://example.com/comments HTTP/1.1
content-type: application/json

{
    "name": "sample",
    "time": "Wed, 21 Oct 2015 18:27:50 GMT"
}
To send a prepared request, you have several options. The easiest way is to click the Send Request link above the request. This link will appear automatically if the file's language mode is set to HTTP. You can also use the shortcut Ctrl+Alt+R(Cmd+Alt+R for macOS), right-click in the editor and select Send Request from the context menu, or press F1 and select/type Rest Client: Send Request.
The response will be previewed in a separate webview panel inside Visual Studio Code. If you prefer to use the full power of searching, selecting, or manipulating in Visual Studio Code, you can preview the response in an untitled document by setting rest-client.previewResponseInUntitledDocument to true.
When you issue a request, a waiting spin icon will appear in the status bar until the response is received. You can click the spin icon to cancel the request. Once the response is received, the waiting icon will be replaced with the total duration and response size. By hovering over the total duration in the status bar, you can view a breakdown of the response time, including details on Socket, DNS, TCP, First Byte and Download. By hovering over the response size displayed in the status bar, you can view a breakdown of the response size details for both the headers and body.
The shortcuts in the REST Client Extension can be accessed exclusively when using the file language modes
httpandplaintext.
Select Request Text
If you need to store multiple requests in the same file and execute them at your convenience, REST Client Extension has got you covered. By using the three or more consecutive # symbol as a delimiter, you can create a separation between the requests that the extension can recognize. Once you have done this, simply place your cursor between the delimiters of the desired request, issue it as usual, and the extension will send it out without any hassle.
GET https://example.com/comments/1 HTTP/1.1

###

GET https://example.com/topics/1 HTTP/1.1

###

POST https://example.com/comments HTTP/1.1
content-type: application/json

{
    "name": "sample",
    "time": "Wed, 21 Oct 2015 18:27:50 GMT"
}
REST Client extension also provides the flexibility that you can send the request with your selected text in editor.
Install
Press F1, type ext install then search for rest-client.
Making Request
Request Line
The first non-empty line of the selection (or document if nothing is selected) is the Request Line. Below are some examples of Request Line:
GET https://example.com/comments/1 HTTP/1.1
GET https://example.com/comments/1
https://example.com/comments/1
If request method is omitted, request will be treated as GET, so above requests are the same after parsing.
Query Strings
You can always write query strings in the request line, like:
GET https://example.com/comments?page=2&pageSize=10
Sometimes there may be several query parameters in a single request, putting all the query parameters in Request Line is difficult to read and modify. So we allow you to spread query parameters into multiple lines(one line one query parameter), we will parse the lines in immediately after the Request Line which starts with ? and &, like
GET https://example.com/comments
    ?page=2
    &pageSize=10
Request Headers
Once you've written your Request line, the lines that immediately follow until the first empty line will be parsed as Request Headers. These headers should follow the standard field-name: field-value format, with each line representing a single header. By default if you don't explicitly specify a User-Agent header, REST Client Extension will automatically add one with the value vscode-restclient. However, if you want to change the default value, you can do so in the rest-client.defaultHeaders setting.
Below are examples of Request Headers:
User-Agent: rest-client
Accept-Language: en-GB,en-US;q=0.8,en;q=0.6,zh-CN;q=0.4
Content-Type: application/json
Request Body
If you want to provide a request body, simply add a blank line following the request headers, as demonstrated in the POST example in the usage section. Anything written after the blank line will be treated as Request Body content. Here are some examples:
POST https://example.com/comments HTTP/1.1
Content-Type: application/xml
Authorization: token xxx

<request>
    <name>sample</name>
    <time>Wed, 21 Oct 2015 18:27:50 GMT</time>
</request>
You can also specify file path to use as a body, which starts with < , the file path(whitespaces should be preserved) can be either in absolute or relative(relative to workspace root or current http file) formats:
POST https://example.com/comments HTTP/1.1
Content-Type: application/xml
Authorization: token xxx

< C:\Users\Default\Desktop\demo.xml
POST https://example.com/comments HTTP/1.1
Content-Type: application/xml
Authorization: token xxx

< ./demo.xml
If you want to use variables in that file, you'll have to use an @ to ensure variables are processed when referencing a file (UTF-8 is assumed as the default encoding)
POST https://example.com/comments HTTP/1.1
Content-Type: application/xml
Authorization: token xxx

<@ ./demo.xml
to override the default encoding, simply type it next to the @ like the below example
POST https://example.com/comments HTTP/1.1
Content-Type: application/xml
Authorization: token xxx

<@latin1 ./demo.xml
When content type of request body is multipart/form-data, you may have the mixed format of the request body as follows:
POST https://api.example.com/user/upload
Content-Type: multipart/form-data; boundary=----WebKitFormBoundary7MA4YWxkTrZu0gW

------WebKitFormBoundary7MA4YWxkTrZu0gW
Content-Disposition: form-data; name="text"

title
------WebKitFormBoundary7MA4YWxkTrZu0gW
Content-Disposition: form-data; name="image"; filename="1.png"
Content-Type: image/png

< ./1.png
------WebKitFormBoundary7MA4YWxkTrZu0gW--
When content type of request body is application/x-www-form-urlencoded, you may even divide the request body into multiple lines. And each key and value pair should occupy a single line which starts with &:
POST https://api.example.com/login HTTP/1.1
Content-Type: application/x-www-form-urlencoded

name=foo
&password=bar
When your mouse is over the document link, you can
Ctrl+Click(Cmd+Clickfor macOS) to open the file in a new tab.
Making GraphQL Request
With GraphQL support in REST Client extension, you can author and send GraphQL query using the request body. Besides that you can also author GraphQL variables in the request body. GraphQL variables part in request body is optional, you also need to add a blank line between GraphQL query and variables if you need it.
You can specify a request as GraphQL Request by adding a custom request header X-Request-Type: GraphQL in your headers. The following code illustrates this:
POST https://api.github.com/graphql
Content-Type: application/json
Authorization: Bearer xxx
X-REQUEST-TYPE: GraphQL

query ($name: String!, $owner: String!) {
  repository(name: $name, owner: $owner) {
    name
    fullName: nameWithOwner
    description
    diskUsage
    forkCount
    stargazers(first: 5) {
        totalCount
        nodes {
            login
            name
        }
    }
    watchers {
        totalCount
    }
  }
}

{
    "name": "vscode-restclient",
    "owner": "Huachao"
}
Making cURL Request
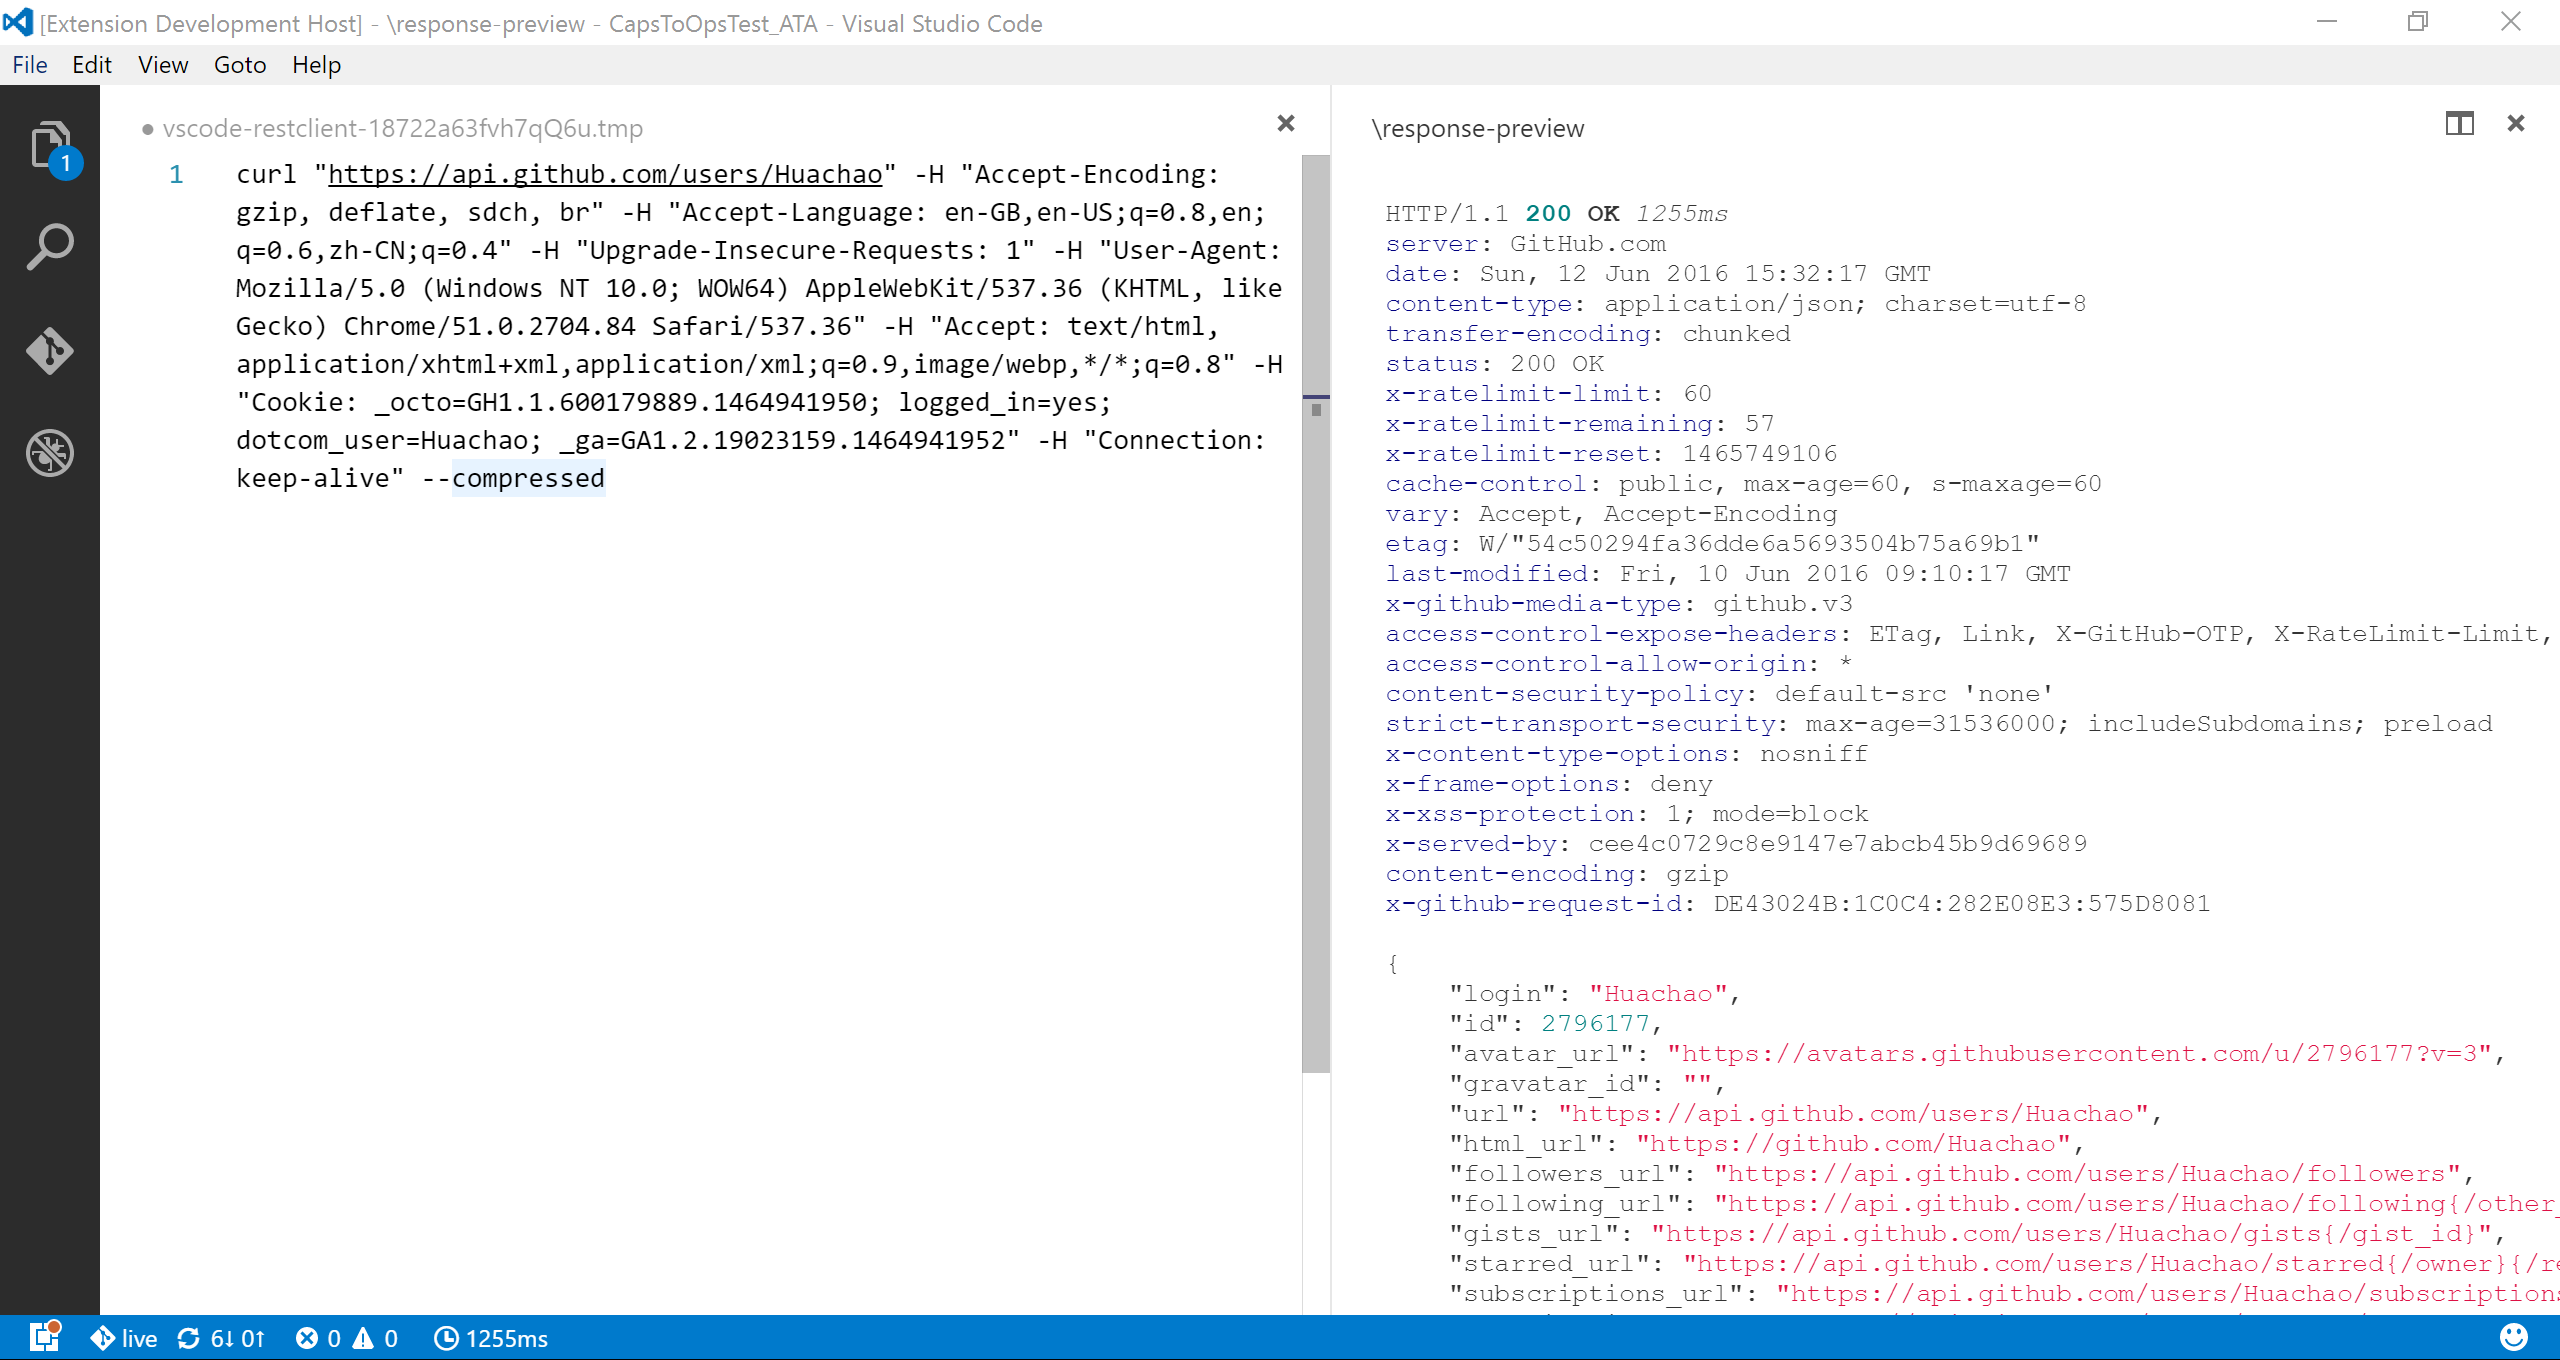 We add the capability to directly run curl request in REST Client extension. The issuing request command is the same as raw HTTP one. REST Client will automatically parse the request with specified parser.
REST Client doesn't fully support all the options of cURL, since underneath we use request library to send request which doesn't accept all the cURL options. Supported options are listed below:
- -X, --request
- -L, --location, --url
- -H, --header(no @ support)
- -I, --head
- -b, --cookie(no cookie jar file support)
- -u, --user(Basic auth support only)
- -d, --data, --data-ascii,--data-binary, --data-raw
Copy Request As cURL
If you need to quickly obtain the curl format of an HTTP request and save it to your clipboard, you can use a handy shortcut. Simply hit F1 and select/type Rest Client: Copy Request As cURL. Alternatively, you can right-click in the editor and select Copy Request As cURL.
Cancel Request
If you want to cancel a processing request, click the waiting spin icon or use shortcut Ctrl+Alt+K(Cmd+Alt+K for macOS), or press F1 and then select/type Rest Client: Cancel Request.
Rerun Last Request
Sometimes you may want to refresh the API response, now you could do it simply using shortcut Ctrl+Alt+L(Cmd+Alt+L for macOS), or press F1 and then select/type Rest Client: Rerun Last Request to rerun the last request.
Request History
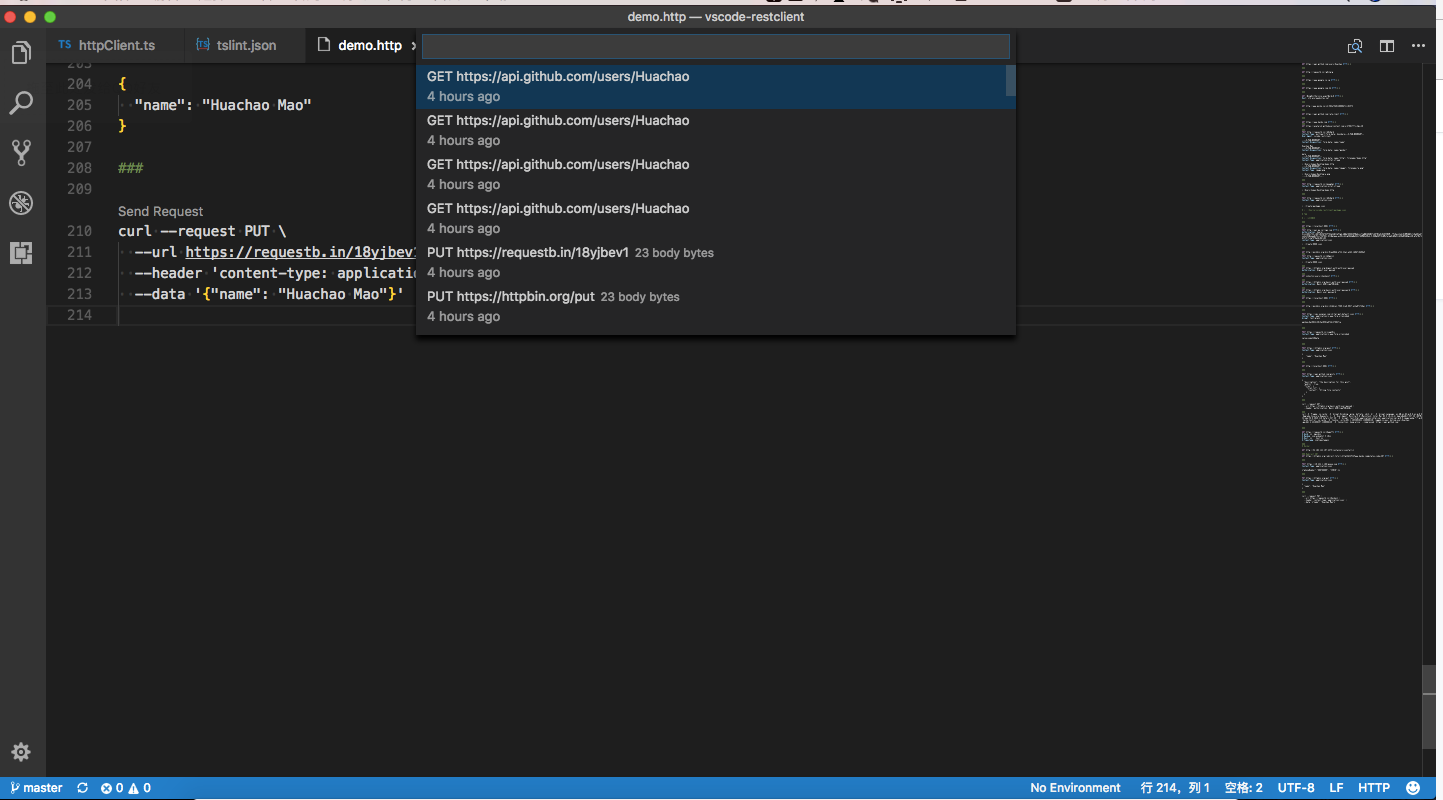 Every time you send an http request, the request details, including method, url, headers, and body, are saved into a file for future reference. To access this content, you can use the shortcut
 Ctrl+Alt+H(Cmd+Alt+H for macOS), or press F1 and then select/type Rest Client: Request History. This will allow you to view the last 50 request items in time reversing order, displaying the method, url, and request time for each one. After specified request history item is selected, the request details would be displayed in a temp file, you can view the request details or follow previous step to trigger the request again.
You can also clear request history by pressing F1 and then selecting/typing Rest Client: Clear Request History.
Save Full Response
 In the upper right corner of the response preview tab, we add a new icon to save the latest response to local file system. After you click the
 Save Full Response icon, it will prompt the window with the saved response file path. You can click the Open button to open the saved response file in current workspace or click Copy Path to copy the saved response path to clipboard.
Save Response Body
Another icon in the upper right corner of the response preview tab is the Save Response Body button, it will only save the response body ONLY to local file system. The extension of saved file is set according to the response MIME type, like if the Content-Type value in response header is application/json, the saved file will have extension .json. You can also overwrite the MIME type and extension mapping according to your requirement with the rest-client.mimeAndFileExtensionMapping setting.
"rest-client.mimeAndFileExtensionMapping": {
编辑推荐精选


音述AI
全球首个AI音乐社区
音述AI是全球首个AI音乐社区,致力让每个人都能用音乐表达��自我。音述AI提供零门槛AI创作工具,独创GETI法则帮助用户精准定义音乐风格,AI润色功能支持自动优化作品质感。音述AI支持交流讨论、二次创作与价值变现。针对中文用户的语言习惯与文化背景进行专门优化,支持国风融合、C-pop等本土音乐标签,让技术更好地承载人文表达。


QoderWork
阿里Qoder团队推出的桌面端AI智能体
QoderWork 是阿里推出的本地优先桌面 AI 智能体,适配 macOS14+/Windows10+,以自然语言交互实现文件管理、数据分析、AI 视觉生成、浏览器自动化等办公任务,自主拆解执行复杂工作流,数据本地运行零上传,技能市场可无限扩展,是高效的 Agentic 生产力办公助手。


lynote.ai
一站式搞定所有学习需求
不再被海量信息淹没,开始真正理解知识。Lynote 可摘要 YouTube 视频、PDF、文章等内容。即时创建笔记,检测 AI 内容并下载资料,将您的学习效率提升 10 倍。


AniShort
为AI短剧协作而生
专为AI短剧协作而生的AniShort正式发布,深度重构AI短剧全流程生产模式,整合创意策划、制作执行、实时协作、在线审片、资产复用等全链路功能,独创无限画布、双轨并行工业化工作流与Ani智能体助手,集成多款主流AI大模型,破解素材零散、版本混乱、沟通低效等行业痛点,助力3人团队效率提升800%,打造标准化、可追溯的AI短剧量产体系,是AI短剧团队协同创作、提升制作效率的核心工具。


seedancetwo2.0
能听懂你表达的视频模型
Seedance two是基于seedance2.0的中国大模型,支持图像、视频、音频、文本四种模态输入,表达方式更丰富,生成也更可控。


nano-banana纳米香蕉中文站
国内直接访问,限时3折
输入简单文字,生成想要的图片,纳米香蕉中文站基于 Google 模型的 AI 图片生成网站,支持文字生图、图生图。官网价格限时3折活动


扣子-AI办公
职场AI,就用扣子
AI办公助手,复杂任务高效处理。办公效率低?扣子空间AI助手支持播客生成、PPT制作、网页开发及报告写作,覆盖科研、商业、舆情等领域的专家Agent 7x24小时响应,生活工作无缝切换,提升50%效率!


堆友
多风格AI绘画神器
堆友平台由阿里巴巴设计团队创建,作为一款AI驱动的设计工具,专为设计师提供一站式增长服务。功能覆盖海量3D素材、AI绘画、实时渲染以及专业抠图,显著提升设计品质和效率。平台不仅提供工具,还是一个促进创意交流和个人发展的空间,界面友好,适合所有级别的设计师和创意工作者。


码上飞
零代码AI应用开发平台
零代码AI应用开发平台,用户只需一句话简单描述需求,AI能自动生成小程序、APP或H5网页应用,无需编写代码。


Vora
免费创建高清无水印Sora视频
Vora是一个免费创建高清无水印Sora视频的AI工具
推荐工具精选


AI云服务特惠
懂AI专属折扣关注微信公众号
最新AI工具、AI资讯
独家AI资源、AI项目落地

微信扫一扫关注公众号