


GitHubPoster
将一切都变为 GitHub svg 海报和 skyline!
简体中文 | English
直接引入 svg 在 README 中的例子

摘要

Skyline

圆形

支持
- Strava
- 开心词场
- 扇贝
- 不背单词
- Nintendo Switch
- GPX
- 多邻国
- Issue
- YouTube
- Bilibili
- GitHub
- GitLab
- Kindle
- WakaTime
- Dota2
- Nike
- Notion
- Garmin
- Forest
- Json
- Multiple
- 即刻
- 微信读书
- 总结
- Covid
- Todoist
- 开言英语
- Apple Health
- ChatGPT
- NeoDB
- AutoSleep
下载
git clone https://github.com/yihong0618/GitHubPoster.git
pip 安装
pip3 install -U 'github_poster[all]'
安装(Python3.6+)
pip3 install -r requirements.txt
使用
生成的 svg 在 OUT_FOLDER 内, 用 type 命名(暂时)
不同类型按下方指定的使用方式:
--year 2022: 可以指定年份(默认)或年份区间--year 2012-2022--track-color=#f4cccc: 指定基础颜色--special-number1 10 -- special_number2 20: 可以指定特殊颜色,默认自动生成不同颜色需要的 number(特殊颜色)--special-color1 pink --special-color2 '#33C6A4': 指定特殊颜色--with-animation: 可以增加动画 (加入 GOGOGO 动画)--animation-time 14: 可以控制动画时间(默认是 10s), 配合--with-animation使用--with-skyline: 可以增加 Skyline (默认生成的为 to_year)--skyline-with-name: 将用户名打印在 Skyline 上, 配合--with-skyline使用--is-circular: 支持 circular svg �配合动画--without-type-name: 支持隐藏标题中生成类型的名称
其它参数可以见 python3 -m github_poster <type> --help
GPX
<details> <summary>制作您的<code>GPX</code> GitHub海报</summary> <br>把其它软件生成的(like running_page) gpx files 拷贝到 GPX_FOLDER 之后运行,或指定文件夹如我的文件夹是 ~/blog/GPX_OUT/
python3 -m github_poster gpx --gpx_dir ~/blog/GPX_OUT/ --year 2013-2021
or pip
github_poster gpx --gpx_dir ~/blog/GPX_OUT/ --year 2013-2021
Strava
<details> <summary>制作您的<code>Strava</code> GitHub海报</summary>-
注册/登陆 Strava 账号
-
登陆成功后打开 Strava Developers -> Create & Manage Your App
-
创建
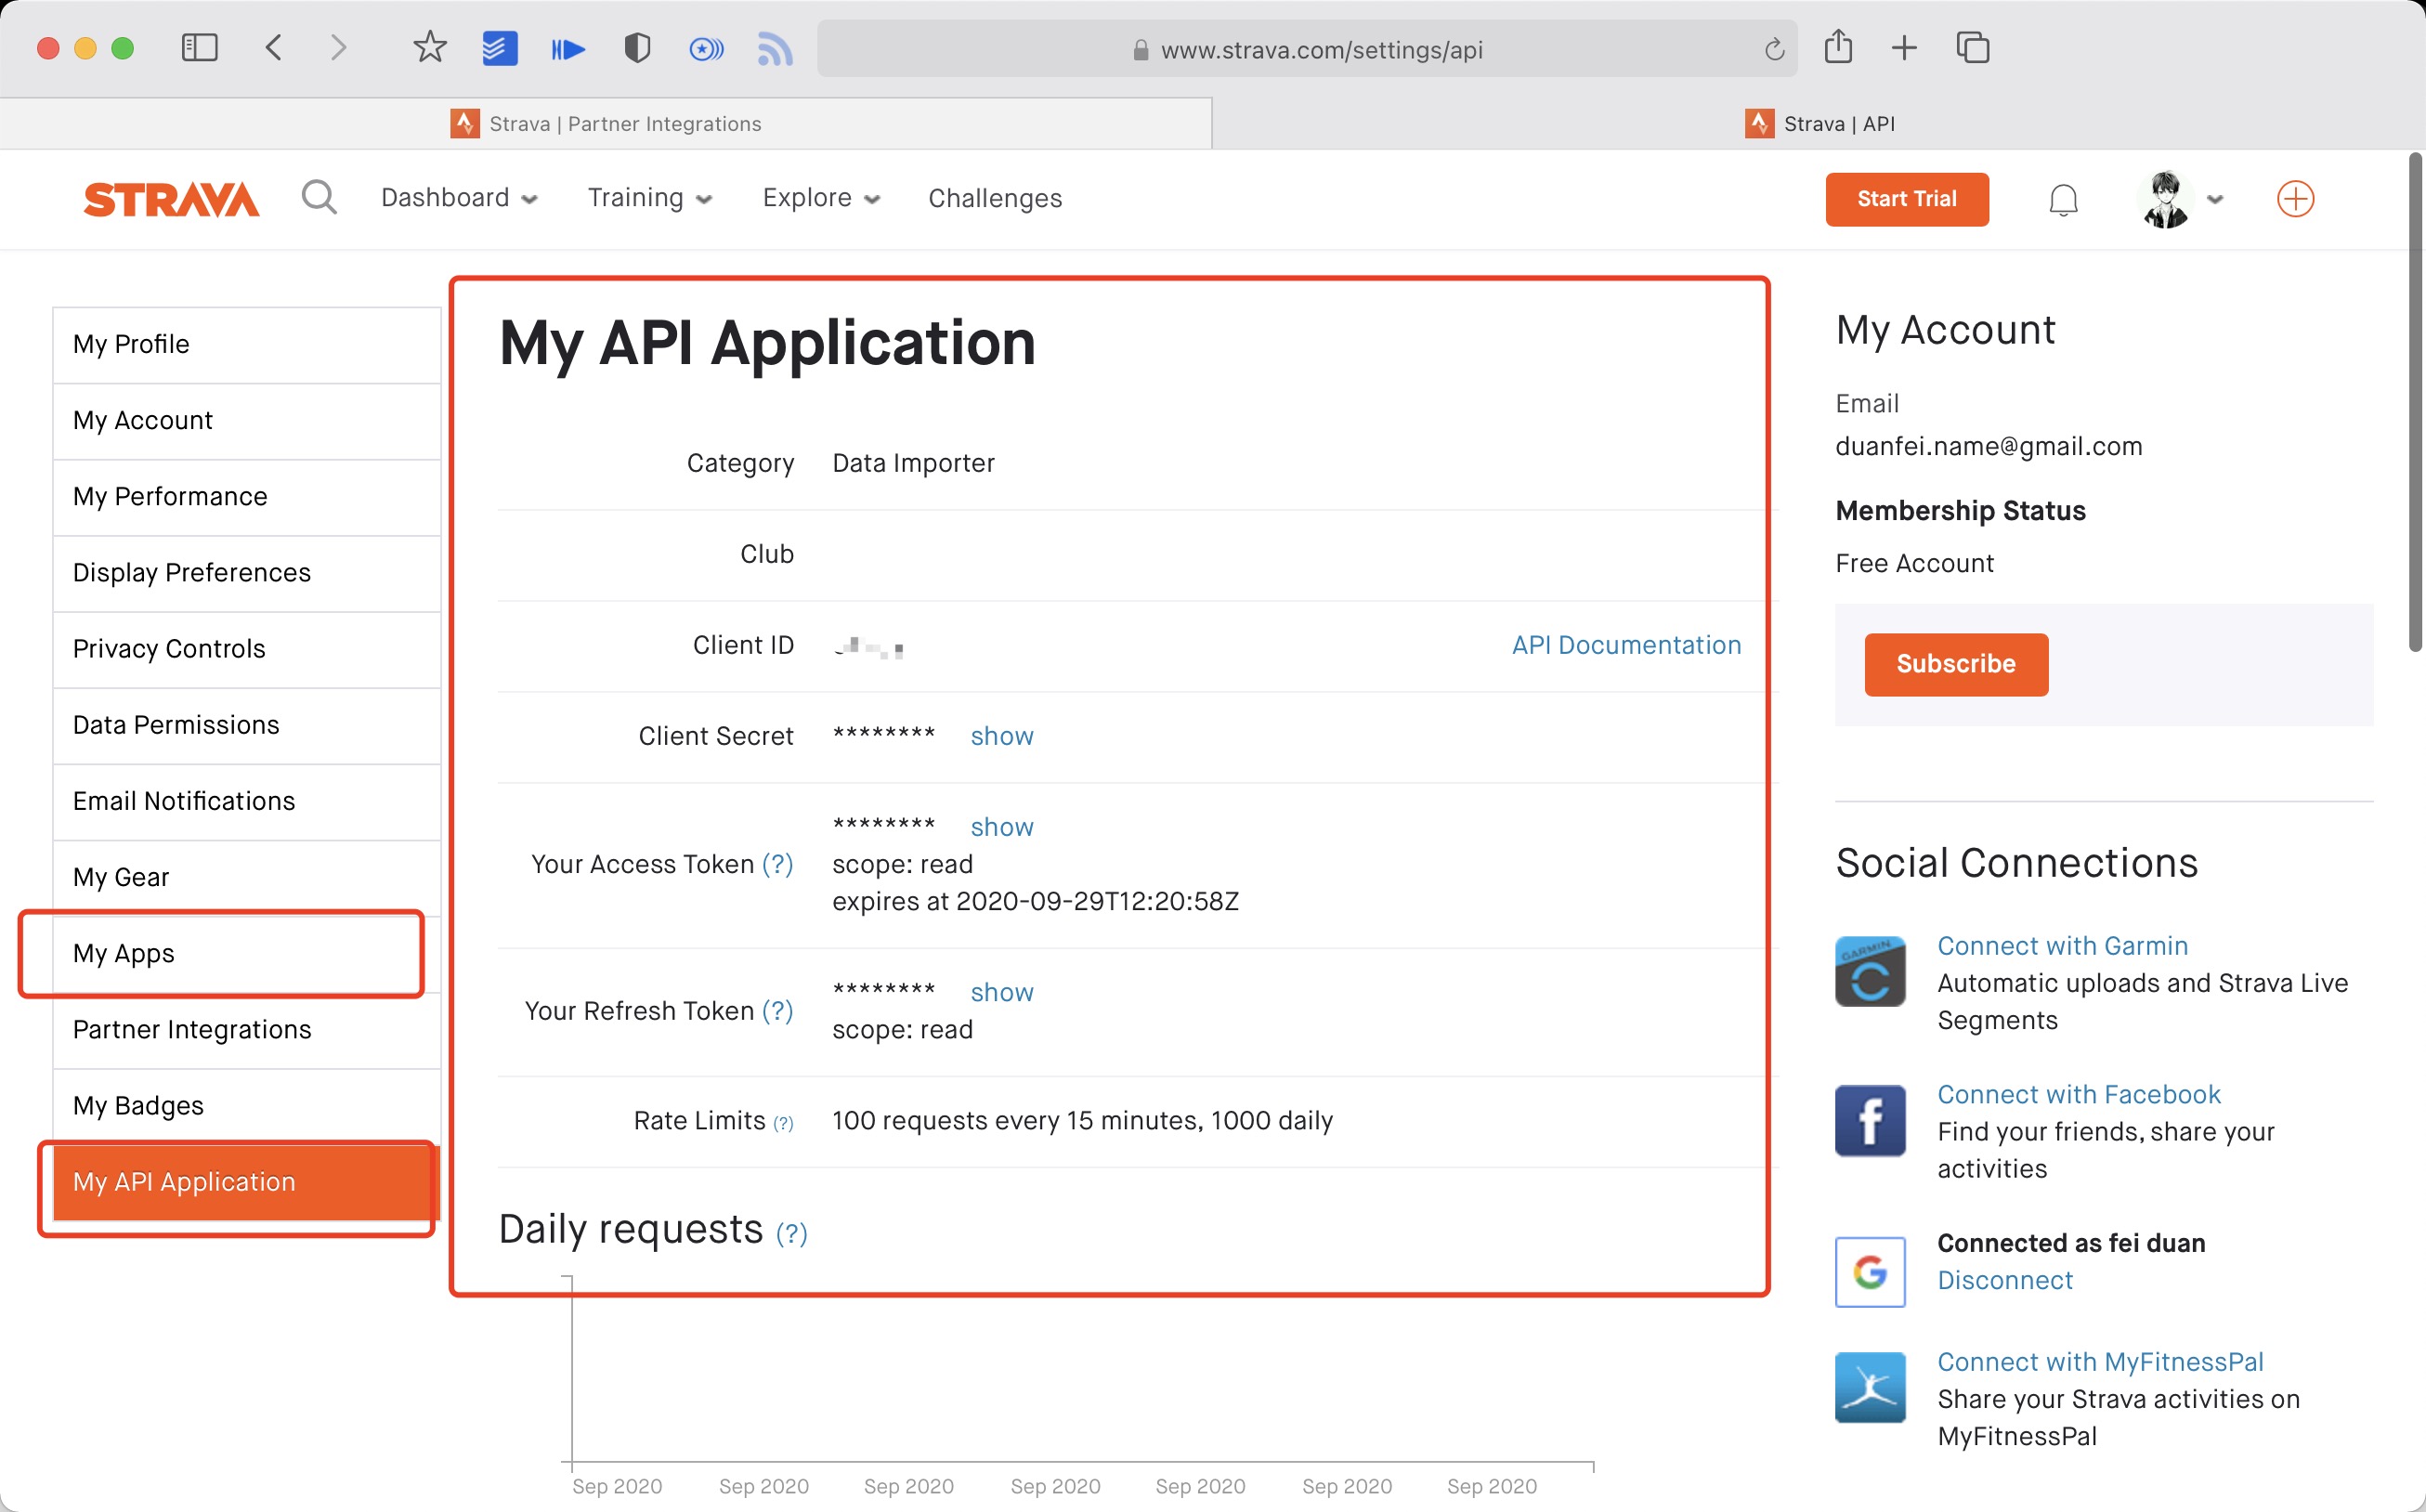
My API Application输入下列信息: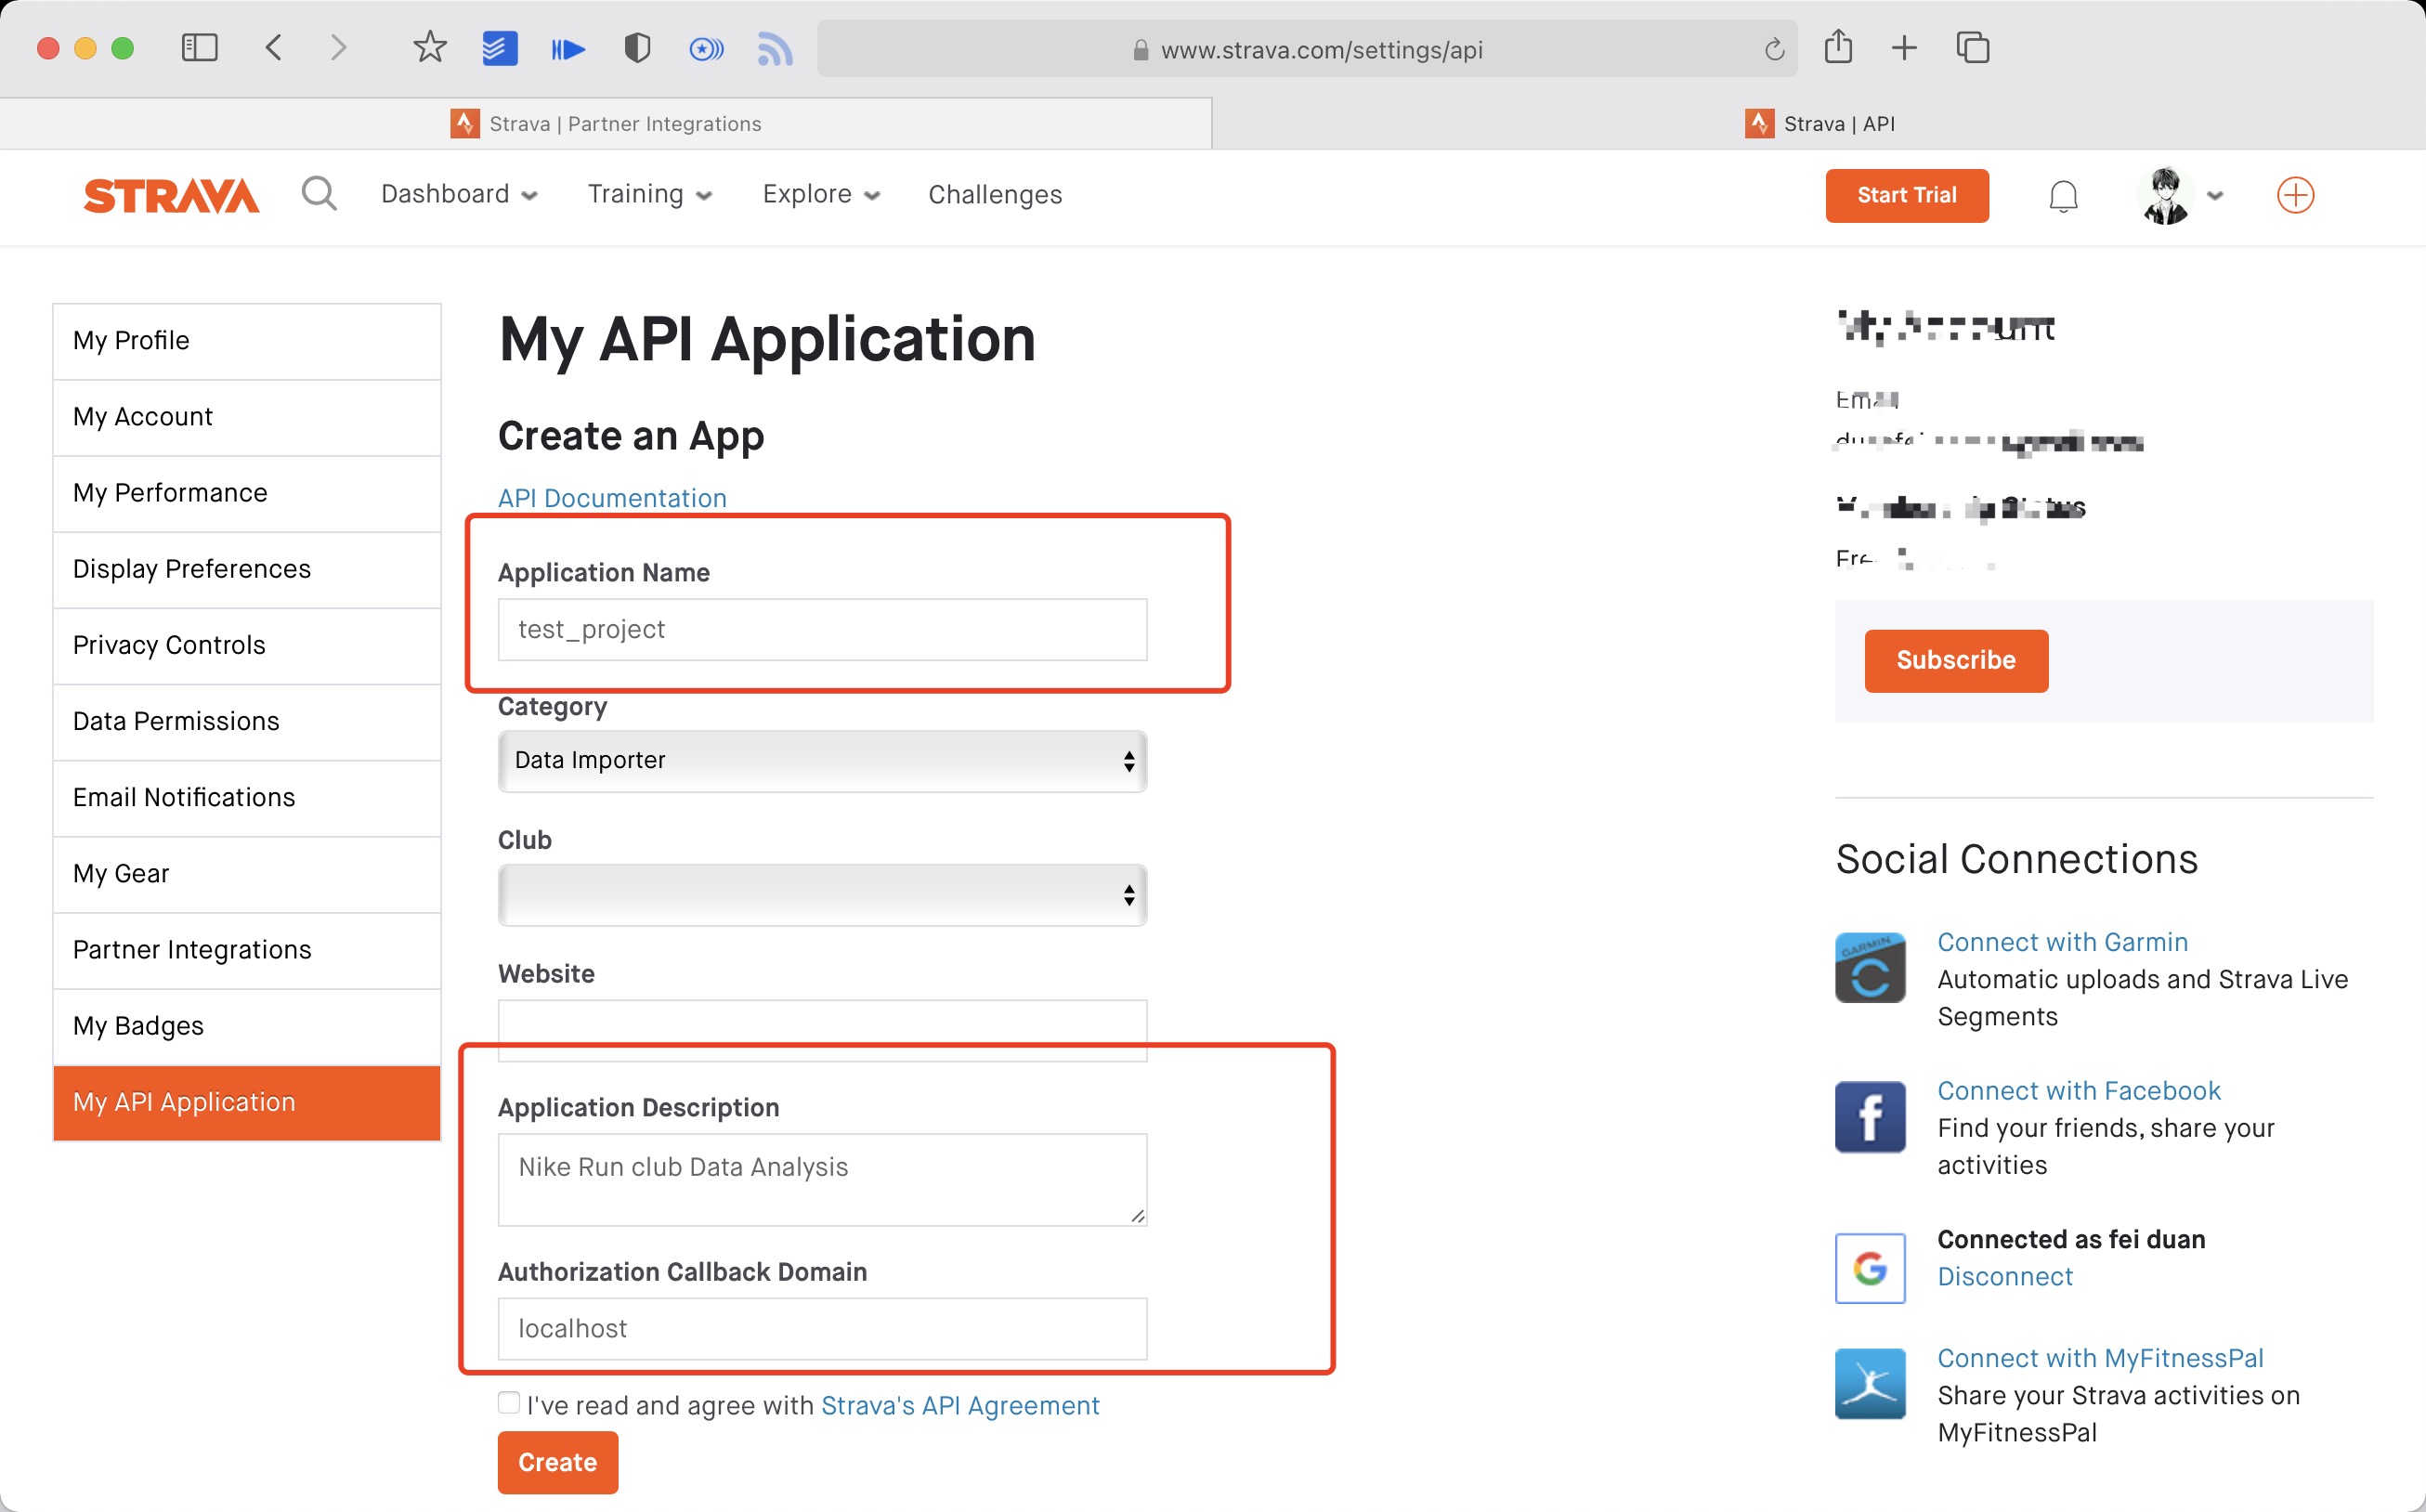 创建成功:
创建成功:
-
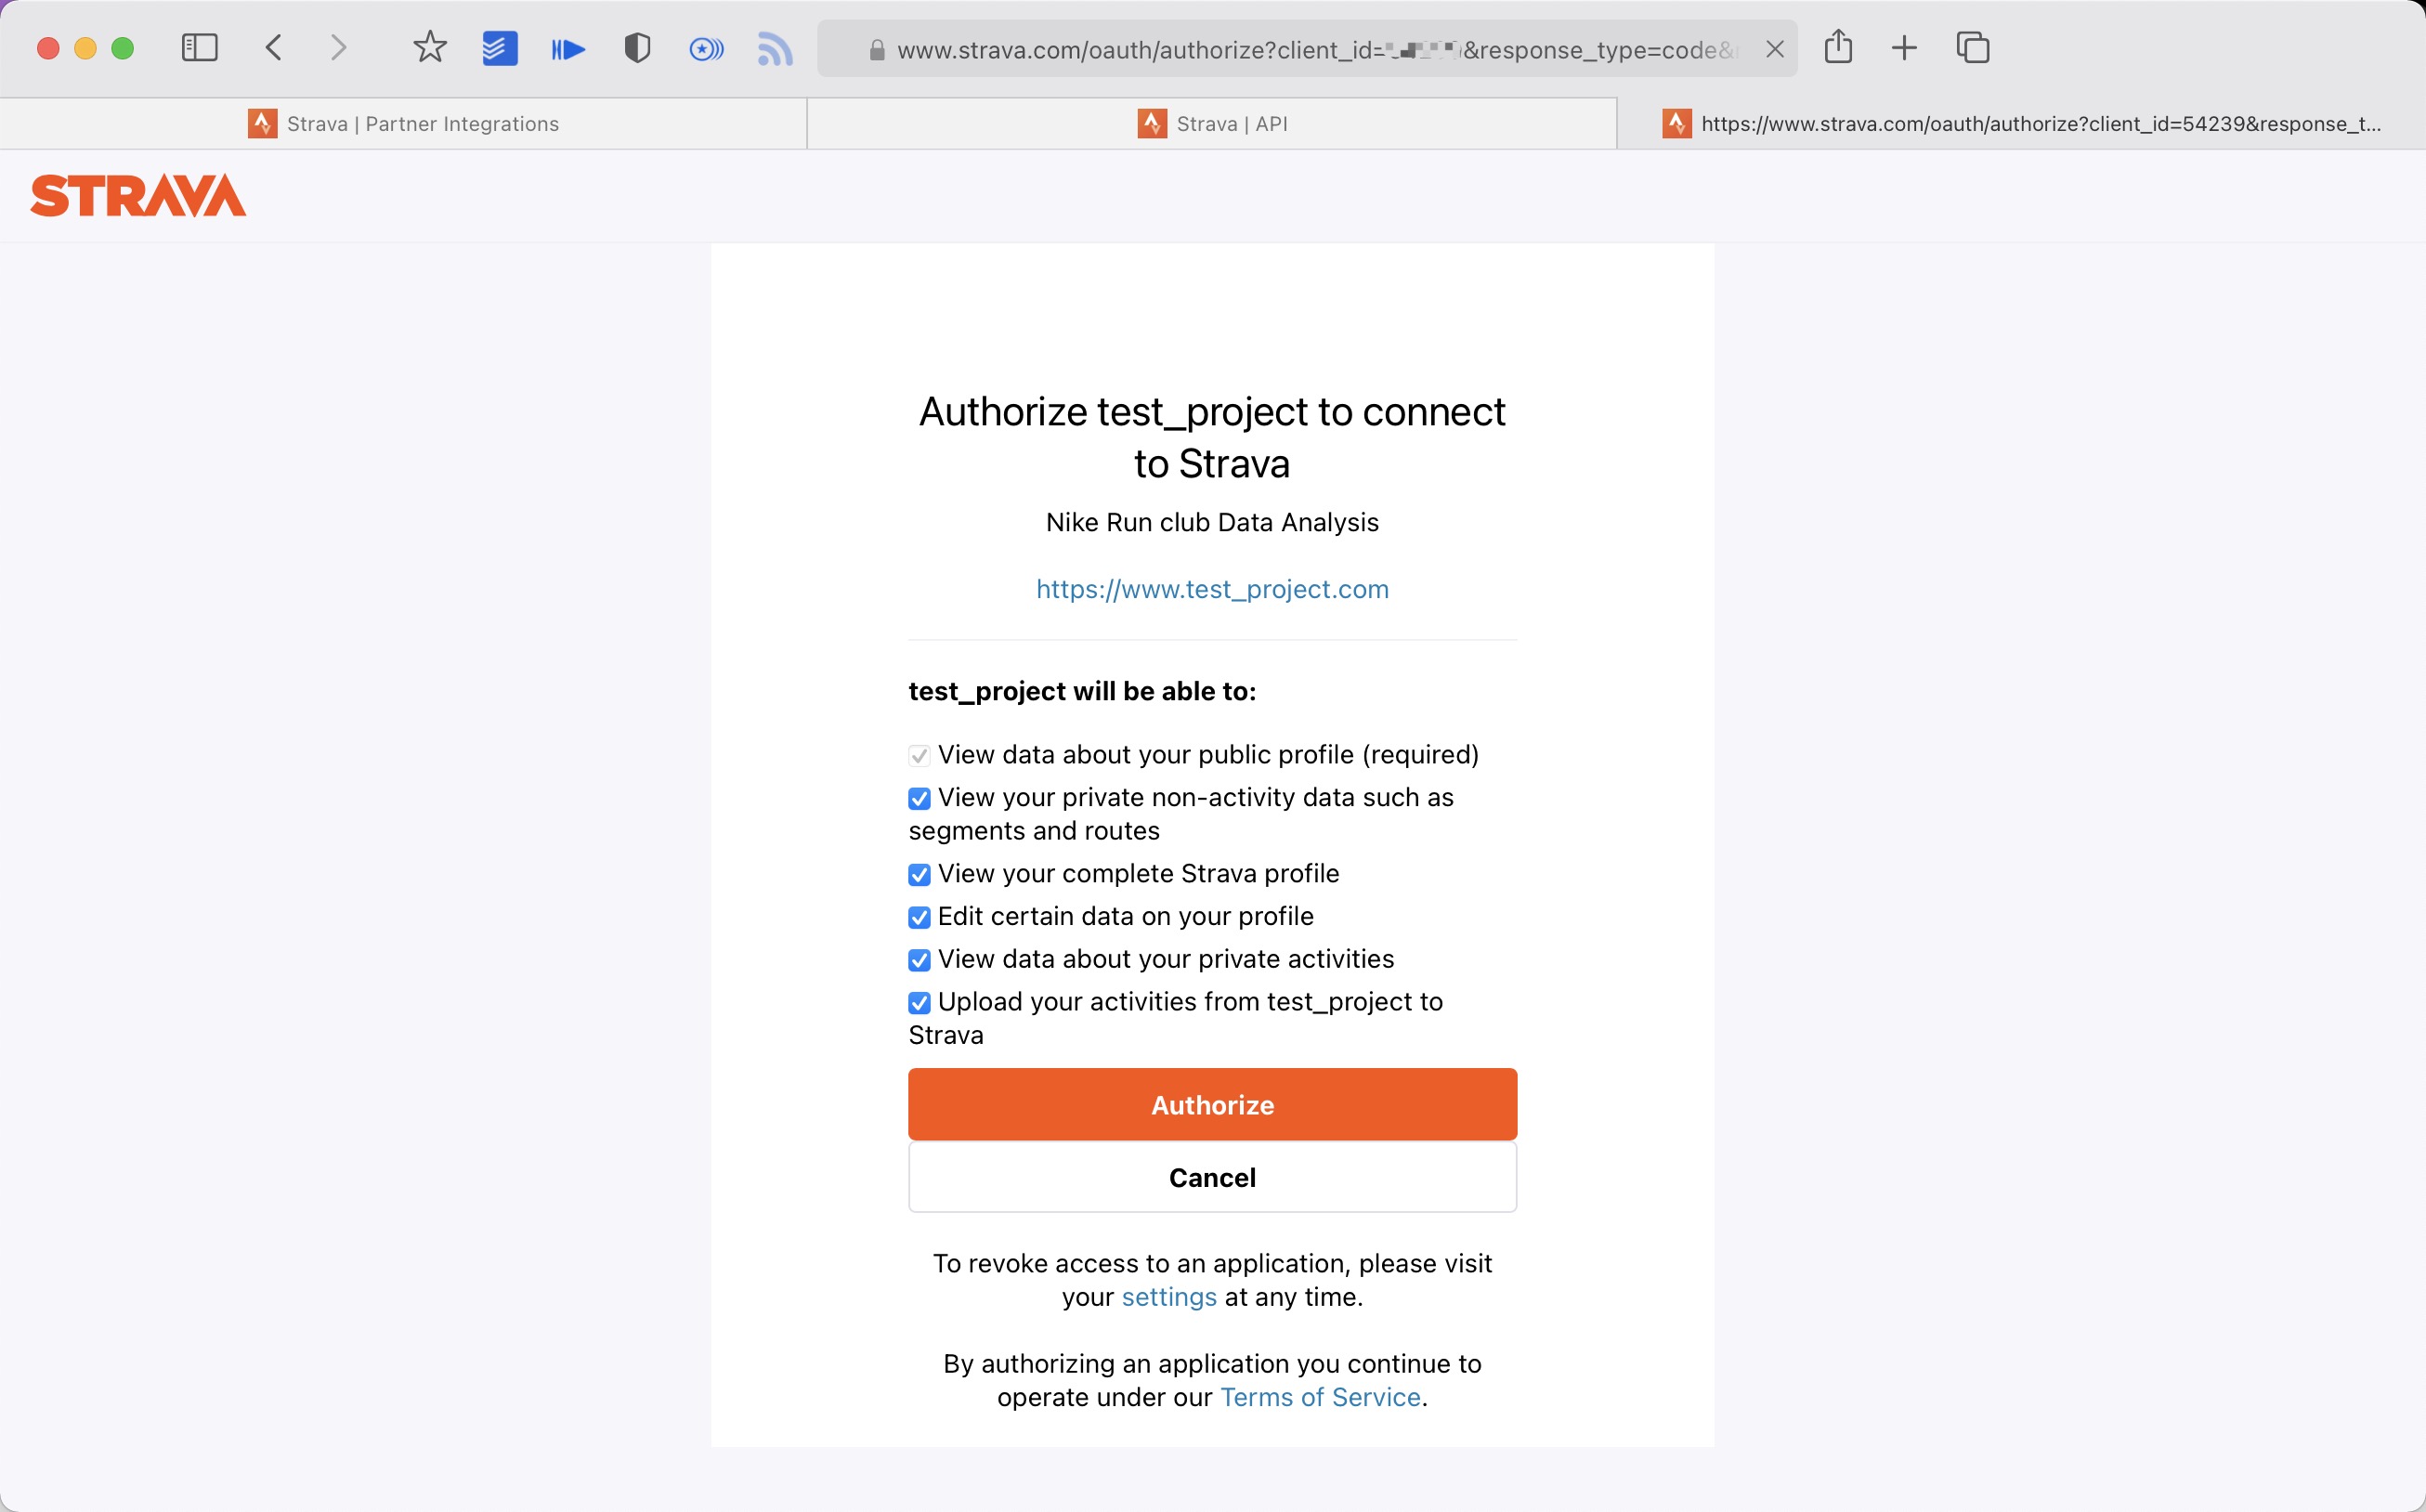
使用以下链接请求所有权限 将 ${your_id} 替换为 My API Application 中的 Client ID 后访问完整链接
https://www.strava.com/oauth/authorize?client_id=${your_id}&response_type=code&redirect_uri=http://localhost/exchange_token&approval_prompt=force&scope=read_all,profile:read_all,activity:read_all,profile:write,activity:write
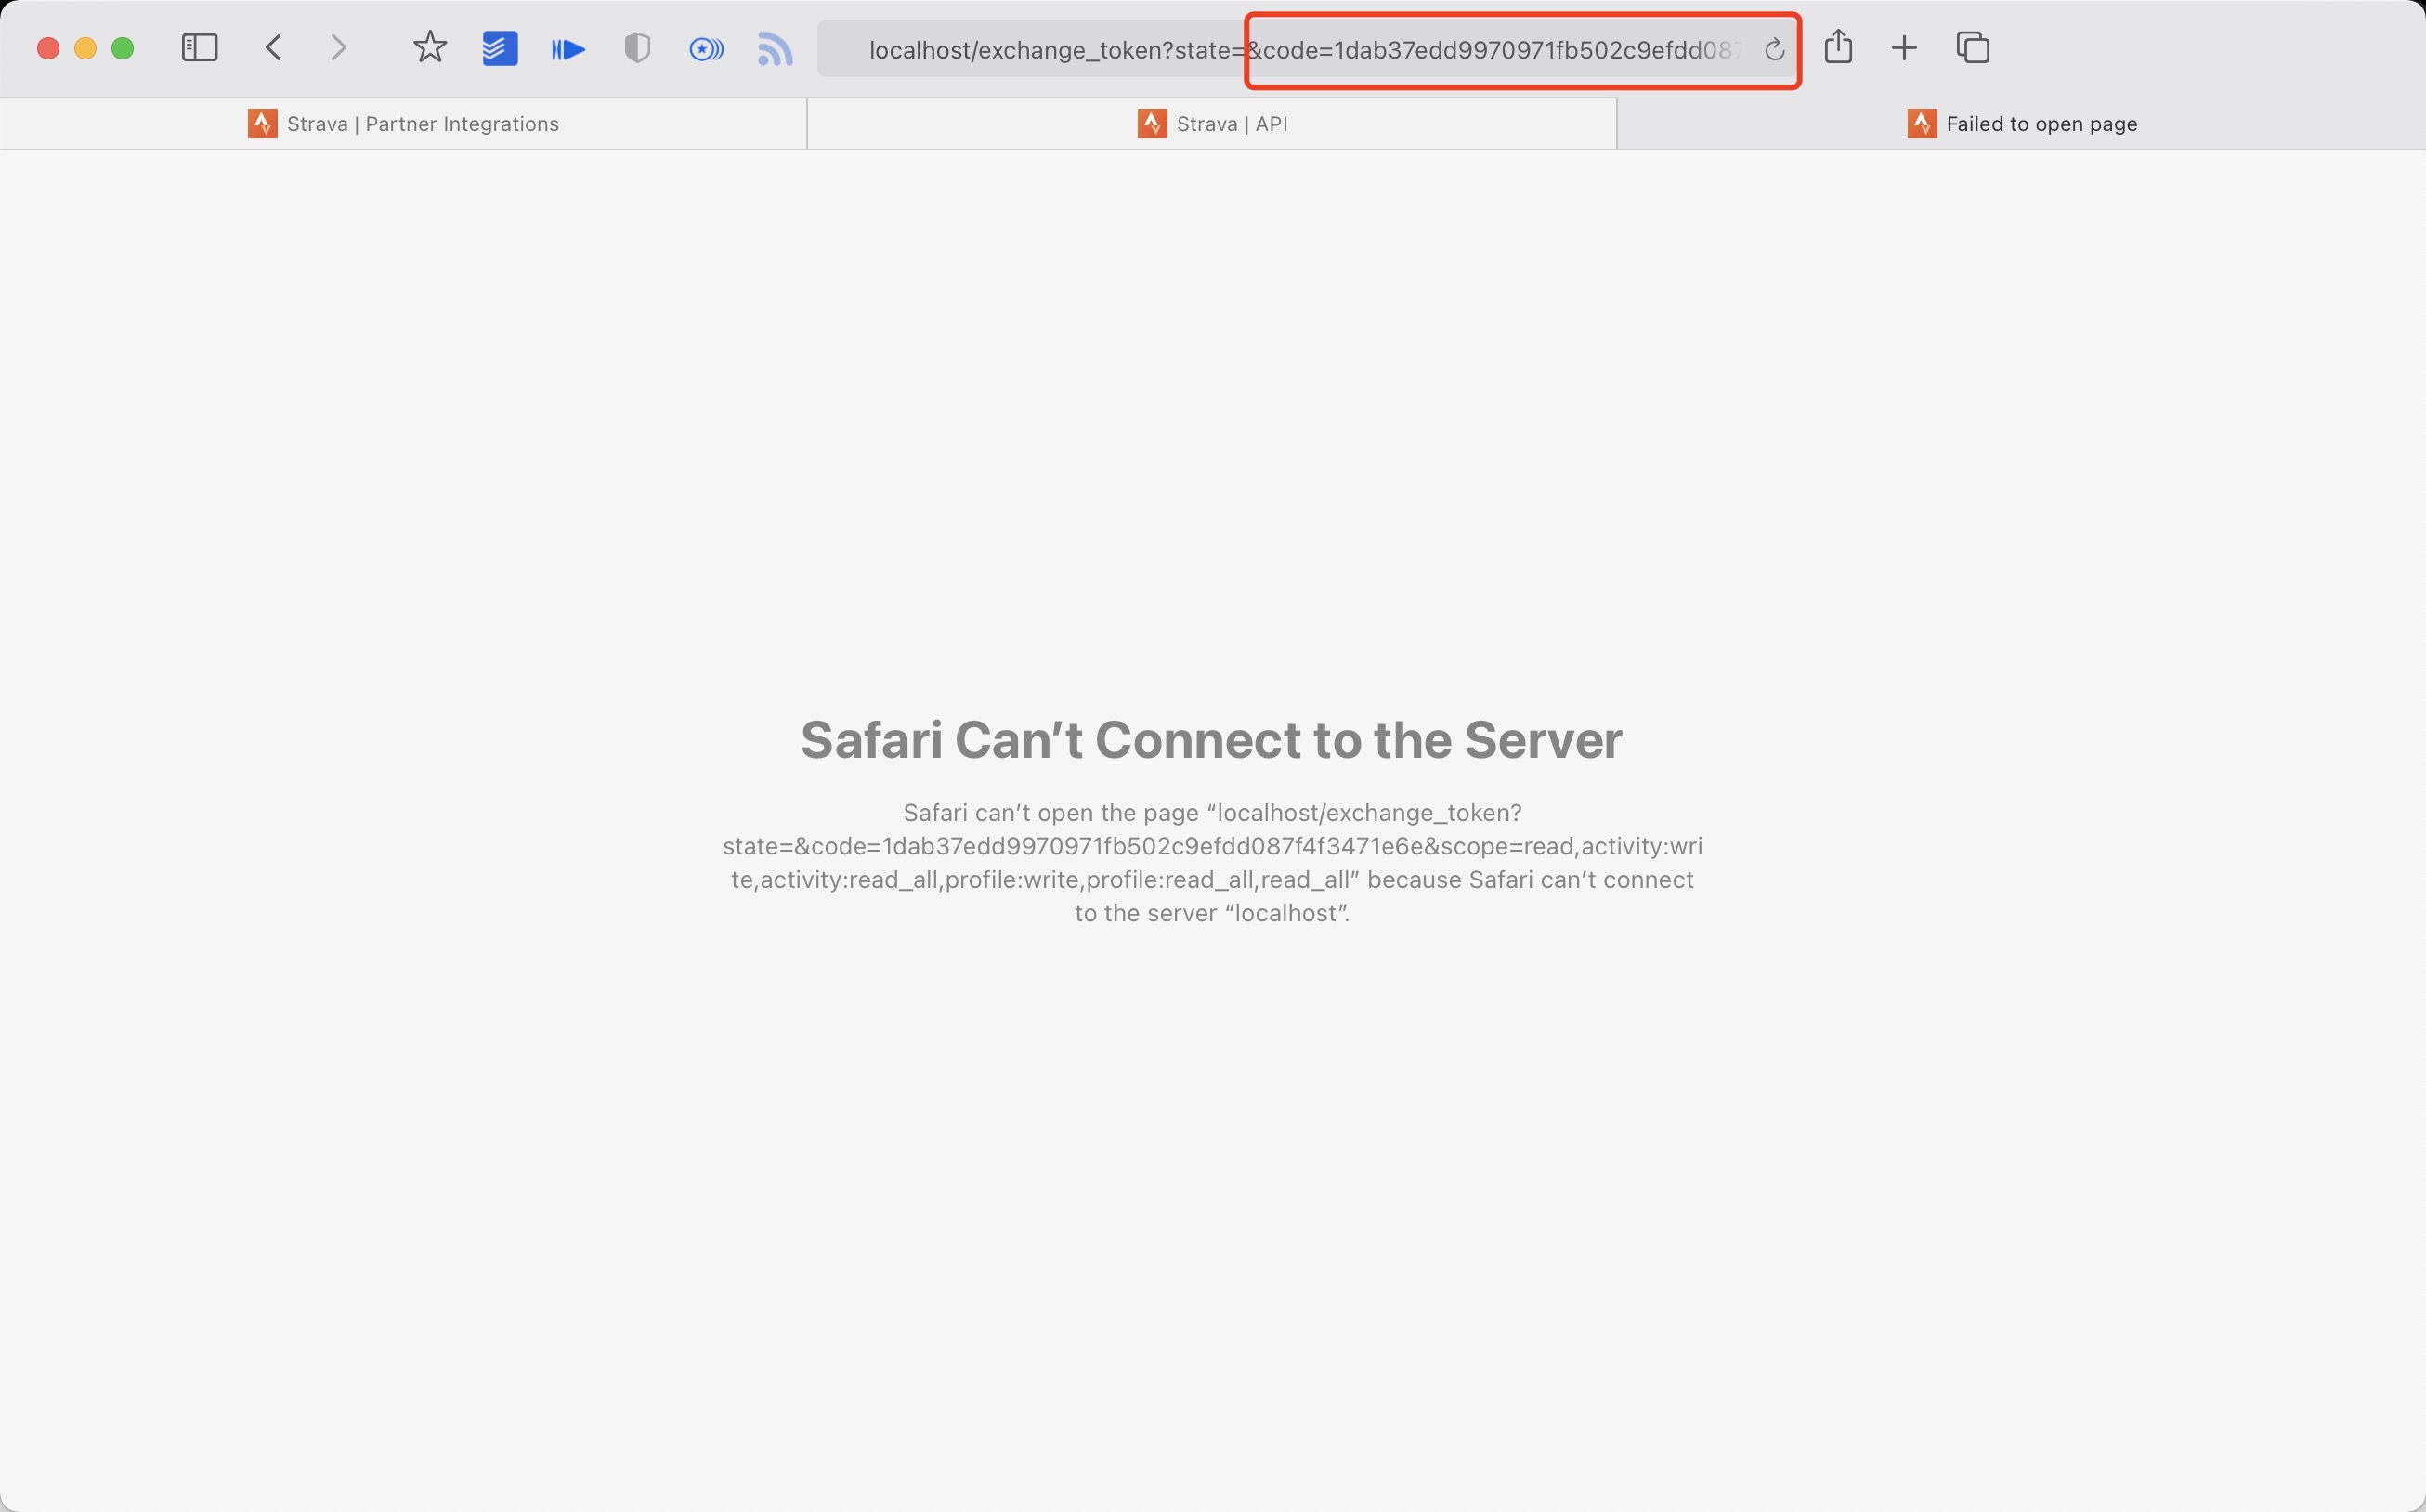
 5. 提取授权后返回链接中的 code 值
例如:
5. 提取授权后返回链接中的 code 值
例如:
http://localhost/exchange_token?state=&code=1dab37edd9970971fb502c9efdd087f4f3471e6e&scope=read,activity:write,activity:read_all,profile:write,profile:read_all,read_all
code 数值为:
1dab37edd9970971fb502c9efdd087f4f3471e6
 6. 使用
6. 使用 Client_id、Client_secret、Code 请求 refresch_token
在 终端/iTerm 中执行:
curl -X POST https://www.strava.com/oauth/token \
-F client_id=${Your Client ID} \
-F client_secret=${Your Client Secret} \
-F code=${Your Code} \
-F grant_type=authorization_code
示例:
curl -X POST https://www.strava.com/oauth/token \
-F client_id=12345 \
-F client_secret=b21******d0bfb377998ed1ac3b0 \
-F code=d09******b58abface48003 \
-F grant_type=authorization_code

- 同步数据至
Strava在项目根目录执行:
python3 -m github_poster strava --strava_client_id  ${client_id} --strava_client_secret ${client_secret} --strava_refresh_token ${refresh_token} --year 2012-2021
or pip
github_poster strava --strava_client_id  ${client_id} --strava_client_secret ${client_secret} --strava_refresh_token ${refresh_token} --year 2012-2021
NS
<details> <summary>制作您的<code>Nintendo Switch</code> GitHub海报</summary> <br>需要下载 家长控制那个 APP(Nintendo Switch Parent Controls) 进行抓包(可以使用 mitmproxy 等抓包软件)
python3 -m github_poster ns --ns_session_token ${session_token} --ns_device_id ${device_id} --year 2020-2021
or pip
github_poster ns --ns_session_token ${session_token} --ns_device_id ${device_id} --year 2020-2021
开心词场
<details> <summary>制作您的<code>开心词场</code> GitHub海报</summary> <br>需要填写开心词场的账号和密码
python3 -m github_poster cichang --cichang_user_name ${user_name} --cichang_password ${pass_word} --year 2016-2021 --special-color1 blue --special-color2 pink --me yihong0618
or
github_poster cichang --cichang_user_name ${user_name} --cichang_password ${pass_word} --year 2016-2021 --special-color1 blue --special-color2 pink --me yihong0618
多邻国
<details> <summary>制作您的<code>多邻国(duolingo)</code> GitHub海报</summary> <br>- 在浏览器中登录多邻国
- 在控制台执行
document.cookie.match(new RegExp('(^| )jwt_token=([^;]+)'))[0].slice(11)获取duolingo_jwt
python3 -m github_poster duolingo --duolingo_user_name ${duolingo_user_name} --duolingo_jwt ${duolingo_jwt} --year 2015-2021
或
github_poster duolingo --duolingo_user_name ${duolingo_user_name} --duolingo_duolingo_jwt ${duolingo_jwt} --year 2015-2021
### 扇贝
需要找到你的扇贝 user_id, 从网页抓 xhr 就可以获得如下图
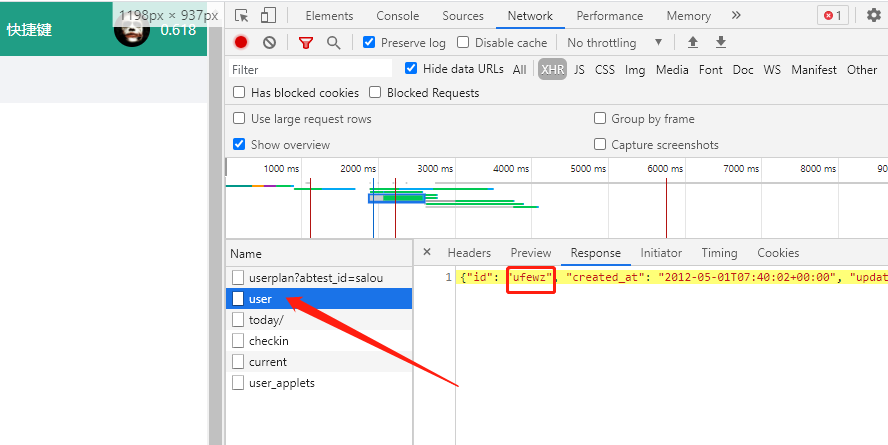
python3 -m github_poster shanbay --shanbay_user_name ${user_name} --year 2012-2021 --special-color1 '#009688' --special-color2 '#007BFF' --track-color '#ADD8E6' 或 github_poster shanbay --shanbay_user_name ${user_name} --year 2012-2021 --special-color1 '#009688' --special-color2 '#007BFF' --track-color '#ADD8E6'
### 不背单词
在设置最下方可以获得 user_id
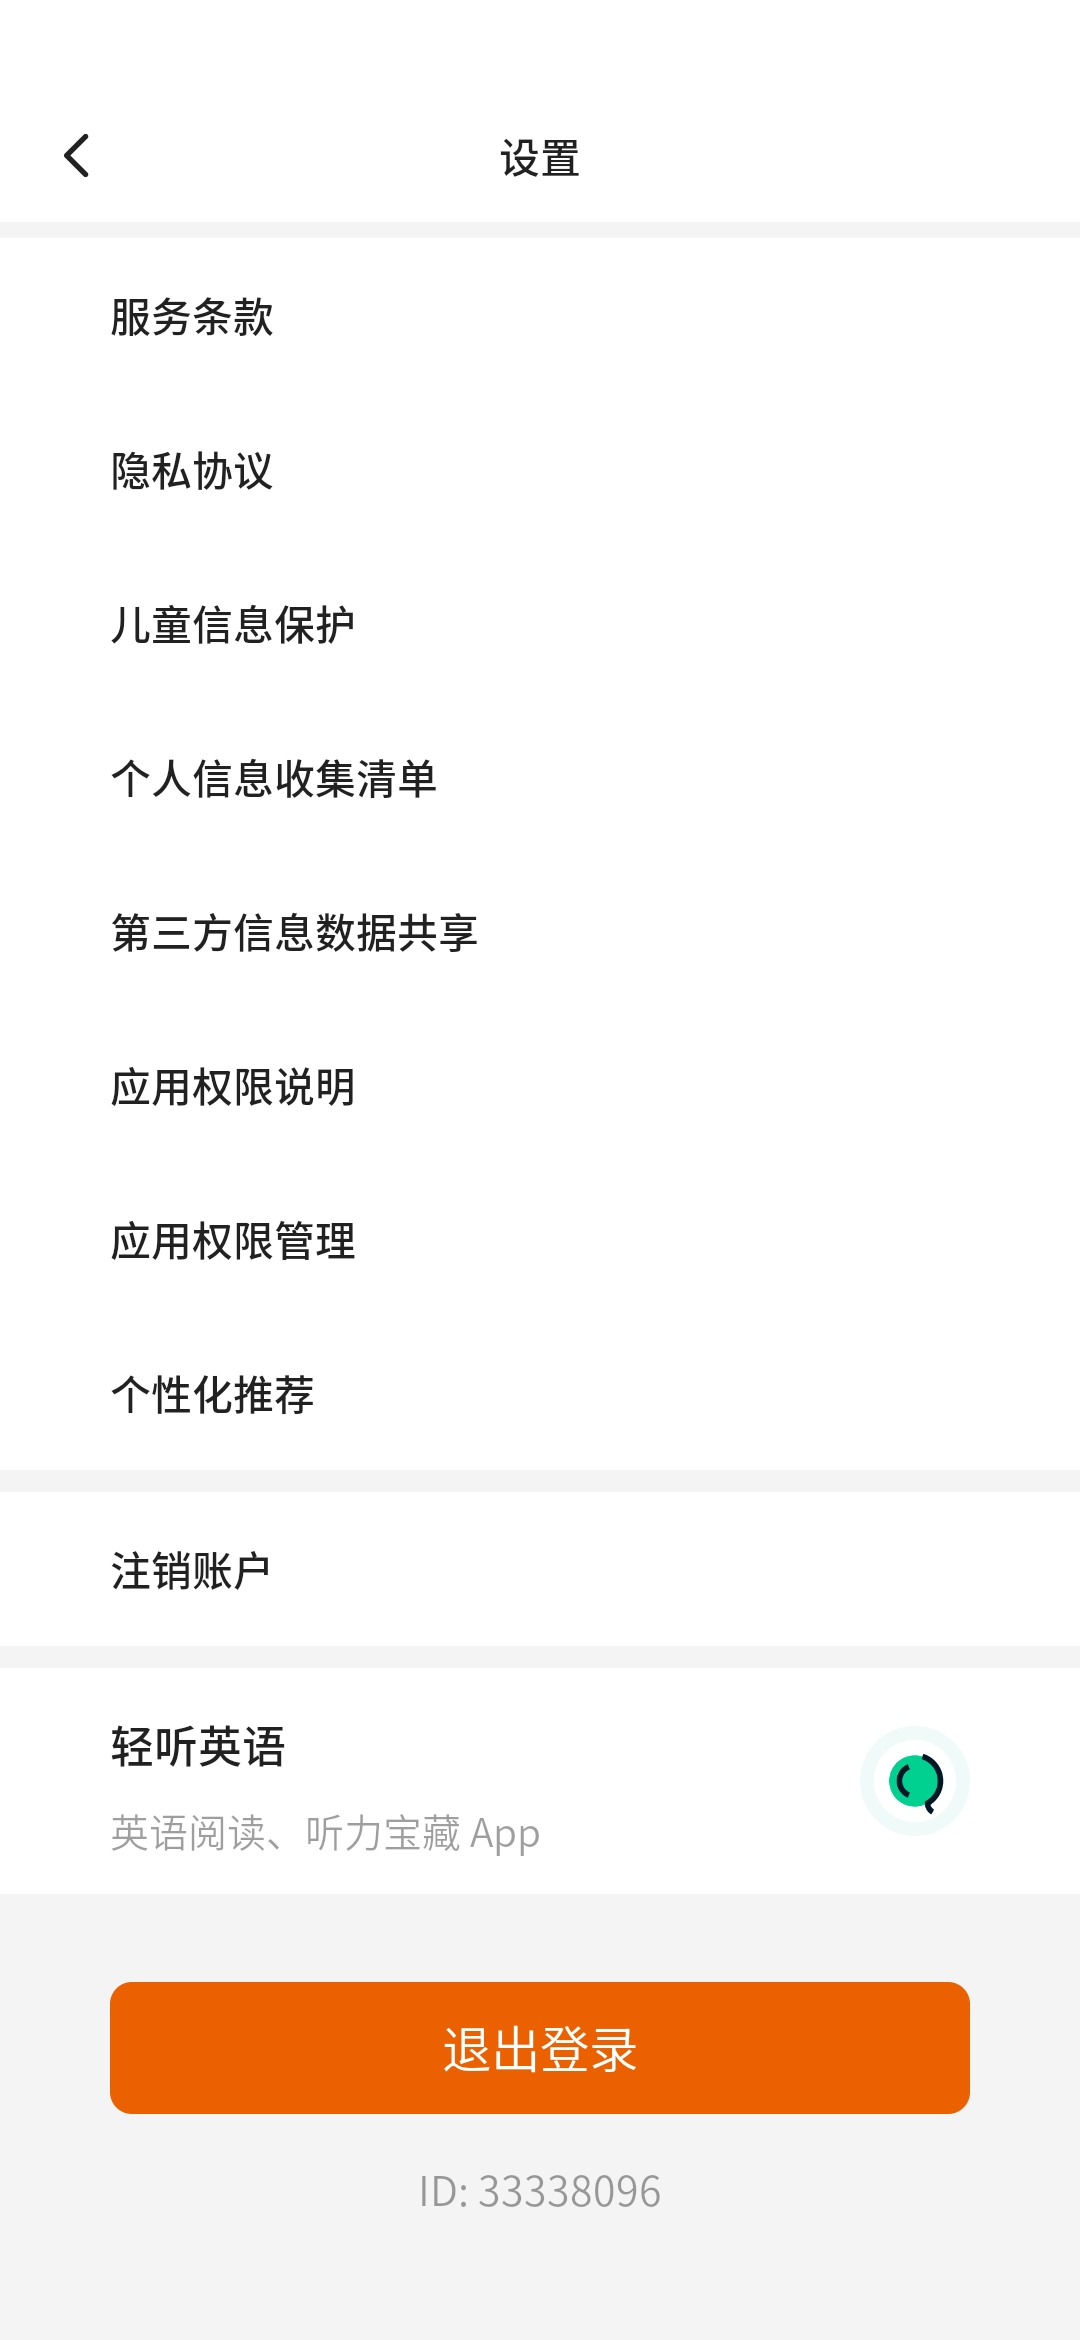
python3 -m github_poster bbdc --bbdc_user_id ${user_id} --bbdc_type ${time/word} 或 github_poster bbdc --bbdc_user_id ${user_id} --bbdc_type ${time/word}
### Issue

可以参考我的 [issue](https://github.com/yihong0618/2021/issues/5)
> 1. 确保issue中是有内容的
> 2. 内容的第一行必须是数字,因为是取的第一行的数字来进行计数的
python3 -m github_poster issue --issue_number ${issue_number} --repo_name ${repo_name} --github_token ${github_token} 或 github_poster issue --issue_number ${issue_number} --repo_name ${repo_name} --github_token ${github_token}
### LeetCode

需要找到你 `LeetCode` 的 `cookie`
python3 -m github_poster leetcode --leetcode_cookie ${leetcode_cookie} --year 2019-2021 或 github_poster leetcode --leetcode_cookie ${leetcode_cookie} --year 2019-2021
如果使用的是 leetcode-cn(leetcode 中国需要加上参数)--cn
python3 -m github_poster leetcode --leetcode_cookie ${leetcode_cookie} --year 2019-2021 --cn 或 github_poster leetcode --leetcode_cookie ${leetcode_cookie} --year 2019-2021 --cn
### Youtube

利用 Google 的[历史下载](https://takeout.google.com/settings/takeout)下载 `YouTube` 的历史数据,选择 `json` 格式,将 `watch-history.json` 拷贝到 `IN-FOLDER` 然后运行
python3 -m github_poster youtube --year 2015-2021 或 github_poster youtube --year 2015-2021
### Bilibili

需要找到你 `Bilibili (XHR)` 的 `cookie`
python3 -m github_poster bilibili --bilibili_cookie "${bilibili-cookie}" 或 github_poster bilibili --bilibili_cookie "${bilibili-cookie}"
### GitHub

需要找到你 `GitHub Name` (url 后面那个)
python3 -m github_poster github --github_user_name "${github_user_name}" --with-skyline 或 github_poster github --github_user_name "${github_user_name}" --with-skyline
### GitLab

需要找到你 `GitLab Name` (url 后面那个)
python3 -m github_poster gitlab --gitlab_user_name "${gitlab_user_name}" 或 github_poster gitlab --gitlab_user_name "${gitlab_user_name}"
如果是自己搭建的 `GitLab`,可以指定 `GitLab` 的 URL,以及登录 `GitLab` 后得到的 `_gitlab_session` 这个 `cookie`(如果需要登录的话)
python3 -m github_poster gitlab --gitlab_user_name "${gitlab_user_name}" --base_url "https://your-gitlab.com" --session "${gitlab_session}" 或 github_poster gitlab --gitlab_user_name "${gitlab_user_name}" --base_url "https://your-gitlab.com" --session "${gitlab_session}"
### Kindle

在亚马逊网站上需要找到你 [Amazon-CN](https://www.amazon.cn/) (XHR) Cookie
python3 -m github_poster kindle --kindle_cookie ${kindle_cookie} --cn --year 2018-2021 或 github_poster kindle --kindle_cookie ${kindle_cookie} --cn --year 2018-2021
### WakaTime

在 WakaTime 官网获取你的 WakaTime API Key:[WakaTime API Key](https://wakatime.com/settings/api-key)
python3 -m github_poster wakatime --wakatime_key="your_wakatime_api_key" --year 2019-2021 或 github_poster wakatime --wakatime_key="your_wakatime_api_key" --year 2019-2021
### Dota2

找到 `Dota2` 的游戏 ID,例如:`Dendi` 的 ID `70388657`
通过 `steam url/username` 查询到你的 `dota2_id` : https://steamid.xyz/
使用 `dota2_id` 取得你的游戏数据:https://api.opendota.com/api/players/{dota2_id}/matches.
更多接口信息:https://docs.opendota.com/#section/Introduction"
python3 -m github_poster dota2 --dota2_id="your dota2 id" --year 2017-2018 或 github_poster dota2 --dota2_id="your dota2 id" --year 2017-2018
### Nike
获取 Nike 的 refresh_token
**全部需要在大陆以外的全局 ip 下进行**
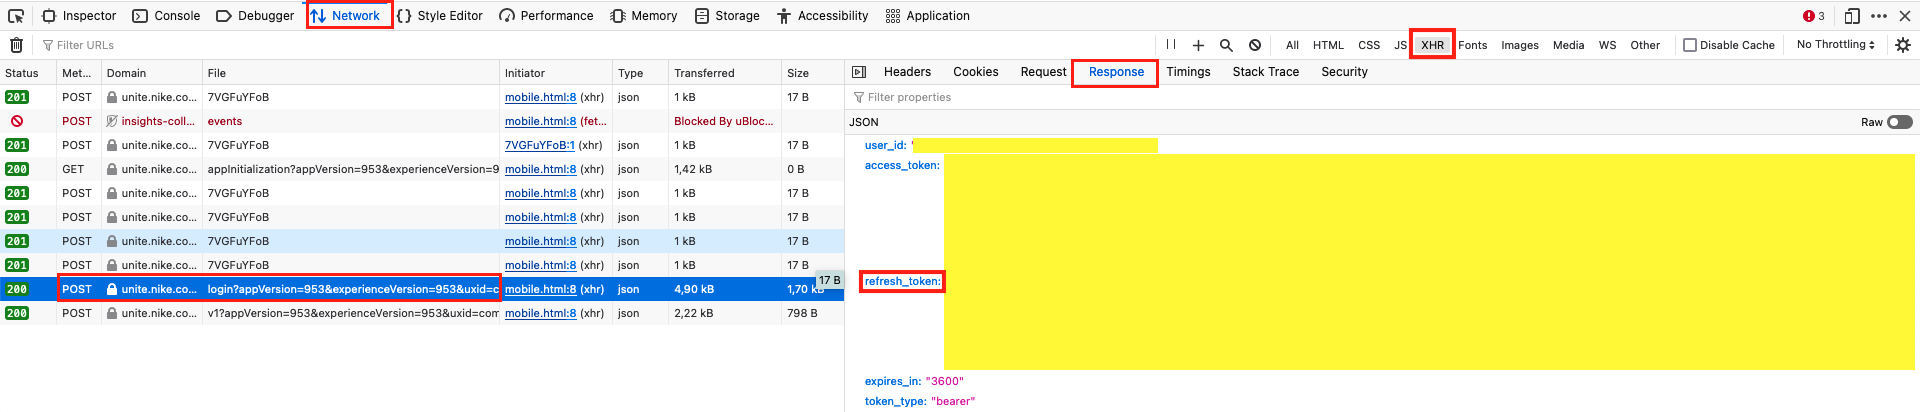
1. 在这里登陆[website](https://unite.nike.com/s3/unite/mobile.html?androidSDKVersion=3.1.0&corsoverride=https%3A%2F%2Funite.nike.com&uxid=com.nike.sport.running.droid.3.8&backendEnvironment=identity&view=login&clientId=VhAeafEGJ6G8e9DxRUz8iE50CZ9MiJMG), 打开 F12 在浏览器抓 login -> XHR -> get the `refresh_token` from login api
2. 复制 `refresh_token`
python3 -m github_poster nike --nike_refresh_token="your nike_refresh_token" --year 2012-2021 或 github_poster nike --nike_refresh_token="your nike_refresh_token" --year 2012-2021
### Notion

获取 Notion 的 `Internal Integration Token`(notion_token),查看[官方文档](https://developers.notion.com/docs/authorization#authorizing-internal-integrations)获取更多信息。

1. 登录 [Notion](https://www.notion.so/my-integrations) 开发者网站
2. 点击「New integration」添加基础信息后,创建新的 Token
3. 提交后可以看到 `Secrets` 下的 `Internal Integration Token`

获取用于生成 Poster 的 Notion 数据库 ID(database_id),查看[官方文档](https://developers.notion.com/docs/working-with-databases#adding-pages-to-a-database)获取更多信息。
- 以全屏页面打开数据库
- 复制页面链接,链接组成应该是
https://www.notion.so/{workspace_name}/{database_id}?v={view_id}这样的 - 其中
{database_id}部分即为数据库 ID
注:数据库需要添加一个属性类型为 Date 的日期属性,该属性的值将作为生成 Poster 的日期数据使用。在生成时需�将该日期属性的名称作为选项 prop_name 的值,默认值为 Datetime
python3 -m github_poster notion --notion_token="your notion_token" --database_id="your database_id" --prop_name="your prop_name"
or
github_poster notion --notion_token="your notion_token" --database_id="your database_id" --prop_name="your prop_name"
- 以全屏页面打开数据库
- 复制页面链接,链接组成应该是
https://www.notion.so/{workspace_name}/{database_id}?v={view_id}这样的 - 其中
{database_id}部分即为数据库 ID
注:数据库需要添加一个属性类型为 Date 的日期属性,该属性的值将作为生成 Poster 的日期数据使用。在生成时需将该日期属性的名称作为选项 prop_name 的值,默认值为 Datetime
python3 -m github_poster notion --notion_token="your notion_token" --database_id="your database_id" --prop_name="your prop_name"
or
github_poster notion --notion_token="your notion_token" --database_id="your database_id" --prop_name="your prop_name"
将ChatGPT官方导出的历史记录中的conversations.json,拷贝到 IN-FOLDER 然后运行(重命名为 chatgpt-history.json)
python3 -m github_poster chatgpt
or
github_poster chatgpt --me yihong0618
NeoDB
利用 NeoDB 提供的 API,可以方便地制作以标注作为数据的 GitHub Poster。
需要在 NeoDB 的开发者页面获取访问用户信息的 token。
neodb 模块需要两个参数,neodb_token 为获取到的 token,mark_type 对应 NeoDB 上标注的三种分类:complete, wishlist, progress。
python3 -m github_poster neodb --neodb_token <token> --mark_type <complete, wishlist, progress, all> --me "your name"
特别地,mark_type 也可以选择 all, 此时会将三种分类的标注都导入。
AutoSleep
导出 AutoSleep 的数据(eg. autosleep.csv)
python3 -m github_poster autosleep --autosleep_file "your csv file" --me "your name"
or
github_poster autosleep --autosleep_file "your csv file" --me "your name"
编辑推荐精选


扣子-AI办公
职场AI,就用扣子
AI办公助手,复杂任务高效处理。办公效率低?扣子空间AI助手支持播客生成、PPT制作、网页开发及报告写作,覆盖科研、商业、舆情等领域的专家Agent 7x24小时响应,生活工作无缝切换,提升50%效率!


堆友
多风格AI绘画神器
堆友平台由阿里巴巴设计团队创建,作为一款AI驱动的设计工具,专为设计师提供一站式增长服务。功能覆盖海量3D素材、AI绘画、实时渲染以及专业抠图,显著提升设计品质和效率。平台不仅提供工具,还是一个促进创意交流和个人发展的空间,界面友好,适合所有级别的设计师和创意工作者。


码上飞
零代码AI应用开发平台
零代码AI应用开发平台,用户只需一句话简单描述需求,AI能自动生成小程序�、APP或H5网页应用,无需编写代码。


Vora
免费创建高清无水印Sora视频
Vora是一个免费创建高清无水印Sora视频的AI工具


Refly.AI
最适合小白的AI自动化工作流平台
无需编码,轻松生成可复用、可变现的AI自动化工作流


酷表ChatExcel
大模型驱动的Excel数据处理工具
基于大模型交互的表格处理系统,允许用户通过对话方式完成数据整理和可视化分析。系统采用机器学习算法解析用户指令,自动执行排序、公式计算和数据透视等操作,支持多种文件格式导入导出。数据处理响应速度保持在0.8秒以内,支持超过100万行数据的即时分析。


TRAE编程
AI辅助编程,代码自动修复
Trae是一种自适应的集成开发环境(IDE),通过自动化和多元协作改变开发流程。利用Trae,团队能够更快速、精确地编写和部署代码,从而提高编程效率和项目交付速度。Trae具备上下文感知和代码自动完成功能,是提升开发效率的理想工具。


AIWritePaper论文写作
AI论文写作指导平台
AIWritePaper论文写作是一站式AI论文写作辅助工具,简化了选题、文献检索至论文撰写的整个过程。通过简单设定,平台可快速生成高质量论文大纲和全文,配合图表、参考文献等一应俱全,同时提供开题报告和答辩PPT等增值服务,保障数据安全,有效提升写作效率和论文质量。


博思AIPPT
AI一键生成PPT,就用博思AIPPT!
博思AIPPT,新一代的AI生成PPT平台,支持智能生成PPT、AI美化PPT、文本&链接生成PPT、导入Word/PDF/Markdown文档生成PPT等,内置海量精美PPT模板,涵盖商务、教育、科技等不同风格,同时针对每个页面提供多种版式,一键自适应切换,完美适配各种办公场景。


潮际好麦
AI赋能电商视觉革命,一站式智能商拍平台
潮际好麦深耕服装行业,是国内AI试衣效果最好的软件。使用先进AIGC能力为电商卖家批量提供优质的、低成本的商拍图。合作品牌有Shein、Lazada、安踏、百丽等65个国内外头部品牌,以及国内10万+淘宝、天猫、京东等主流平台的品牌商家,为卖家节省将近85%的出图成本,提升约3倍出图效率,让品牌能够快速上架。
推荐工具精选


AI云服务特惠
懂AI专属折扣关注微信公众号
最新AI工具、AI资讯
独家AI资源、AI项目落地

微信扫一扫关注公众号