
hackathon-starter
Node.js Web应用开发的全功能样板项目
Hackathon Starter是一个功能丰富的Node.js Web应用样板项目。它集成了多种认证方式、用户管理和API示例,简化了开发流程。该项目以简单易用为核心,同时保持通用性和可重用性,适用于黑客马拉松和各类Web应用开发。其详尽文档和完备功能使开发者能快速启动项目,将精力集中在核心业务逻辑上。项目特点包括本地认证、OAuth 2.0社交登录、用户账户管理、API集成示例等。它还提供了文件上传、CSRF保护、MVC结构等实用功能。Hackathon Starter旨在为开发者提供一个全面而灵活的起点,无论是用于快速原型开发还是作为学习资源,都能满足多样化的Web应用需求。


 Hackathon Starter
Live Demo: Link
Jump to What's new?
A boilerplate for Node.js web applications.
If you have attended any hackathons in the past, then you know how much time it takes to get a project started: decide on what to build, pick a programming language, pick a web framework, pick a CSS framework. A while later, you might have an initial project up on GitHub, and only then can other team members start contributing. Or how about doing something as simple as Sign in with Facebook authentication? You can spend hours on it if you are not familiar with how OAuth 2.0 works.
When I started this project, my primary focus was on simplicity and ease of use. I also tried to make it as generic and reusable as possible to cover most use cases of hackathon web apps, without being too specific. In the worst case, you can use this as a learning guide for your projects, if for example you are only interested in Sign in with Google authentication and nothing else.
Testimonials
“Nice! That README alone is already gold!”<br> — Adrian Le Bas
“Awesome. Simply awesome.”<br> — Steven Rueter
“I'm using it for a year now and many projects, it's an awesome boilerplate and the project is well maintained!”<br> — Kevin Granger
<h4 align="center">Modern Theme</h4>“Small world with Sahat's project. We were using his hackathon starter for our hackathon this past weekend and got some prizes. Really handy repo!”<br> — Interview candidate for one of the companies I used to work with.


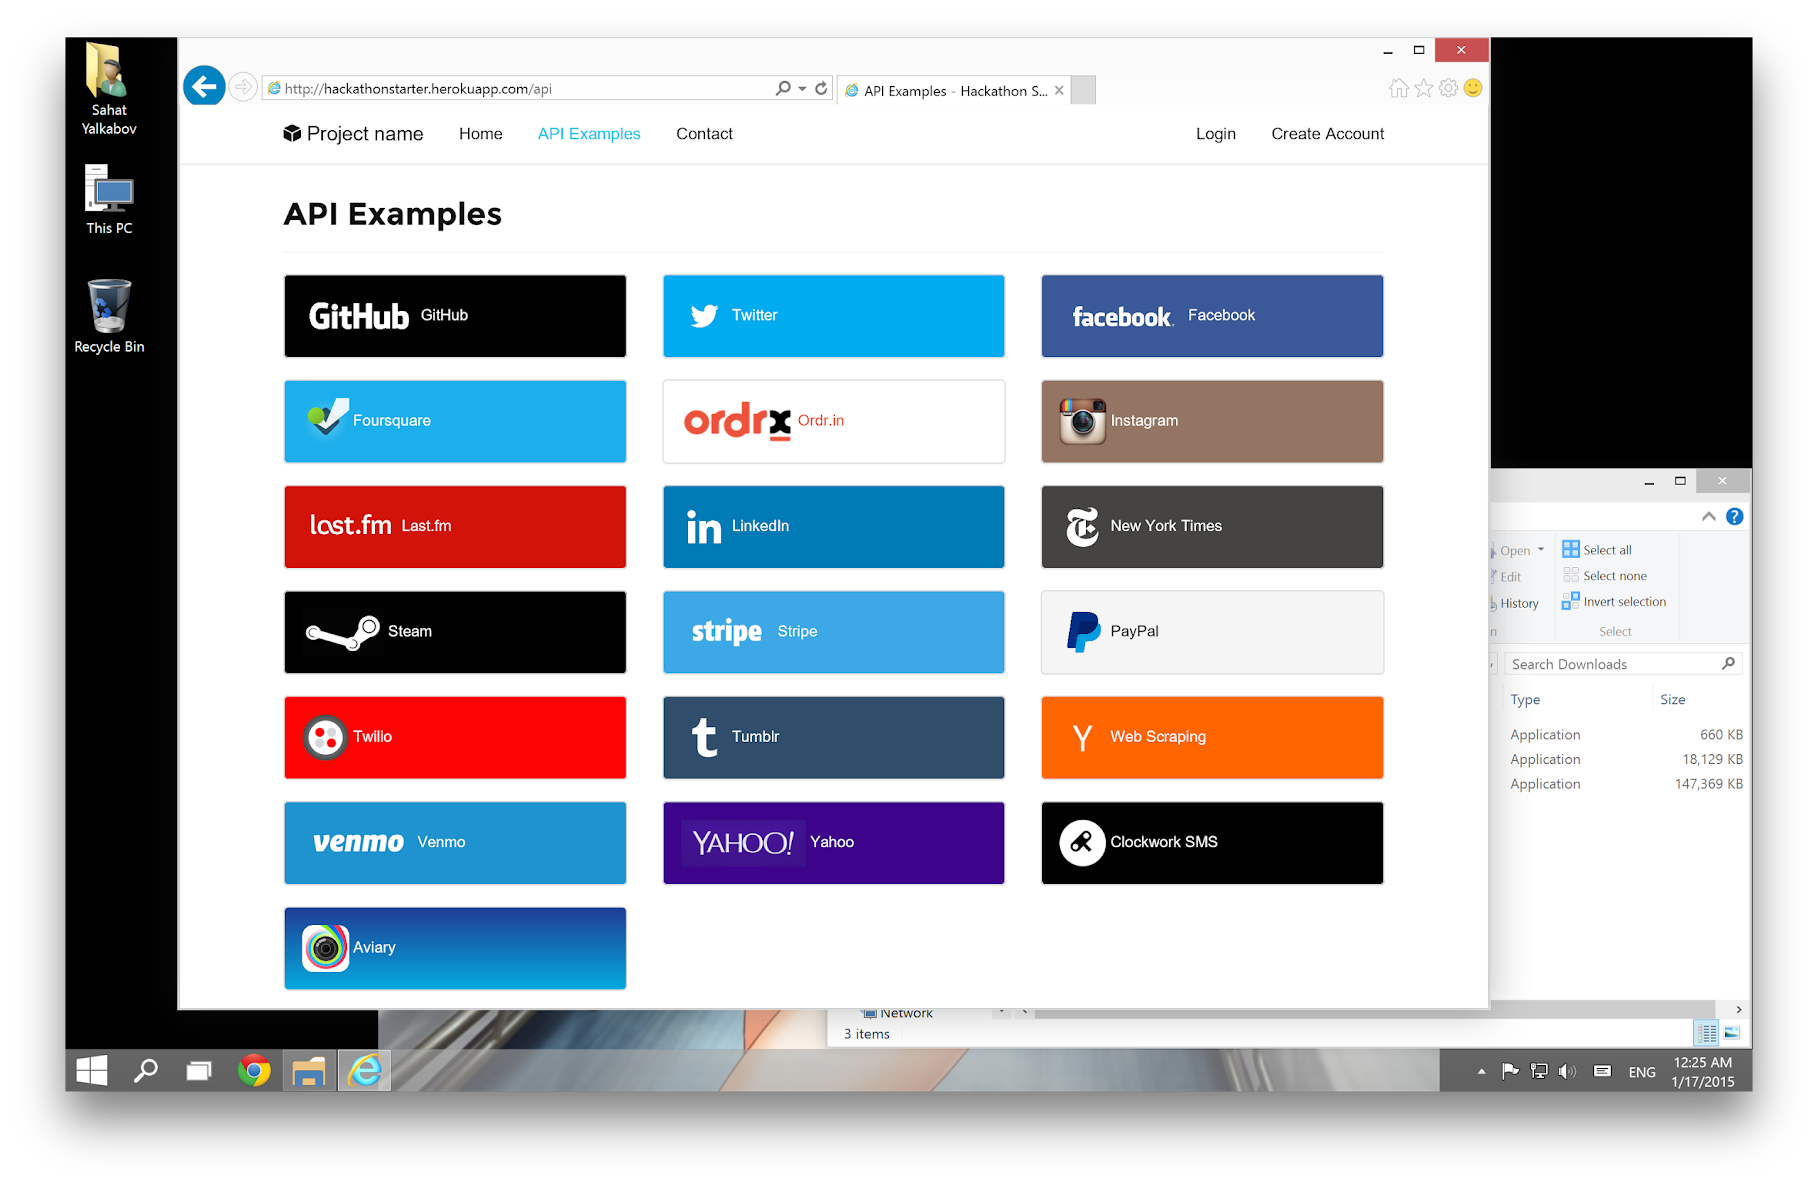
Table of Contents
- Features
- Prerequisites
- Getting Started
- Obtaining API Keys
- Project Structure
- List of Packages
- Useful Tools and Resources
- Recommended Design Resources
- Recommended Node.js Libraries
- Recommended Client-side Libraries
- Pro Tips
- FAQ
- How It Works
- Cheatsheets
- Deployment
- Docker
- Production
- Changelog
- Contributing
- License
Features
- Login
- Local Authentication using Email and Password
- OAuth 2.0 Authentication: Sign in with Google, Facebook, X (Twitter), LinkedIn, Twitch, Github, Snapchat
- User Profile and Account Management
- Gravatar
- Profile Details
- Change Password
- Forgot Password
- Reset Password
- Verify Email
- Link multiple OAuth strategies to one account
- Delete Account
- Contact Form (powered by SMTP via Sendgrid, Mailgun, AWS SES, etc.)
- File upload
- API Examples
- Facebook, Foursquare, Tumblr, Pinterest, Github, Steam, Quickbooks, Paypal, Stripe, Twilio (text messaging), Lob (USPS Mail), HERE Maps, Google Maps, Google Drive, Google Sheets, Alpha Vantage (stocks and finance info) with ChartJS, Last.fm, New York Times, Web Scraping,
- Flash notifications
-
- reCaPTCHA and rate limit protection
- CSRF protection
- MVC Project Structure
- Node.js clusters support
- HTTPS Proxy support (via ngrok, Cloudflare, etc.)
- Sass stylesheets (auto-compiled via middleware)
- Bootstrap 5
- "Go to production" checklist
Prerequisites
-
MongoDB (local install OR hosted)
- Local Install: MongoDB
- Hosted: No need to install, see the MongoDB Atlas section
-
Command Line Tools
-
<img src="https://upload.wikimedia.org/wikipedia/commons/1/1b/Apple_logo_grey.svg" height="17"> Mac OS X: Xcode (or OS X 10.9+:
xcode-select --install) -
<img src="https://upload.wikimedia.org/wikipedia/commons/8/87/Windows_logo_-_2021.svg" height="17"> Windows: Visual Studio Code + Windows Subsystem for Linux - Ubuntu OR Visual Studio
-
<img src="https://upload.wikimedia.org/wikipedia/commons/thumb/9/9e/UbuntuCoF.svg/512px-UbuntuCoF.svg.png?20120210072525" height="17"> Ubuntu / <img src="https://upload.wikimedia.org/wikipedia/commons/3/3f/Linux_Mint_logo_without_wordmark.svg" height="17"> Linux Mint:
sudo apt-get install build-essential -
<img src="https://upload.wikimedia.org/wikipedia/commons/3/3f/Fedora_logo.svg" height="17"> Fedora:
sudo dnf groupinstall "Development Tools" -
<img src="https://en.opensuse.org/images/b/be/Logo-geeko_head.png" height="17"> OpenSUSE:
sudo zypper install --type pattern devel_basis
Note: If you are new to Node or Express, you may find Node.js & Express From Scratch series helpful for learning the basics of Node and Express. Alternatively, here is another great tutorial for complete beginners - Getting Started With Node.js, Express, MongoDB.
Getting Started
Step 1: The easiest way to get started is to clone the repository:
# Get the latest snapshot
git clone https://github.com/sahat/hackathon-starter.git myproject

# Change directory
cd myproject

# Install NPM dependencies
npm install

# Then simply start your app
node app.js
Note: I highly recommend installing Nodemon. It watches for any changes in your node.js app and automatically restarts the server. Once installed, instead of node app.js use nodemon app.js. It will
save you a lot of time in the long run, because you won't need to manually restart the server each time you make a small change in code. To install, run sudo npm install -g nodemon.
Step 2: Obtain API Keys and change configs if needed After completing step 1 and locally installing MongoDB, you should be able to access the application through a web browser and use local user accounts. However, certain functions like API integrations may not function correctly until you obtain specific keys from service providers. The keys provided in the project serve as placeholders, and you can retain them for features you are not currently utilizing. To incorporate the acquired keys into the application, you have two options:
- Set environment variables in your console session: Alternatively, you can set the keys as environment variables directly through the command prompt. For instance, in bash, you can use the
exportcommand like this:export FACEBOOK_SECRET=xxxxxx. This method is considered a better practice as it reduces the risk of accidentally including your secrets in a code repository. - Replace the keys in the
.env.examplefile: Open the.env.examplefile and update the placeholder keys with the newly acquired ones. This method has the risk of accidental checking-in of your secrets to code repos.
What to get and configure:
-
SMTP
- For user workflows for reset password and verify email
- For contact form processing
-
reCAPTCHA
- For contact form submission
-
OAuth for social logins (Sign in with / Login with)
- Depending on your application need, obtain keys from Google, Facebook, X (Twitter), LinkedIn, Twitch, GitHub, Snapchat. You don't have to obtain valid keys for any provider that you don't need. Just remove the buttons and links in the login and account pug views before your demo.
-
API keys for service providers in the API Examples if you are planning to use them.
-
MongoDB Atlas
- If you are using MongoDB Atlas instead of a local db, set the MONGODB_URI to your db URI (including your db user/password).
-
Email address
- Set SITE_CONTACT_EMAIL as your incoming email address for messages sent to you thru the contact form.
- Set TRANSACTION_EMAIL as the "From" address for emails sent to users thru the lost password or email verification emails to users. You may set this to the same address as SITE_CONTACT_EMAIL.
-
ngrok and HTTPS If you want to use some API that needs HTTPS to work (for example Pinterest or Facebook), you will need to download ngrok. Start ngrok, set your BASE_URL to the forwarding address (i.e
https://3ccb-1234-abcd.ngrok-free.app), and use the forwarding address to access your application. If you are using a proxy like ngrok, you may get a CSRF mismatch error if you try to access the app athttp://localhost:8080instead of the https://...ngrok-free.app address.After installing or downloading the standalone ngrok client you can start ngrok to intercept the data exchanged on port 8080 with
./ngrok http 8080in Linux orngrok http 8080in Windows.
Step 3: Develop your application and customize the experience
- Check out How It Works
Step 4: Optional - deploy to production See:
Obtaining API Keys
You will need to obtain appropriate credentials (Client ID, Client Secret, API Key, or Username & Password) for API and service provides which you need. See Step 2 in the Getting started section for more info.
SMTP
Obtain SMTP credentials from a provider for transactional emails. Set the SMTP_USER, SMTP_PASSWORD, and SMTP_HOST environment variables accordingly. When picking the smtp host, keep in mind that the app is configured to use secure SMTP transmissions over port 465 out of the box. You have the flexibility to select any provider that suits your needs or take advantage of one of the following providers, each offering a free tier for your convenience.
| Provider | Free Tier | Website |
|---|---|---|
| SendGrid | 100 emails/day for free | https://sendgrid.com |
| SMTP2Go | 1000 emails/month for free | https://www.smtp2go.com |
| Brevo | 300 emails/day for free | https://www.brevo.com |
- Visit <a href="https://www.google.com/recaptcha/admin" target="_blank">Google reCAPTCHA Admin Console</a>
- Enter your application's name as the Label
- Choose reCAPTCHA v2, "I'm not a robot" Checkbox
- Enter localhost as the domain. You can have other domains added in addition to localhost
- Accept the terms and submit the form
- Copy the Site Key and the Secret key into
.env. These keys will be accessible under Settings, reCAPTCHA keys drop down if you need them again later
- Visit <a href="https://cloud.google.com/console/project" target="_blank">Google Cloud Console</a>
- Click on the Create Project button
- Enter Project Name, then click on Create button
- Then click on APIs & auth in the sidebar and select API tab
- Click on Google+ API under Social APIs, then click Enable API
- Click on Google Drive API under G Suite, then click Enable API
- Click on Google Sheets API under G Suite, then click Enable API
- Next, under APIs & auth in the sidebar click on Credentials tab
- Click on Create new Client ID button
- Select Web Application and click on Configure Consent Screen
- Fill out the required fields then click on Save
- In the Create Client ID modal dialog:
- Application Type: Web Application
- Authorized Javascript origins: set to your BASE_URL value (i.e.
http://localhost:8080, etc) - Authorized redirect URI: set to your BASE_URL value followed by /auth/google/callback (i.e.
http://localhost:8080/auth/google/callback) - Click on Create Client ID button
- Copy and paste Client ID and Client secret keys into
.env
- Visit <a href="https://kit.snapchat.com/portal" target="_blank">Snap Kit Developer Portal</a>
- Click on the + button to create an app
- Enter a name for your app
- Enable the scopes that you will want to use in your app
- Click on the Continue button
- Find the Kits section and make sure that Login Kit is enabled
- Find the Redirect URLs section, click the + Add button, and enter your BASE_URL value followed by /auth/snapchat/callback (i.e.
http://localhost:8080/auth/snapchat/callback) - Find the Development Environment section. Click the Generate button next to the Confidential OAuth2 Client heading within it.
- Copy and paste the generated Private Key and OAuth2 Client ID keys into
.env - Note: OAuth2 Client ID is SNAPCHAT_ID, Private Key is SNAPCHAT_SECRET in
.env - To prepare the app for submission, fill out the rest of the required fields: Category, Description, Privacy Policy Url, and App Icon
- Visit <a href="https://developers.facebook.com/" target="_blank">Facebook Developers</a>
- Click My Apps, then select *Add a New App from the dropdown menu
- Enter a new name for your app
- Click on the Create App ID button
- Find the Facebook Login Product and click on Facebook Login
- Instead of going through their Quickstart, click on Settings for your app in the top left corner
- Copy and paste App ID and App Secret keys into
.env - Note: App ID is FACEBOOK_ID, App Secret is FACEBOOK_SECRET in
.env - Enter
localhostunder App Domains - Choose a Category that best describes your app
- Click on + Add Platform and select Website
- Enter your BASE_URL value (i.e.
http://localhost:8080, etc) under Site URL - Click on the Settings tab in the left nav under Facebook Login
- Enter your BASE_URL value followed by /auth/facebook/callback (i.e.
http://localhost:8080/auth/facebook/callback
编辑推荐精选


扣子-AI办公
职场AI,就用扣子
AI办公助手,复杂任务高效处理。办公效率低?扣子空间AI助手支持播客生成、PPT制作、网页开发及报告写作,覆盖科研、商业、舆情等领域的专家Agent 7x24小时响应,生活工作无缝切换,提升50%效率!


堆友
多风格AI绘画神器
堆友平台由阿里巴巴设计团队创建,作为一款AI驱动的设计工具,专为设计师提供一站式增长服务。功能覆盖海量3D素材、AI绘画、实时渲染以及专业抠图,显著提升设计品质和效率。平台不仅提供工具,还是一个促进创意交流和个人发展的空间,界面友好,适合所有级别的设计师和创意工作者。


码上飞
零代码AI应用开发平台
零代码AI应用开发平台,用户只需一句话简单描述需求,AI能自动生成小程序、APP或H5网页应用,无需编写代码。


Vora
免费创建高清无水印Sora视频
Vora是一个免费创建高清��无水印Sora视频的AI工具


Refly.AI
最适合小白的AI自动化工作流平台
无需编码,轻松生成可复用、可变现的AI自动化工作流


酷表ChatExcel
大模型驱动的Excel数据处理工具
基于大模型交互的表格处理系统,允许用户通过对话方式完成数据整理和可视化分析。系统采用机器学习算法解析用户指令,自动执行排序、公式计算和数据透视等操作,支持多种文件格式导入导出。数据处理响应速度保持在0.8秒以内,支持超过100万行数据的即时分析。


TRAE编程
AI辅助编程,代码自动修复
Trae是一种自适应的集成开发环境(IDE),通过自动化和多元协作改变开发流程。利用Trae,团队能够更快速、精确地编写和部署代码,从而提高编程效率和项目交付速度。Trae具备上下文感知和代码自动完成功能,是提升开发效率的理想工具。


AIWritePaper论文写作
AI论文写作指导平台
AIWritePaper论文写作是一站式AI论文写作辅助工具,简化了选题、文献检索至论文撰写的整个过程。通过简单设定,平台可快速生成高质量论文大纲和全文,配合图表、参考文献等一应俱全,同时提供开题报告和答辩PPT等增值服务,保障数据安全,有效提升写作效率和论文质量。


博思AIPPT
AI一键生成PPT,就用博思AIPPT!
博思AIPPT,新一代的AI生成PPT平台,支持智能生成PPT、AI美化PPT、文本&链接生成PPT、导入Word/PDF/Markdown文档生成PPT等,内置海量精美PPT模板,涵盖商务、教育、科技等不同风格,同时针对每个页面提供多种版式,一键自适应切换,完美适配各种办公场景。


潮际好麦
AI赋能电商视觉革命,一站式智能商拍平台
潮际好麦深耕服装行业,是国内AI试衣效果最好的软件。使用先进AIGC能力为电商卖家批量提供优质的、低成本的商拍图。合作品牌有Shein、Lazada、安踏、百丽等65个国内外头部品牌,以及国内10万+淘宝、天猫、京东等主流平台的品牌商家,为卖家节省将近85%的出图成本,提升约3倍出图效率,让品牌能够快速上架。
推荐工具精选


AI云服务特惠
懂AI专属折扣关注微信公众号
最新AI工具、AI资讯
独家AI资源、AI项目落地

微信扫一扫关注公众号