


![]()
![]()

![]()
![]() <a href="https://github.com/Solido/awesome-flutter">
<img alt="Awesome Flutter" src="https://img.shields.io/badge/Awesome-Flutter-blue.svg?longCache=true&style=flat-square" />
</a>
<a href="https://www.buymeacoffee.com/jonataslaw" target="_blank"><img src="https://i.imgur.com/aV6DDA7.png" alt="Buy Me A Coffee" style="height: 41px !important;width: 174px !important; box-shadow: 0px 3px 2px 0px rgba(190, 190, 190, 0.5) !important;-webkit-box-shadow: 0px 3px 2px 0px rgba(190, 190, 190, 0.5) !important;" > </a>
<a href="https://github.com/Solido/awesome-flutter">
<img alt="Awesome Flutter" src="https://img.shields.io/badge/Awesome-Flutter-blue.svg?longCache=true&style=flat-square" />
</a>
<a href="https://www.buymeacoffee.com/jonataslaw" target="_blank"><img src="https://i.imgur.com/aV6DDA7.png" alt="Buy Me A Coffee" style="height: 41px !important;width: 174px !important; box-shadow: 0px 3px 2px 0px rgba(190, 190, 190, 0.5) !important;-webkit-box-shadow: 0px 3px 2px 0px rgba(190, 190, 190, 0.5) !important;" > </a>
Languages:
- About Get
- Installing
- Counter App with GetX
- The Three pillars
- Utils
- Breaking changes from 2.0
- Why Getx?
- Community
About Get
-
GetX is an extra-light and powerful solution for Flutter. It combines high-performance state management, intelligent dependency injection, and route management quickly and practically.
-
GetX has 3 basic principles. This means that these are the priority for all resources in the library: PRODUCTIVITY, PERFORMANCE AND ORGANIZATION.
-
PERFORMANCE: GetX is focused on performance and minimum consumption of resources. GetX does not use Streams or ChangeNotifier.
-
PRODUCTIVITY: GetX uses an easy and pleasant syntax. No matter what you want to do, there is always an easier way with GetX. It will save hours of development and will provide the maximum performance your application can deliver.
Generally, the developer should be concerned with removing controllers from memory. With GetX this is not necessary because resources are removed from memory when they are not used by default. If you want to keep it in memory, you must explicitly declare "permanent: true" in your dependency. That way, in addition to saving time, you are less at risk of having unnecessary dependencies on memory. Dependency loading is also lazy by default.
-
ORGANIZATION: GetX allows the total decoupling of the View, presentation logic, business logic, dependency injection, and navigation. You do not need context to navigate between routes, so you are not dependent on the widget tree (visualization) for this. You don't need context to access your controllers/blocs through an inheritedWidget, so you completely decouple your presentation logic and business logic from your visualization layer. You do not need to inject your Controllers/Models/Blocs classes into your widget tree through
MultiProviders. For this, GetX uses its own dependency injection feature, decoupling the DI from its view completely.With GetX you know where to find each feature of your application, having clean code by default. In addition to making maintenance easy, this makes the sharing of modules something that until then in Flutter was unthinkable, something totally possible. BLoC was a starting point for organizing code in Flutter, it separates business logic from visualization. GetX is a natural evolution of this, not only separating the business logic but the presentation logic. Bonus injection of dependencies and routes are also decoupled, and the data layer is out of it all. You know where everything is, and all of this in an easier way than building a hello world. GetX is the easiest, practical, and scalable way to build high-performance applications with the Flutter SDK. It has a large ecosystem around it that works perfectly together, it's easy for beginners, and it's accurate for experts. It is secure, stable, up-to-date, and offers a huge range of APIs built-in that are not present in the default Flutter SDK.
-
-
GetX is not bloated. It has a multitude of features that allow you to start programming without worrying about anything, but each of these features are in separate containers and are only started after use. If you only use State Management, only State Management will be compiled. If you only use routes, nothing from the state management will be compiled.
-
GetX has a huge ecosystem, a large community, a large number of collaborators, and will be maintained as long as the Flutter exists. GetX too is capable of running with the same code on Android, iOS, Web, Mac, Linux, Windows, and on your server. It is possible to fully reuse your code made on the frontend on your backend with Get Server.
In addition, the entire development process can be completely automated, both on the server and on the front end with Get CLI.
In addition, to further increase your productivity, we have the extension to VSCode and the extension to Android Studio/Intellij
Installing
Add Get to your pubspec.yaml file:
dependencies:
  get:
Import get in files that it will be used:
import 'package:get/get.dart';
Counter App with GetX
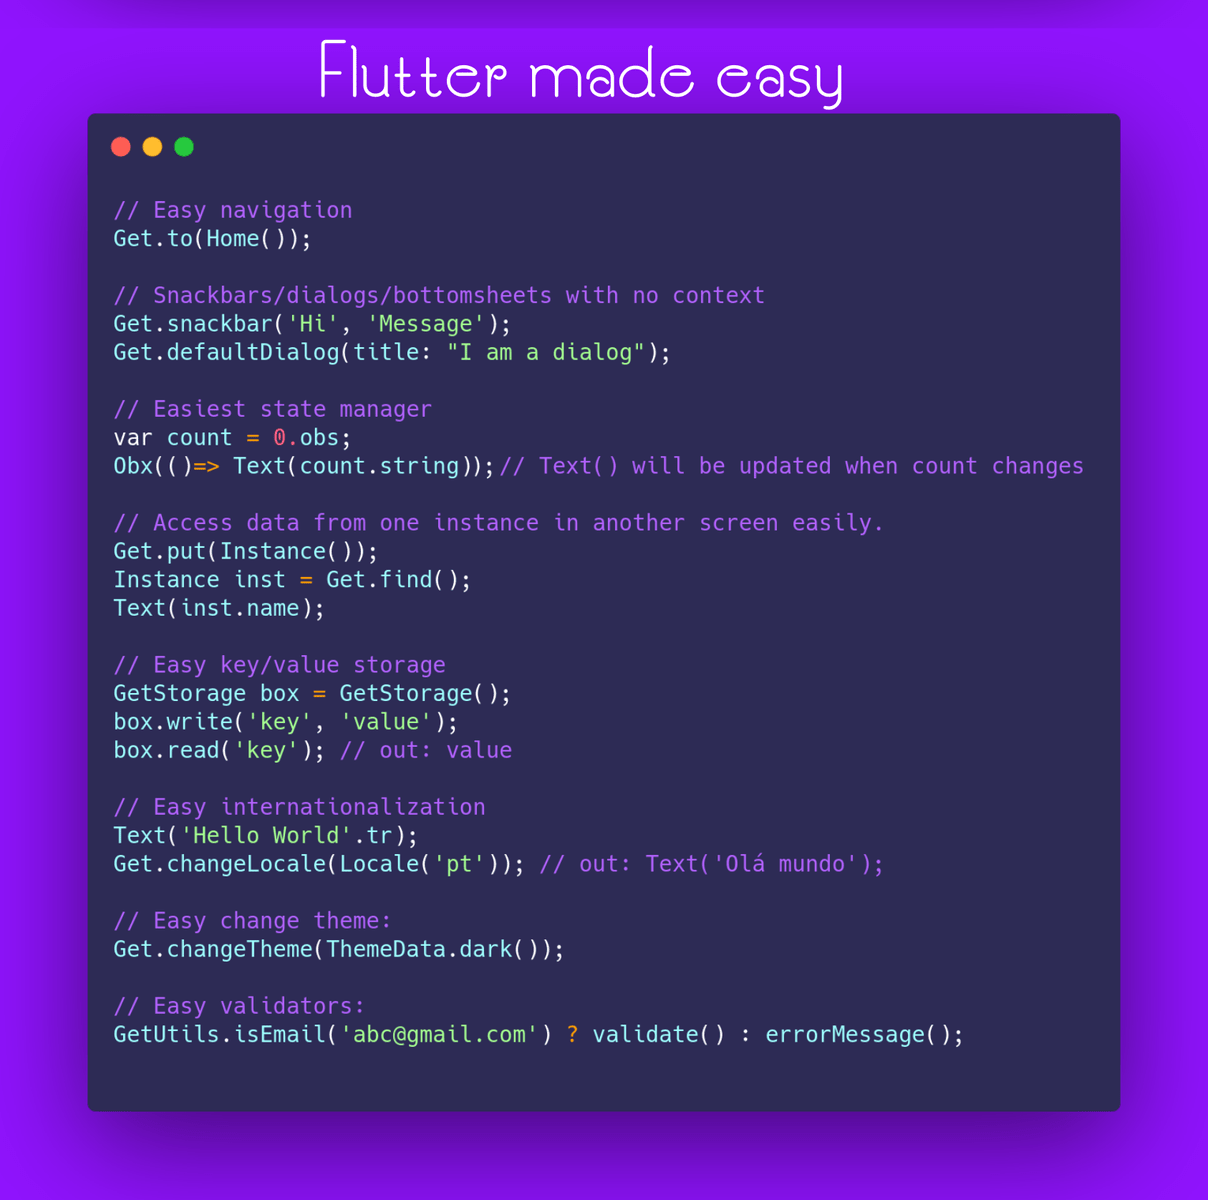
The "counter" project created by default on new project on Flutter has over 100 lines (with comments). To show the power of Get, I will demonstrate how to make a "counter" changing the state with each click, switching between pages and sharing the state between screens, all in an organized way, separating the business logic from the view, in ONLY 26 LINES CODE INCLUDING COMMENTS.
- Step 1: Add "Get" before your MaterialApp, turning it into GetMaterialApp
void main() => runApp(GetMaterialApp(home: Home()));
-
Note: this does not modify the MaterialApp of the Flutter, GetMaterialApp is not a modified MaterialApp, it is just a pre-configured Widget, which has the default MaterialApp as a child. You can configure this manually, but it is definitely not necessary. GetMaterialApp will create routes, inject them, inject translations, inject everything you need for route navigation. If you use Get only for state management or dependency management, it is not necessary to use GetMaterialApp. GetMaterialApp is necessary for routes, snackbars, internationalization, bottomSheets, dialogs, and high-level apis related to routes and absence of context.
-
Note²: This step is only necessary if you gonna use route management (
Get.to(),Get.back()and so on). If you not gonna use it then it is not necessary to do step 1 -
Step 2: Create your business logic class and place all variables, methods and controllers inside it. You can make any variable observable using a simple ".obs".
class Controller extends GetxController{
  var count = 0.obs;
  increment() => count++;
}
- Step 3: Create your View, use StatelessWidget and save some RAM, with Get you may no longer need to use StatefulWidget.
class Home extends StatelessWidget { Widget build(context) { // Instantiate your class using Get.put() to make it available for all "child" routes there. final Controller c = Get.put(Controller()); return Scaffold( // Use Obx(()=> to update Text() whenever count is changed. appBar: AppBar(title: Obx(() => Text("Clicks: ${c.count}"))), // Replace the 8 lines Navigator.push by a simple Get.to(). You don't need context body: Center(child: ElevatedButton( child: Text("Go to Other"), onPressed: () => Get.to(Other()))), floatingActionButton: FloatingActionButton(child: Icon(Icons.add), onPressed: c.increment)); } } class Other extends StatelessWidget { // You can ask Get to find a Controller that is being used by another page and redirect you to it. final Controller c = Get.find(); Widget build(context){ // Access the updated count variable return Scaffold(body: Center(child: Text("${c.count}"))); } }
Result:

This is a simple project but it already makes clear how powerful Get is. As your project grows, this difference will become more significant.
Get was designed to work with teams, but it makes the job of an individual developer simple.
Improve your deadlines, deliver everything on time without losing performance. Get is not for everyone, but if you identified with that phrase, Get is for you!
The Three pillars
State management
Get has two different state managers: the simple state manager (we'll call it GetBuilder) and the reactive state manager (GetX/Obx)
Reactive State Manager
Reactive programming can alienate many people because it is said to be complicated. GetX turns reactive programming into something quite simple:
- You won't need to create StreamControllers.
- You won't need to create a StreamBuilder for each variable
- You will not need to create a class for each state.
- You will not need to create a get for an initial value.
- You will not need to use code generators
Reactive programming with Get is as easy as using setState.
Let's imagine that you have a name variable and want that every time you change it, all widgets that use it are automatically changed.
This is your count variable:
var name = 'Jonatas Borges';
To make it observable, you just need to add ".obs" to the end of it:
var name = 'Jonatas Borges'.obs;
And in the UI, when you want to show that value and update the screen whenever the values changes, simply do this:
Obx(() => Text("${controller.name}"));
That's all. It's that simple.
More details about state management
See an more in-depth explanation of state management here. There you will see more examples and also the difference between the simple state manager and the reactive state manager
You will get a good idea of GetX power.
Route management
If you are going to use routes/snackbars/dialogs/bottomsheets without context, GetX is excellent for you too, just see it:
Add "Get" before your MaterialApp, turning it into GetMaterialApp
GetMaterialApp( // Before: MaterialApp(
  home: MyHome(),
)
Navigate to a new screen:
Get.to(NextScreen());
Navigate to new screen with name. See more details on named routes here
Get.toNamed('/details');
To close snackbars, dialogs, bottomsheets, or anything you would normally close with Navigator.pop(context);
Get.back();
To go to the next screen and no option to go back to the previous screen (for use in SplashScreens, login screens, etc.)
Get.off(NextScreen());
To go to the next screen and cancel all previous routes (useful in shopping carts, polls, and tests)
Get.offAll(NextScreen());
Noticed that you didn't have to use context to do any of these things? That's one of the biggest advantages of using Get route management. With this, you can execute all these methods from within your controller class, without worries.
More details about route management
Get works with named routes and also offers lower-level control over your routes! There is in-depth documentation here
Dependency management
Get has a simple and powerful dependency manager that allows you to retrieve the same class as your Bloc or Controller with just 1 lines of code, no Provider context, no inheritedWidget:
Controller controller = Get.put(Controller()); // Rather Controller controller = Controller();
- Note: If you are using Get's State Manager, pay more attention to the bindings API, which will make it easier to connect your view to your controller.
Instead of instantiating your class within the class you are using, you are instantiating it within the Get instance, which will make it available throughout your App. So you can use your controller (or class Bloc) normally
Tip: Get dependency management is decoupled from other parts of the package, so if for example, your app is already using a state manager (any one, it doesn't matter), you don't need to rewrite it all, you can use this dependency injection
编辑推荐精选


扣子-AI办公
职场AI,就用扣子
AI办公助手,复杂任务高效处理。办公效率低?扣子空间AI助手支持播客生成、PPT制作、网页开发及报告写作,覆盖科研、商业、舆情等领域的专家Agent 7x24小时响应,生活工作无缝切换,提升50%效率!


堆友
多风格AI绘画神器
堆友平台由阿里巴巴设计团队创建,作为一款AI驱动的设计工具,专为设计师提供一站式增长服务。功能覆盖海量3D素材、AI绘画、实时渲染以及专业抠图,显著提升设计品质和效率。平台不仅提供工具,还是一个促进创意交流和个人发展的空间,界面友好,适合所有级别的设计师和创意工作者。


码上飞
零代码AI应用开发平台
零代码AI应用开发平台,用户只需一句话简单描述需求,AI能自动生成小程序、APP或H5网页应用,无需编写代码。


Vora
免费创建高清无水印Sora视频
Vora是一个免费创建高清无水印Sora视频的AI工具


Refly.AI
最适合小白的AI自动化工作流平台
无需编码,轻松生成可复用、可变现的AI自动化工作流


酷表ChatExcel
大模型驱动的Excel数据处理工具
基于大模型交互的表格处理系统,允许用户通过对话方式完成数据整理和可视化分析。系统采用机器学习算法解析用户指令,自动执行排序、公式计算和数据透视等操作,支持多种文件格式导入导出。数据处理响应速度保持在0.8秒以内,支持超过100万行数据的即时分析。


TRAE编程
AI辅助编程,代码自动修复
Trae是一种自适应的集成开发环境(IDE),通过自动化和多元协作改变开发流程。利用Trae,团队能够更快速、精确地编写和部署代码,从而提高编程效率和项目交付速度。Trae具备上下文感知和代码自动完成功能,是提升开发效率的理想工具。


AIWritePaper论文写作
AI论文写作指导平台
AIWritePaper论文写作是一站式AI论文写作辅助工具,简化了选题、文献检索至论文撰写的整个过程。通过简单设定,平台可快速生成高质量论文大纲和全文,配合图表、参考文献等一应俱全,同时提供开题报告和答辩PPT等增值服务,保障数据安全,有效提升写作效率和论文质量。


博思AIPPT
AI一键生成PPT,就用博思AIPPT!
博思AIPPT,新一代的AI生成PPT平台,支持智能生成PPT、AI美化PPT、文本&链接生成PPT、导入Word/PDF/Markdown文档生成PPT等,内置海量精美PPT模板,涵盖商务、教育、科技等不同风格,同时针对每个页面提供多种版式,一键自适应切换,完美适配各种办公场景。


潮际好麦
AI赋能电商视觉革命,一站式智能商拍平台
潮际好麦深耕服装行业,是国内AI试衣效果最好的软件。使用先进AIGC能力为电商卖家批量提供优质的、低成本的商拍图。合作品牌有Shein、Lazada、安踏、百丽等65个国内外头部品牌,以及国内10万+淘宝、天猫、京东等主流平台的品牌商家,为卖家节省将近85%的出图成本,提升约3倍出图效率,让品牌能够快速上架。
推荐工具精选


AI云服务特惠
懂AI专属折扣关注微信公众号
最新AI工具、AI资讯
独家AI资源、AI项目落地

微信扫一扫关注公众号