


Lip Gloss
<p> <a href="https://stuff.charm.sh/lipgloss/lipgloss-mascot-2k.png"><img width="340" alt="Lip Gloss title treatment" src="https://github.com/charmbracelet/lipgloss/assets/25087/147cadb1-4254-43ec-ae6b-8d6ca7b029a1"></a><br> <a href="https://github.com/charmbracelet/lipgloss/releases"><img src="https://img.shields.io/github/release/charmbracelet/lipgloss.svg" alt="Latest Release"></a> <a href="https://pkg.go.dev/github.com/charmbracelet/lipgloss?tab=doc"><img src="https://godoc.org/github.com/golang/gddo?status.svg" alt="GoDoc"></a> <a href="https://github.com/charmbracelet/lipgloss/actions"><img src="https://github.com/charmbracelet/lipgloss/workflows/build/badge.svg" alt="Build Status"></a> <a href="https://www.phorm.ai/query?projectId=a0e324b6-b706-4546-b951-6671ea60c13f"><img src="https://stuff.charm.sh/misc/phorm-badge.svg" alt="phorm.ai"></a> </p>Style definitions for nice terminal layouts. Built with TUIs in mind.
Lip Gloss takes an expressive, declarative approach to terminal rendering. Users familiar with CSS will feel at home with Lip Gloss.
import "github.com/charmbracelet/lipgloss"

var style = lipgloss.NewStyle().
    Bold(true).
    Foreground(lipgloss.Color("#FAFAFA")).
    Background(lipgloss.Color("#7D56F4")).
    PaddingTop(2).
    PaddingLeft(4).
    Width(22)

fmt.Println(style.Render("Hello, kitty"))
Colors
Lip Gloss supports the following color profiles:
ANSI 16 colors (4-bit)
lipgloss.Color("5")  // magenta
lipgloss.Color("9")  // red
lipgloss.Color("12") // light blue
ANSI 256 Colors (8-bit)
lipgloss.Color("86")  // aqua
lipgloss.Color("201") // hot pink
lipgloss.Color("202") // orange
True Color (16,777,216 colors; 24-bit)
lipgloss.Color("#0000FF") // good ol' 100% blue
lipgloss.Color("#04B575") // a green
lipgloss.Color("#3C3C3C") // a dark gray
...as well as a 1-bit ASCII profile, which is black and white only.
The terminal's color profile will be automatically detected, and colors outside the gamut of the current palette will be automatically coerced to their closest available value.
Adaptive Colors
You can also specify color options for light and dark backgrounds:
lipgloss.AdaptiveColor{Light: "236", Dark: "248"}
The terminal's background color will automatically be detected and the appropriate color will be chosen at runtime.
Complete Colors
CompleteColor specifies exact values for True Color, ANSI256, and ANSI color profiles.
lipgloss.CompleteColor{TrueColor: "#0000FF", ANSI256: "86", ANSI: "5"}
Automatic color degradation will not be performed in this case and it will be based on the color specified.
Complete Adaptive Colors
You can use CompleteColor with AdaptiveColor to specify the exact values for
light and dark backgrounds without automatic color degradation.
lipgloss.CompleteAdaptiveColor{
    Light: CompleteColor{TrueColor: "#d7ffae", ANSI256: "193", ANSI: "11"},
    Dark:  CompleteColor{TrueColor: "#d75fee", ANSI256: "163", ANSI: "5"},
}
Inline Formatting
Lip Gloss supports the usual ANSI text formatting options:
var style = lipgloss.NewStyle().
    Bold(true).
    Italic(true).
    Faint(true).
    Blink(true).
    Strikethrough(true).
    Underline(true).
    Reverse(true)
Block-Level Formatting
Lip Gloss also supports rules for block-level formatting:
// Padding
var style = lipgloss.NewStyle().
    PaddingTop(2).
    PaddingRight(4).
    PaddingBottom(2).
    PaddingLeft(4)

// Margins
var style = lipgloss.NewStyle().
    MarginTop(2).
    MarginRight(4).
    MarginBottom(2).
    MarginLeft(4)
There is also shorthand syntax for margins and padding, which follows the same format as CSS:
// 2 cells on all sides
lipgloss.NewStyle().Padding(2)

// 2 cells on the top and bottom, 4 cells on the left and right
lipgloss.NewStyle().Margin(2, 4)

// 1 cell on the top, 4 cells on the sides, 2 cells on the bottom
lipgloss.NewStyle().Padding(1, 4, 2)

// Clockwise, starting from the top: 2 cells on the top, 4 on the right, 3 on
// the bottom, and 1 on the left
lipgloss.NewStyle().Margin(2, 4, 3, 1)
Aligning Text
You can align paragraphs of text to the left, right, or center.
var style = lipgloss.NewStyle().
    Width(24).
    Align(lipgloss.Left).  // align it left
    Align(lipgloss.Right). // no wait, align it right
    Align(lipgloss.Center) // just kidding, align it in the center
Width and Height
Setting a minimum width and height is simple and straightforward.
var style = lipgloss.NewStyle().
    SetString("What’s for lunch?").
    Width(24).
    Height(32).
    Foreground(lipgloss.Color("63"))
Borders
Adding borders is easy:
// Add a purple, rectangular border
var style = lipgloss.NewStyle().
    BorderStyle(lipgloss.NormalBorder()).
    BorderForeground(lipgloss.Color("63"))

// Set a rounded, yellow-on-purple border to the top and left
var anotherStyle = lipgloss.NewStyle().
    BorderStyle(lipgloss.RoundedBorder()).
    BorderForeground(lipgloss.Color("228")).
    BorderBackground(lipgloss.Color("63")).
    BorderTop(true).
    BorderLeft(true)

// Make your own border
var myCuteBorder = lipgloss.Border{
    Top:         "._.:*:",
    Bottom:      "._.:*:",
    Left:        "|*",
    Right:       "|*",
    TopLeft:     "*",
    TopRight:    "*",
    BottomLeft:  "*",
    BottomRight: "*",
}
There are also shorthand functions for defining borders, which follow a similar pattern to the margin and padding shorthand functions.
// Add a thick border to the top and bottom
lipgloss.NewStyle().
    Border(lipgloss.ThickBorder(), true, false)

// Add a double border to the top and left sides. Rules are set clockwise
// from top.
lipgloss.NewStyle().
    Border(lipgloss.DoubleBorder(), true, false, false, true)
For more on borders see [the docs][docs].
Copying Styles
Just use assignment:
style := lipgloss.NewStyle().Foreground(lipgloss.Color("219"))

copiedStyle := style // this is a true copy

wildStyle := style.Blink(true) // this is also true copy, with blink added
Since Style data structures contains only primitive types, assigning a style
to another effectively creates a new copy of the style without mutating the
original.
Inheritance
Styles can inherit rules from other styles. When inheriting, only unset rules on the receiver are inherited.
var styleA = lipgloss.NewStyle().
    Foreground(lipgloss.Color("229")).
    Background(lipgloss.Color("63"))

// Only the background color will be inherited here, because the foreground
// color will have been already set:
var styleB = lipgloss.NewStyle().
    Foreground(lipgloss.Color("201")).
    Inherit(styleA)
Unsetting Rules
All rules can be unset:
var style = lipgloss.NewStyle().
    Bold(true).                        // make it bold
    UnsetBold().                       // jk don't make it bold
    Background(lipgloss.Color("227")). // yellow background
    UnsetBackground()                  // never mind
When a rule is unset, it won't be inherited or copied.
Enforcing Rules
Sometimes, such as when developing a component, you want to make sure style
definitions respect their intended purpose in the UI. This is where Inline
and MaxWidth, and MaxHeight come in:
// Force rendering onto a single line, ignoring margins, padding, and borders.
someStyle.Inline(true).Render("yadda yadda")

// Also limit rendering to five cells
someStyle.Inline(true).MaxWidth(5).Render("yadda yadda")

// Limit rendering to a 5x5 cell block
someStyle.MaxWidth(5).MaxHeight(5).Render("yadda yadda")
Tabs
The tab character (\t) is rendered differently in different terminals (often
as 8 spaces, sometimes 4). Because of this inconsistency, Lip Gloss converts
tabs to 4 spaces at render time. This behavior can be changed on a per-style
basis, however:
style := lipgloss.NewStyle() // tabs will render as 4 spaces, the default
style = style.TabWidth(2)    // render tabs as 2 spaces
style = style.TabWidth(0)    // remove tabs entirely
style = style.TabWidth(lipgloss.NoTabConversion) // leave tabs intact
Rendering
Generally, you just call the Render(string...) method on a lipgloss.Style:
style := lipgloss.NewStyle().Bold(true).SetString("Hello,")
fmt.Println(style.Render("kitty.")) // Hello, kitty.
fmt.Println(style.Render("puppy.")) // Hello, puppy.
But you could also use the Stringer interface:
var style = lipgloss.NewStyle().SetString("你好,猫咪。").Bold(true)
fmt.Println(style) // 你好,猫咪。
Custom Renderers
Custom renderers allow you to render to a specific outputs. This is particularly important when you want to render to different outputs and correctly detect the color profile and dark background status for each, such as in a server-client situation.
func myLittleHandler(sess ssh.Session) {
    // Create a renderer for the client.
    renderer := lipgloss.NewRenderer(sess)

    // Create a new style on the renderer.
    style := renderer.NewStyle().Background(lipgloss.AdaptiveColor{Light: "63", Dark: "228"})

    // Render. The color profile and dark background state will be correctly detected.
    io.WriteString(sess, style.Render("Heyyyyyyy"))
}
For an example on using a custom renderer over SSH with [Wish][wish] see the [SSH example][ssh-example].
Utilities
In addition to pure styling, Lip Gloss also ships with some utilities to help assemble your layouts.
Joining Paragraphs
Horizontally and vertically joining paragraphs is a cinch.
// Horizontally join three paragraphs along their bottom edges
lipgloss.JoinHorizontal(lipgloss.Bottom, paragraphA, paragraphB, paragraphC)

// Vertically join two paragraphs along their center axes
lipgloss.JoinVertical(lipgloss.Center, paragraphA, paragraphB)

// Horizontally join three paragraphs, with the shorter ones aligning 20%
// from the top of the tallest
lipgloss.JoinHorizontal(0.2, paragraphA, paragraphB, paragraphC)
Measuring Width and Height
Sometimes you’ll want to know the width and height of text blocks when building your layouts.
// Render a block of text.
var style = lipgloss.NewStyle().
    Width(40).
    Padding(2)
var block string = style.Render(someLongString)

// Get the actual, physical dimensions of the text block.
width := lipgloss.Width(block)
height := lipgloss.Height(block)

// Here's a shorthand function.
w, h := lipgloss.Size(block)
Placing Text in Whitespace
Sometimes you’ll simply want to place a block of text in whitespace.
// Center a paragraph horizontally in a space 80 cells wide. The height of
// the block returned will be as tall as the input paragraph.
block := lipgloss.PlaceHorizontal(80, lipgloss.Center, fancyStyledParagraph)

// Place a paragraph at the bottom of a space 30 cells tall. The width of
// the text block returned will be as wide as the input paragraph.
block := lipgloss.PlaceVertical(30, lipgloss.Bottom, fancyStyledParagraph)

// Place a paragraph in the bottom right corner of a 30x80 cell space.
block := lipgloss.Place(30, 80, lipgloss.Right, lipgloss.Bottom, fancyStyledParagraph)
You can also style the whitespace. For details, see [the docs][docs].
Rendering Tables
Lip Gloss ships with a table rendering sub-package.
import "github.com/charmbracelet/lipgloss/table"
Define some rows of data.
rows := [][]string{
    {"Chinese", "您好", "你好"},
    {"Japanese", "こんにちは", "やあ"},
    {"Arabic", "أهلين", "أهلا"},
    {"Russian", "Здравствуйте", "Привет"},
    {"Spanish", "Hola", "¿Qué tal?"},
}
Use the table package to style and render the table.
t := table.New().
    Border(lipgloss.NormalBorder()).
    BorderStyle(lipgloss.NewStyle().Foreground(lipgloss.Color("99"))).
    StyleFunc(func(row, col int) lipgloss.Style {
        switch {
        case row == 0:
            return HeaderStyle
        case row%2 == 0:
            return EvenRowStyle
        default:
            return OddRowStyle
        }
    }).
    Headers("LANGUAGE", "FORMAL", "INFORMAL").
    Rows(rows...)

// You can also add tables row-by-row
t.Row("English", "You look absolutely fabulous.", "How's it going?")
Print the table.
fmt.Println(t)
For more on tables see the docs and examples.
Rendering Lists
Lip Gloss ships with a list rendering sub-package.
import "github.com/charmbracelet/lipgloss/list"
Define a new list.
l := list.New("A", "B", "C")
Print the list.
fmt.Println(l)

// • A
// • B
// • C
Lists have the ability to nest.
l := list.New(
  "A", list.New("Artichoke"),
  "B", list.New("Baking Flour", "Bananas", "Barley", "Bean Sprouts"),
  "C", list.New("Cashew Apple", "Cashews", "Coconut Milk", "Curry Paste", "Currywurst"),
  "D", list.New("Dill", "Dragonfruit", "Dried Shrimp"),
  "E", list.New("Eggs"),
  "F", list.New("Fish Cake", "Furikake"),
  "J", list.New("Jicama"),
  "K", list.New("Kohlrabi"),
  "L", list.New("Leeks", "Lentils", "Licorice Root"),
)
Print the list.
<p align="center"> <img width="600" alt="image" src="https://github.com/charmbracelet/lipgloss/assets/42545625/0dc9f440-0748-4151-a3b0-7dcf29dfcdb0"> </p>fmt.Println(l)
Lists can be customized via their enumeration function as well as using
lipgloss.Styles.
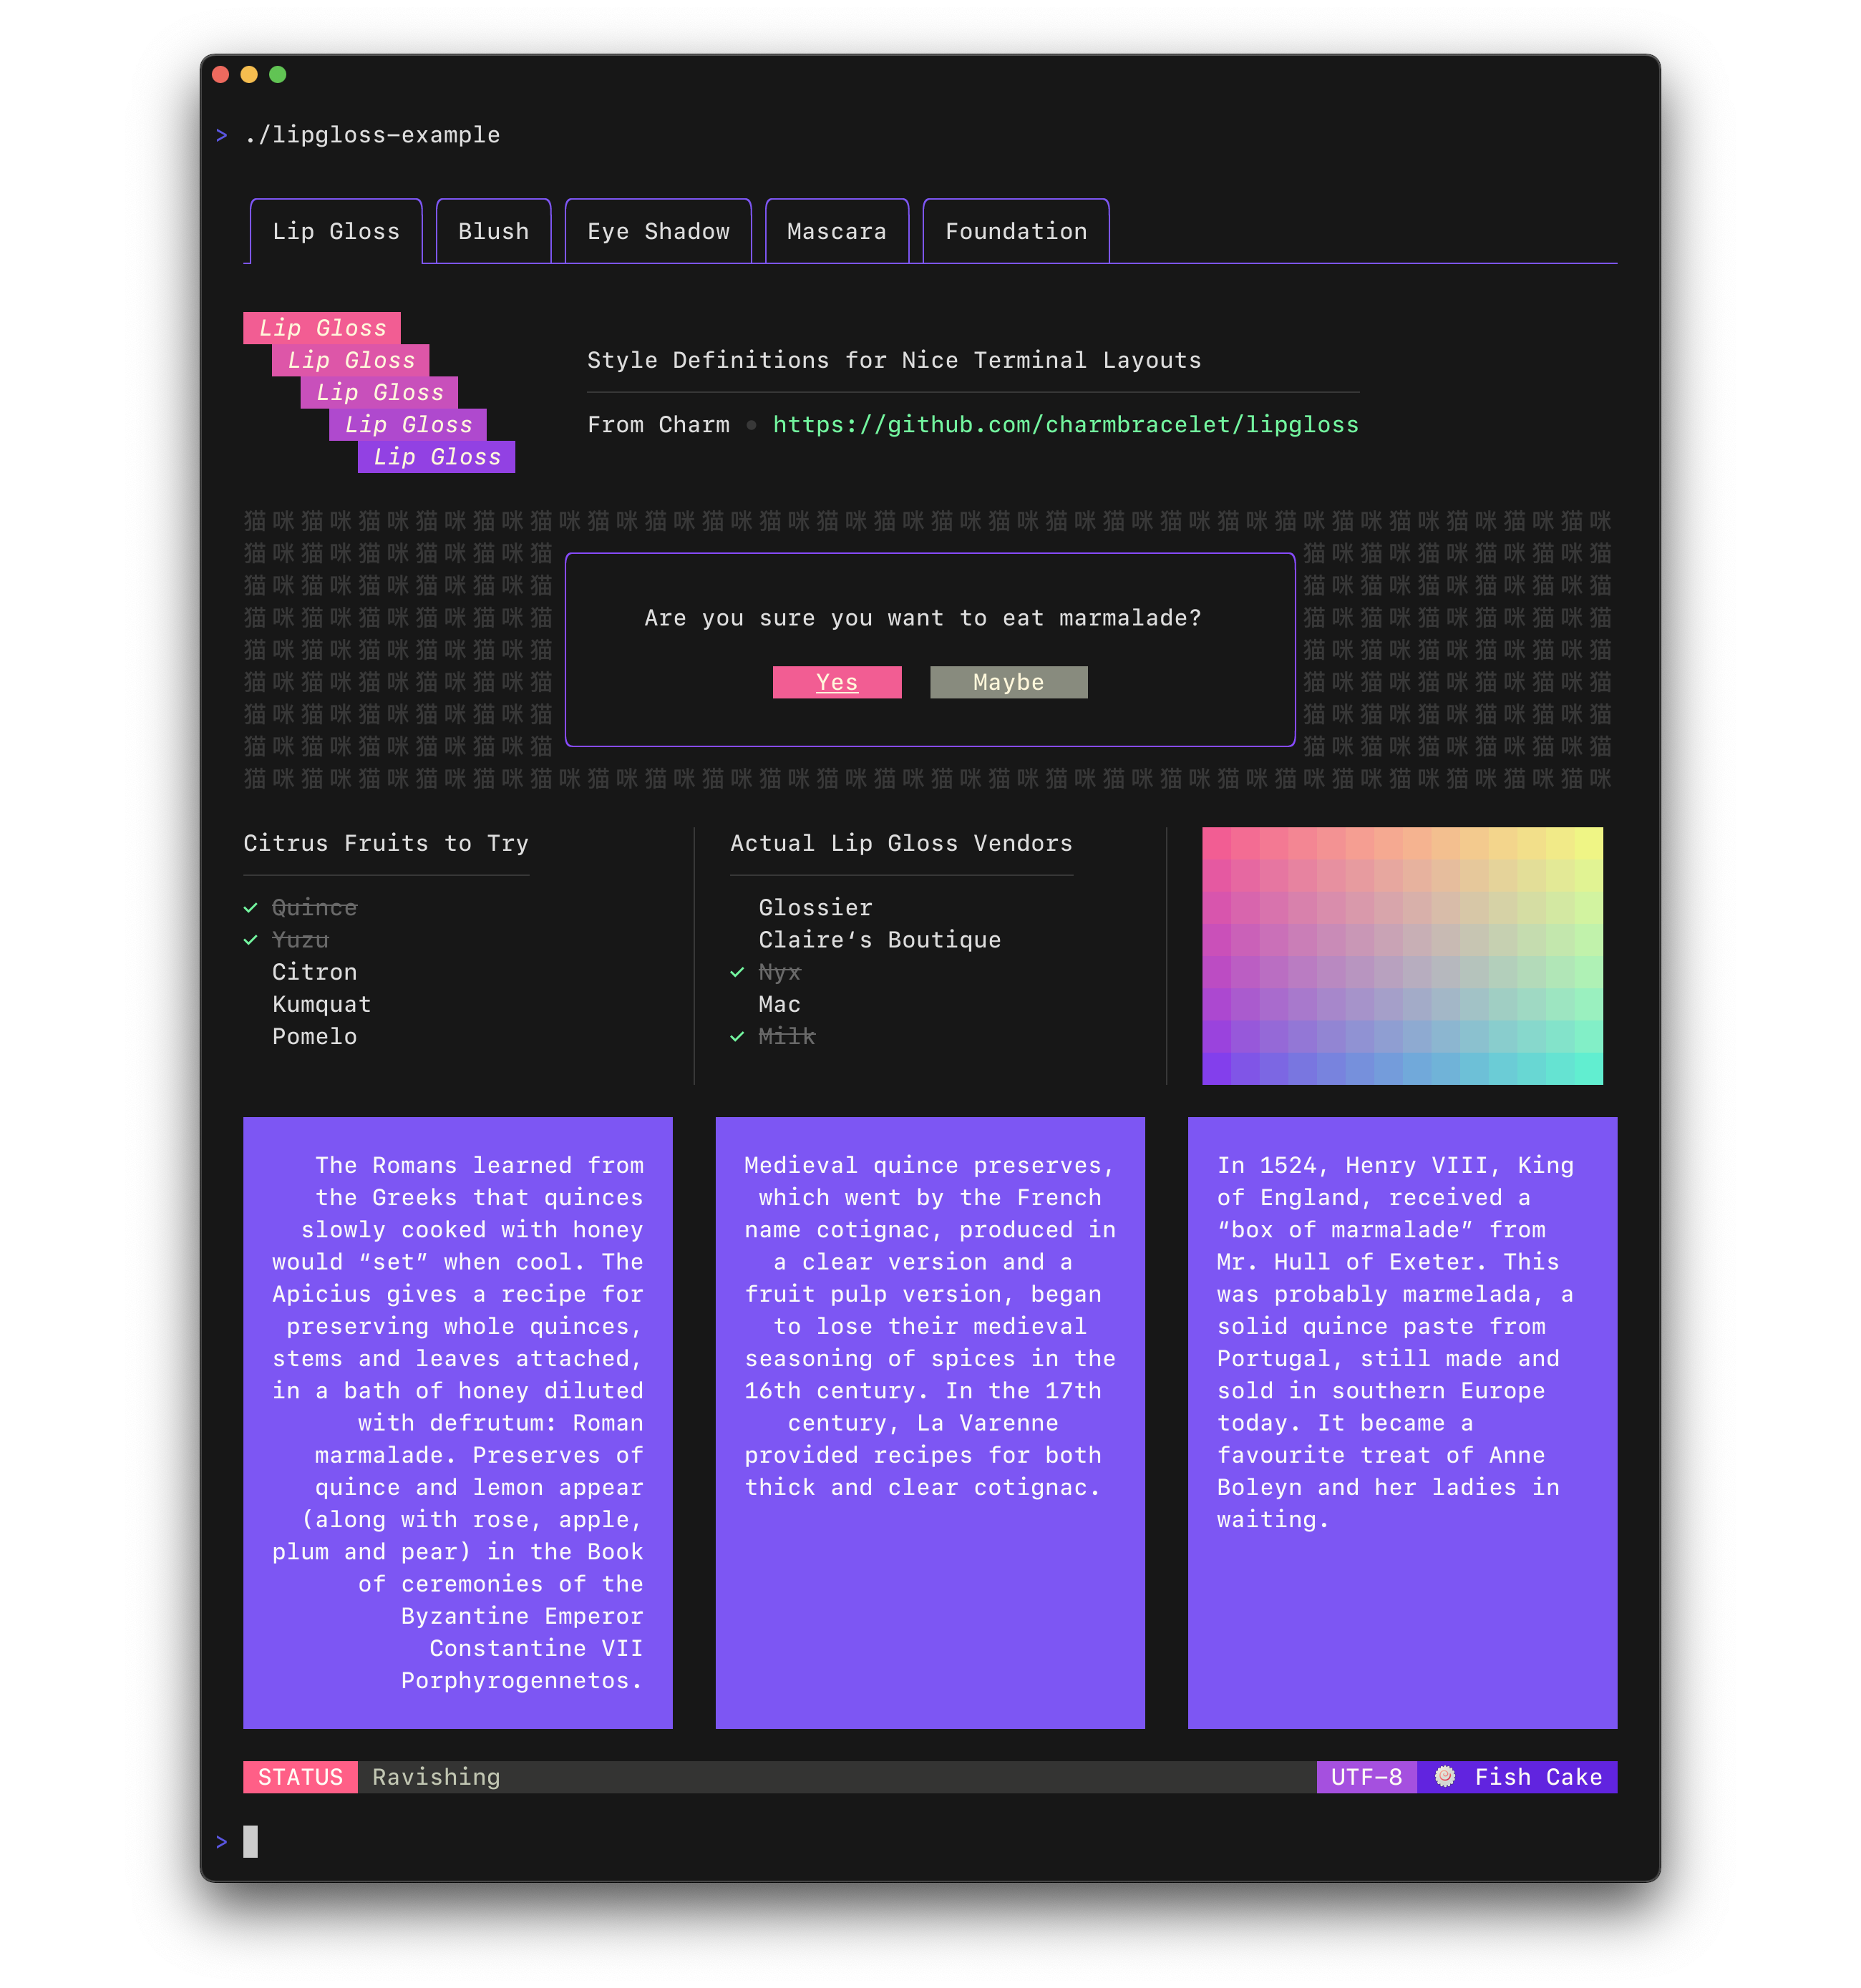
enumeratorStyle := lipgloss.NewStyle().Foreground(lipgloss.Color("99")).MarginRight(1)
itemStyle := lipgloss.NewStyle().Foreground(lipgloss.Color("212")).MarginRight(1)

l := list.New(
  "Glossier",
  "Claire’s Boutique",
  "Nyx",
  "Mac",
  "Milk",
).
  Enumerator(list.Roman).
  EnumeratorStyle(enumeratorStyle).
  ItemStyle(itemStyle)
Print the list.
<p align="center"> <img width="600" alt="List example" src="https://github.com/charmbracelet/lipgloss/assets/42545625/360494f1-57fb-4e13-bc19-0006efe01561"> </p>In addition to the predefined enumerators (Arabic, Alphabet, Roman, Bullet, Tree),
you may also define your own custom enumerator:
l := list.New("Duck", "Duck", "Duck", "Duck", "Goose", "Duck", "Duck")

func
编辑推荐精选


音述AI
全球首个AI音乐社区
音述AI是全球首个AI音乐社区,致力让每个人都能用音乐表达自我。音述AI提供零门槛AI创作工具,独创GETI法则帮助用户精准定义音乐风格,AI润色功能支持自动优化作品质感。音述AI支持交流讨论、二次创作与价值变现。针对中文用户的语言习惯与文化背景进行专门优化,支持国风融合、C-pop等本土音乐标签,让技术更好地承载人文表达。


QoderWork
阿里Qoder团队推出的桌面端AI智能体
QoderWork 是阿里推出的本地优先桌面 AI 智能体,适配 macOS14+/Windows10+,以自然语言交互实现文件管理、数据分析、AI 视觉生成、浏览器自动化等办公任务,自主拆解执行复杂工作流,数据本地运行零上传,技能市场可无限扩展,是高效的 Agentic 生产力办公助手。


lynote.ai
一站�式搞定所有学习需求
不再被海量信息淹没,开始真正理解知识。Lynote 可摘要 YouTube 视频、PDF、文章等内容。即时创建笔记,检测 AI 内容并下载资料,将您的学习效率提升 10 倍。


AniShort
为AI短剧协作而生
专为AI短剧协作而生的AniShort正式发布,深度重构AI短剧全流程生产模式,整合创意策划、制作执行、实时协作、在线审片、资产复用等全链路功能,独创无限画布、双轨并行工业化工作流与Ani智能体助手,集成多款主流AI大模型,破解素材零散、版本混乱、沟通低效等行业痛点,助力3人团队效率提升800%,打造标准化、可追溯的AI短剧量产体系,是AI短剧团队协同创作、提升制作效率的核心工具。


seedancetwo2.0
能听懂你表达的视频模型
Seedance two是基于seedance2.0的中国大模型,支持图像、视频、音频、文本四种模态输入,表达方式更丰富,生成也更可控。


nano-banana纳米香蕉中文站
国内直接访问,限时3折
输入简单文字,生成想要的图片,纳米香蕉中文站基于 Google 模型的 AI 图片生成网站,支持文字生图、图生图。官网价格限时3折活动


扣子-AI办公
职场AI,就用扣子
AI办公助手,复杂任务高效处理。办公效率低?扣子空间AI助手支持播客生成��、PPT制作、网页开发及报告写作,覆盖科研、商业、舆情等领域的专家Agent 7x24小时响应,生活工作无缝切换,提升50%效率!


堆友
多风格AI绘画神器
堆友平台由阿里巴巴设计团队创建,作为一款AI驱动的设计工具,专为设计师提供一站式增长服务。功能覆盖海量3D素材、AI绘画、实时渲染以及专业抠图,显著提升设计品质和效率。平台不仅提供工具,还是一个促进创意交流和个人发展的空间,界面友好,适合所有级别的设计师和创意工作者。


码上飞
零代码AI应用开发平台
零代码AI应用开发平台,用户只需一句话简单描述需求,AI能自动生成小程序、APP或H5网页应用,无需编写代码。


Vora
免费创建高清无水印Sora视频
Vora是一个免费创建高清无水印Sora视频的AI工具
推荐工具精选


AI云服务特惠
懂AI专属折扣关注微信公众号
最新AI工具、AI资讯
独家AI资源、AI项目落地

微信扫一扫关注公众号